How to Use the Drop Box in Courses
What Does It Do?
The Drop Box tool allows students to upload and share documents privately with the professor.
How You Can Use It
- Dropbox works great for the submission of drafts or incomplete assignments for review and consultation. It's designed for open-ended collaboration. The tool is not linked to the Gradebook and does not have options to enforce a deadline.
- If you wish to facilitate collaborative group work and file sharing, use the Resources tool or consider a Google Shared Drive instead.
- If you want students to digitally submit their work to be graded by a specific deadline, use the Assignments tool.
Upload File Instructions
- Click the tab for your course or project site.
- Click Drop Box in the left menu. If the Drop Box tool is not listed, add it by Site Info > Manage Tools.

- Once the professor clicks on the Drop Box tool on a site, the system will generate the drop box folders for each participant.
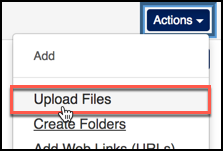
- If you wish to deposit a file into a student's folder, select Actions next to the specific student's folder.

- Select Upload Files from the drop-down menu.
- Either drag and drop files into the "Drop files to upload" box or select the "Drop
files to upload" button to browse to select a file from your computer to share with
the student. (Note: There is a 250 MB limit for a single upload action, whether one or multiple files.)

- Select the file and click Open.
- Specify whether you wish to Create a new version of the file or Overwrite existing files already in the student's Drop Box.
- Click Continue to upload the file(s).

Note: When students upload files to their folders, they can send an email notification to the instructor by checking the box for "Send an email notification to the instructor(s)" before clicking "Upload Files Now."
Download File Instructions
One-at-a-time
- In Drop Box, locate and click on a desired student's folder.
- Hover your mouse cursor over the name of the desired file, and then perform a left-click.
- Select the option "Save link as..."
- Specify the location/directory you wish to save to. You may also rename the file now if you prefer.
- Click Save/OK.
Bulk Download
Zip File
For classes with more than 50 students or files that take up a lot of space (Video or audio files), consider downloading file by file, chunking the zip files by student, and initiating this zip compression outside class hours. For large files, the WebDav protocol may provide a better experience.
- Select the Actions menu for the top-level Drop Box folder.
- Click on the Compress to Zip Archive item in the drop-down menu.
-
The zip file will contain a copy of all of the subfolders and files inside the selected folder and is named the same as the Drop Box folder that was compressed. By default, the zip file is placed inside the root folder of the site.
- Click on the zip file to download it to your computer.
Opening a .zip file on Windows is simple with the Extract All feature. When this happens the .zip file remains, and the contents are extracted in the same directory, or wherever you choose. You typically don’t need to keep .zip files once they’ve been extracted, so delete them to recover the storage space.
Opening .zip files on a Mac is just as simple. Double-click the .zip file and the uncompressed contents will appear next to it. If you do this in a Finder window and don’t immediately see the contents, try organizing by Name or Date Modified. The .zip versions are no longer needed once uncompressed and can be deleted to recover storage space.
WebDav Protocol
- In the Dropbox tool, click the "Transfer Files" tab.
- Follow the on-screen instructions to configure the WebDav protocol for your device. This will create a direct connection between your computer and your class site's Dropbox tool.
- When prompted for a username and password to verify the connection, enter your Pepperdine NetworkID and password as if you were logging into the Courses website.
- Once the connection has been established, drag and drop the files that you would like to keep from your class site to your local computer.