Managing Participants in a Course or Project Site
What Does It Do?
This page outlines two important tools for instructors: "Add Participants" and "Manage Participants." Through these options an instructor can add, remove, and/or change the status, or role, of participants in a site.
How You Can Use It
- With "Add Participants," you can add a Teaching Assistant, Co-Instructor, or Guest Speaker
- With "Manage Participants," you can:
- Update the role or status of a site participant
- Filter your view by role or name to isolate a particular group or individual
- Remove participants
Manage Participants
It is a quick process to make changes to existing site participants. It can be particularly helpful to change a user's role or status, or even remove a site participant as needed.
- Click the tab for your course or project site, or click the "Sites" menu at the top right and click the desired site.
- Click "Site Info" in the left tool menu.
- Click "Manage Participants."

- To filter site participants, click the "View" dropdown and select the user role. Note:
Instructors can also specify a particular user's name in the "Search" field.

- Instructors will also have the option to make changes on the participants table:
- Change Role: To change the user's role, click the "Role" dropdown on the row corresponding to the user. CAUTION: be sure to double-check any new role you are about to assign to a user. Roles accompany access privileges (see below) that instructors may want to strongly consider before assigning to users.
- Change Status: To update a user's status, click the "Status" dropdown on the row corresponding to the user. CAUTION: Changing a user's role to "Inactive" will prevent the user from accessing the site.
- Remove a User: To remove a user from the site, click the "Remove" checkbox on the row corresponding to the user. Note: students who are on the course roster (i.e. registered students) cannot be removed manually this way.
- Click "Update Participants" to process any changes.
Add Participants
It's easy to add a user to your course or project site, such as a teaching assistant, guest participant, or librarian. You can add people on the Pepperdine network as well as anyone outside of Pepperdine who has a valid email address.
Reminders:
- Instructors do not need to add officially enrolled students to a class site. All registered students are automatically enrolled each business day. Updates happen at 8 AM and 4 PM Pacific time.
- It is the responsibility of the instructor of record to add any teaching assistants, unofficial co-instructors, or other special users to class sites. The process is easy, using the instructions below. The official instructor of record may also request training as needed.
- Remember FERPA! Be careful when adding other users to an official course site. Instructors must comply with FERPA and protect student privacy. Choose the appropriate role based on a legitimate need for access. Request training as needed.
Instructions
- Click the tab for your course or project site, or click the "Sites" menu at the top right and click the desired site.
- Click "Site Info" in the left tool menu.
- Click "Add Participants."
- To add official Pepperdine University users (faculty, staff, or students) or previously
added guests:
- It's best to enter the person's NetworkID or network username (e.g. jdoe) in the "Other Official Participants" box. You may also add their formal email address (e.g. First.Last@pepperdine.edu or First.M.Last@pepperdine.edu). NOTE: The email address username@pepperdine.edu will not work. If using the email address, be sure to verify the correct email address.
- If a guest username is known, you may add it here.
- To add multiple people, simply enter each person on a separate line. No punctuation is necessary.
- To add new, outside users (where a non-Pepperdine email address is known):
- Enter the person's outside email address in the "Non-official Participants" box.
- Select whether to "Assign all users to the same role" or "Assign each participant a role individually."
- Select whether the new participants will be "Active" (can view the site) or "Inactive" (cannot view the site).
- Click "Continue."
- Select the role(s) for the participant(s):
- Course Sites
- Instructor (can read, revise, delete, and add both content and participants to the site)
- Librarian (can view Syllabus and add items to Resources)
- Student (can read content and add content to a site where appropriate)
- Support (same access as Instructor to provide technical support)
- TA - All Access (same access as Instructor to assist in all areas)
- Teaching Assistant (assigned access by Instructor to select areas; requires the professor to set permissions in each tool for additional privileges)
- Project Sites
- Access (equivalent to Student)
- Assist (equivalent to Teaching Assistant for assigned access to select areas)
- Maintain (equivalent to Instructor)
- Course Sites
- Click "Continue."
- Select whether to send a notice to the users that they have been added to the site. If participants are new "outside" users, the system will automatically send them an activation email to verify their account, enter name details, and choose a password.
- Click "Continue."
- Review the information for accuracy. Use the "Back" option if you need to make any corrections.
- Click "Finish" to add the participants.
Note: Again, it is the responsibility of the instructor of record to add any teaching assistants or unofficial co-instructors to class sites. The process is very easy, following the instructions above. If the instructor of record is somehow unable to do so due to special circumstances, then the instructor's school support representative can assist but the request must either come directly from the instructor of record or the school department responsible for the class; requests must be made in writing from the user's official Pepperdine University email address to the person's departmental support group. Requests made by the teaching assistant cannot be honored for security purposes.
Finding Official Pepperdine Formal Email Address or NetworkID
Formal Email Address
A quick and easy way to find a person's formal Pepperdine email address is to compose an email in Pepperdine Gmail and then hover your cursor over their profile.
- Launch Pepperdine Email.
- Select Compose.
- Type the person's name (e.g. Jane Doe) and choose the matching option from the list.
- In the compose new message box, hover your cursor over the person's email profile in the "To" field.
- The Google profile details will display with the person's name and email address.
- Select the Copy Email icon to the right of the email address or right-click the email address and choose Copy Email Address.
- Return to Courses and use this email address when adding the user to a site.
You may also use the steps below to find and copy the formal email address.
Pepperdine NetworkID
Another method to add an official Pepperdine community member to a class or project site is with the person's NetworkID or network username (e.g. jdoe2).
- Launch Pepperdine Email.
-
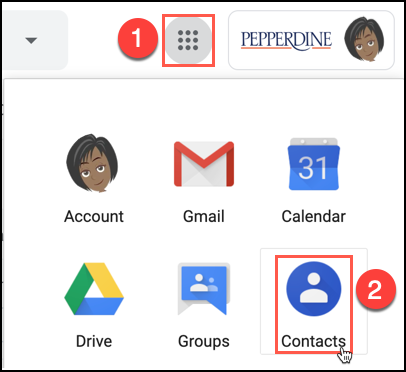
Click on the Site Waffle and select Contacts.

- In the Search field, enter the name of the desired contact and then click the search icon.
- Scroll down and look for the best matches for your search and select the appropriate name.
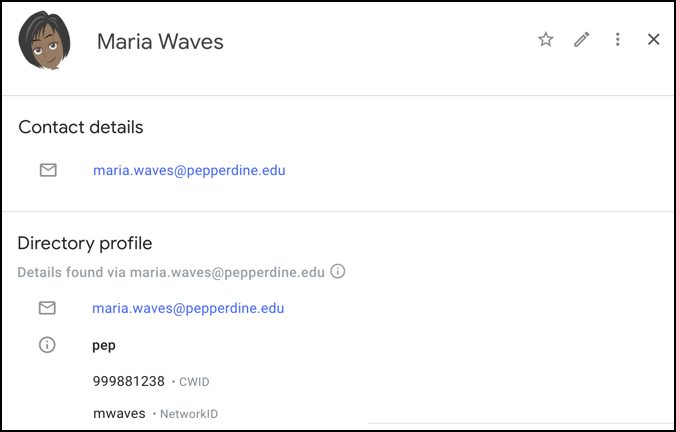
- For all users you will see the official email address. For many users (but not all),
you may also see the Campuswide ID (CWID) and NetworkID.

- Copy the NetworkID and this when adding participants to a class site.
See Also