Deferred Revenue Accounts
Process
The following video and instructions show how to attach a deferred revenue GL account to a ticket or schedule item. This is for paid items when the event is in the following fiscal year and the registration is open in the current fiscal year. Please note that the Revenue Recognition Date value should now be changed to 8/1/2022 instead of 8/1/2018 as shown in the video.
Assigning a Deferred Revenue Account to a Ticket
- Navigate to the Events tab in the Fonteva Events App.
- Select the event to be edited.
- Note: You may need to change the View to All and [click] Go.
- [Click] the Event Builder button.
- [Click] the Tickets tab on the left side panel.
- From the Actions button [click] Edit Ticket Type for the ticket to be edited.
- [Click] the Accounting tab. (see image below for an example)
- In the Income, Refund, and Adjustment Accounts fields, assign the appropriate non-deferred GL account.
- [Click] the Defer Revenue checkbox.
- In the Deferred Revenue Account field, assign the appropriate deferred GL account.
- Change the Revenue Recognition Rule value to Specific Date.
- Change the Revenue Recognition Date value to 8/1/2022.
- [Click] the blue Save & Continue button.
- Repeat steps 5 thru 12 for each ticket type.
- [Click] the blue Save button in the upper right of the event builder.
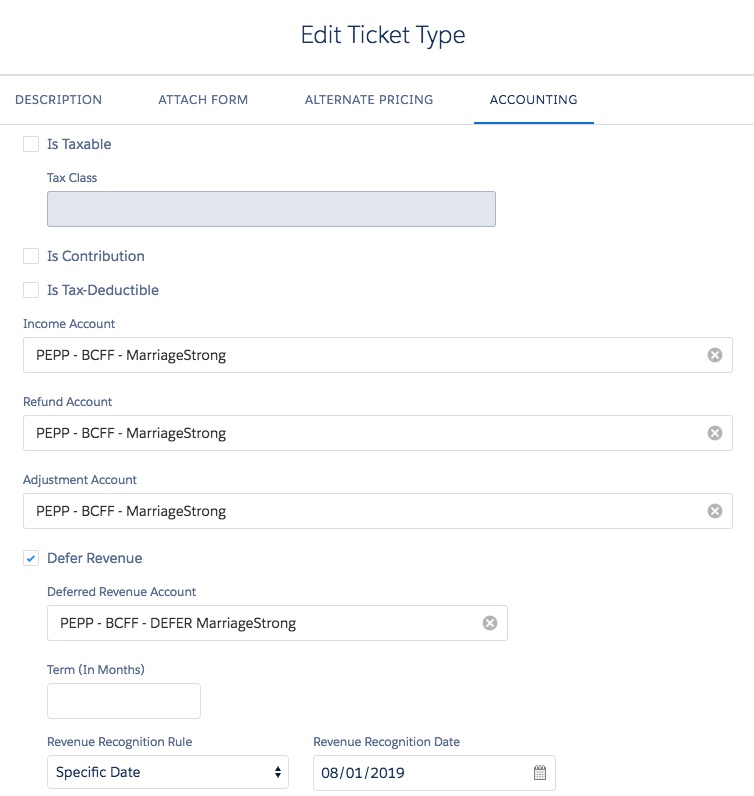
Example of a Deferred Revenue Account
Assigning a Deferred Revenue Account to a Schedule Item
- Navigate to the Events tab in the Fonteva Events App.
- Select the event to be edited.
- Note: You may need to change the View to All and [click] Go.
- [Click] the Event Builder button.
- [Click] the Agenda tab on the left side panel.
- From the Actions button [click] Edit Schedule Item for the schedule item to be edited.
- [Click] the Accounting tab.
- In the Income, Refund, and Adjustment Accounts fields, assign the appropriate non-deferred GL account.
- [Click] the Defer Revenue checkbox.
- In the Deferred Revenue Account field, assign the appropriate deferred GL account.
- Change the Revenue Recognition Rule value to Specific Date.
- Change the Revenue Recognition Date value to 8/1/2022.
- [Click] the blue Save & Continue button.
- Repeat steps 5 thru 12 for each ticket type.
- [Click] the blue Save button in the upper right of the event builder.