Panopto Assignment Folder
How to Record with Panopto for Windows in Courses
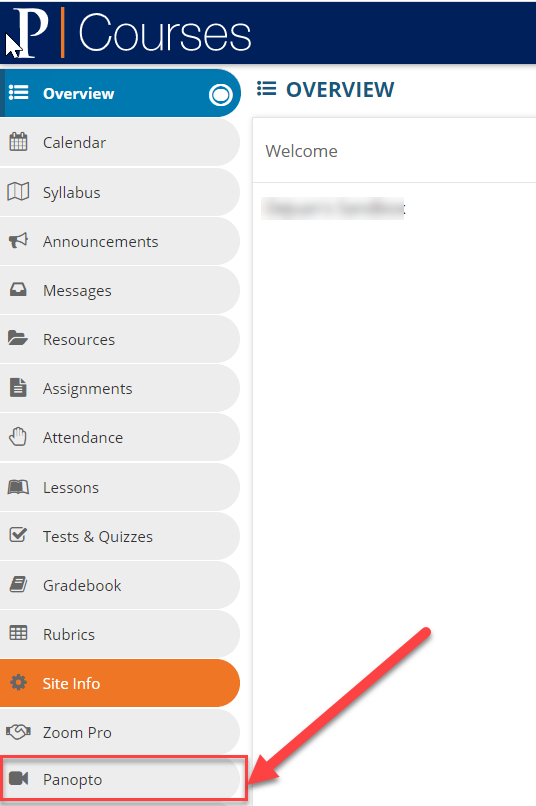
- Click on the "Panopto" tool in your Course site.
- Click the "Create" button and then select "Record a New Session" in the drop-down
menu.

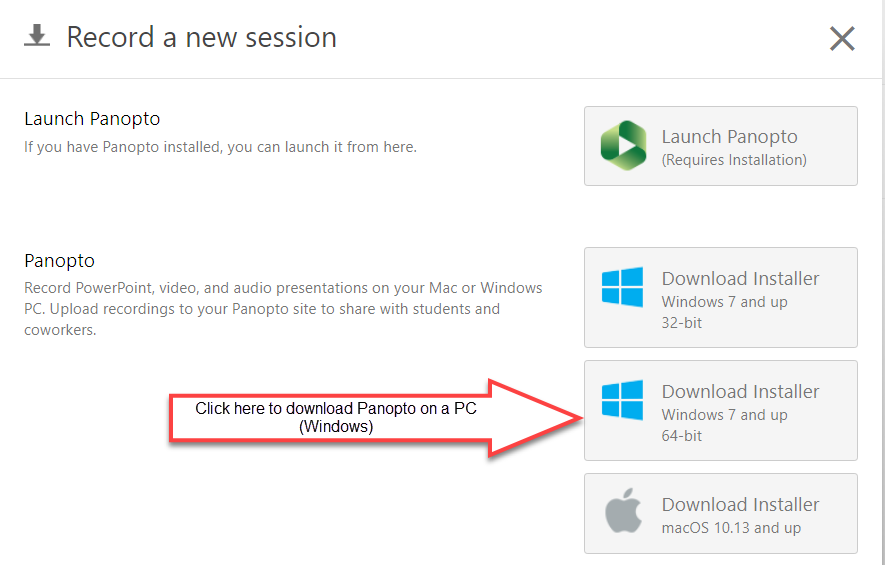
- If you haven't downloaded the Panopto software yet, you will need to do so prior to
creating recordings in Panopto. Please see the screenshot below and install the Panopto
software if necessary. If you've already downloaded the Panopto software on your
PC/Windows computer, you can skip this step and move on to step #4.
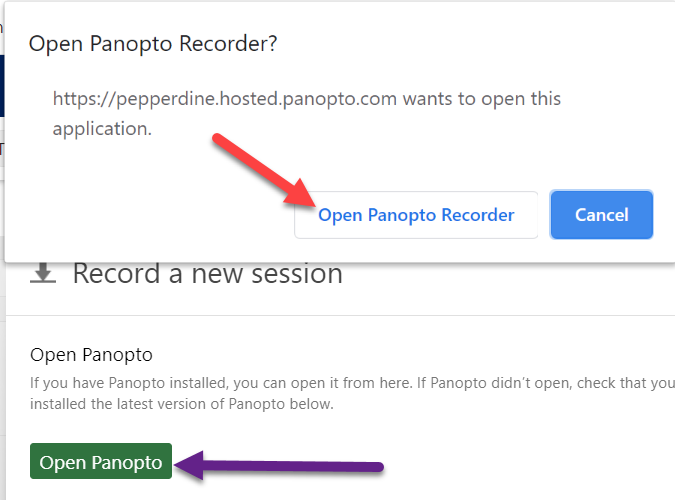
- Click "Open Panopto Recorder" or "Open Panopto" to launch the recorder.
- Recording Folder and Session Name
- Folder: Use the drop-down arrow to select the folder where your recording will be saved.
- Name: By default, the name of the session is the date and time you record the session,
but you can rename the session in the Session text box.

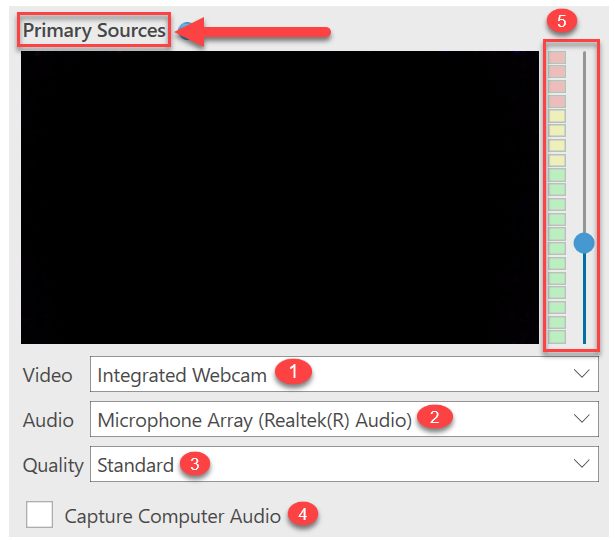
- Choose your Primary Sources
- Video: Integrated Webcam is recommended
- Audio: Default option is recommended
- Quality: Default option is recommended
- Capture Computer Audio: Enable this setting to capture audio from your PC
- Volume Bar (Audio Volume): The color bar reflects the volume of the audio being captured. Note: You can use the slider to adjust the volume if/when necessary.
- Choose your Secondary Sources
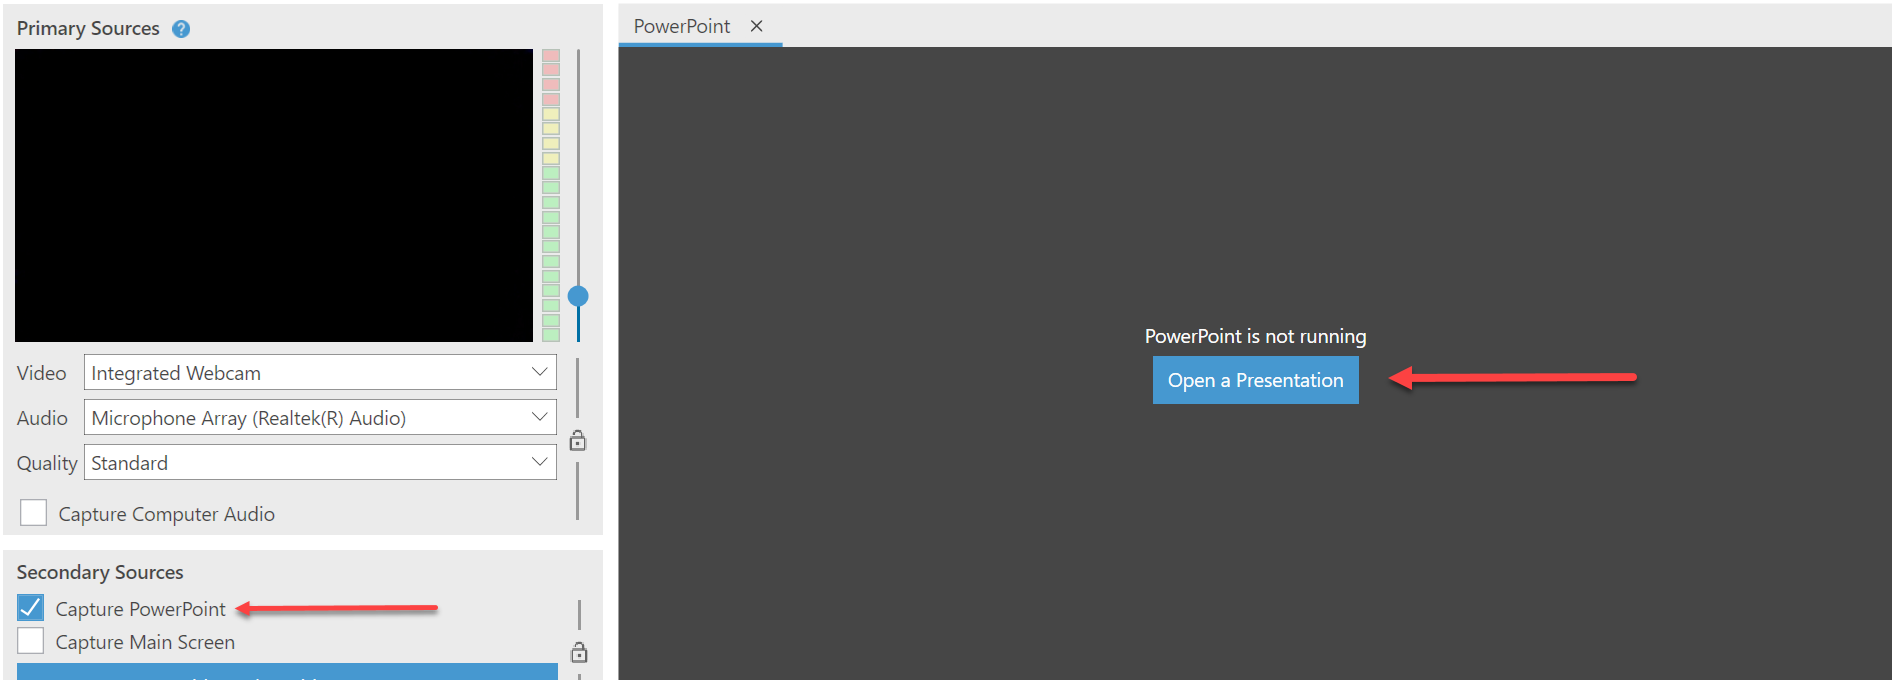
- Capture PowerPoint: Select this option when using a PowerPoint presentation.
- If your PowerPoint contains an embedded video or motion in any of the slides, "Capture
Main Screen" must also be enabled in order to capture that content (see screenshot
below).

- You also have the option to open your PowerPoint presentation from the recorder by
selecting "Capture PowerPoint" in the secondary sources area, and then clicking "Open
a Presentation" to launch PowerPoint (see screenshot below).
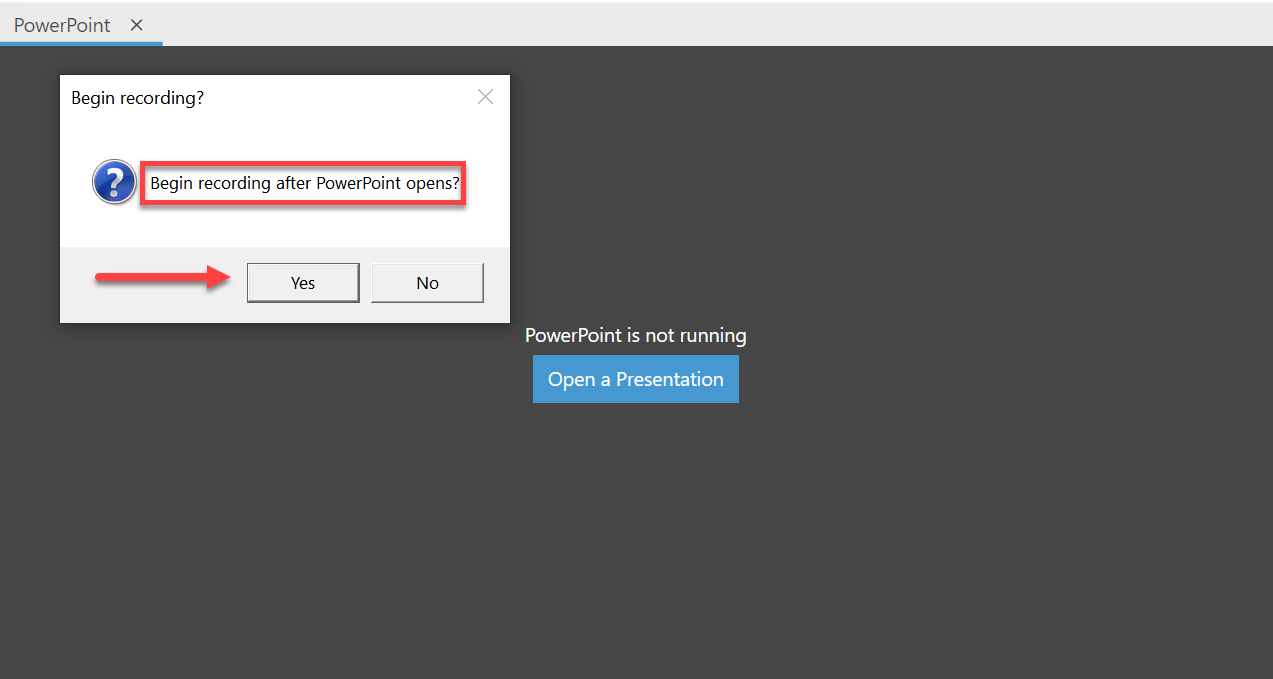
- If you want to launch the PowerPoint as soon as you select "Record", click "Yes",
"Begin Recording after PowerPoint Opens" (see screenshot below). Note: In order to
properly record PowerPoint presentations, after you have launched PowerPoint, you
must have it in full-screen presentation mode.
- If your PowerPoint contains an embedded video or motion in any of the slides, "Capture
Main Screen" must also be enabled in order to capture that content (see screenshot
below).
- Capture Main Screen: Select this option for screen captures.
- Add Another Video Source: If you have more than one camera plugged into your computer
you can utilize this option.

- Google Slides: There are multiple ways you can record audio & video with Google Slides
in Panopto.
- Option 1: To capture your Google Slides presentation as a screen recording, use the "Capture Main Screen" option. Because Google Slides is browser-based, once your presentation is ready, you can bring it up and share it from any web browser. Make sure you've selected to record the screen with your slides presentation as well as your video and audio sources, and click the red record button. Panopto will capture everything you show, automatically sync your webcam or other video inputs, and make everything ready to share in seconds.
- Option 2: Capture your Google Slides presentation as a PowerPoint file. Google Slides can export any presentation as a .pptx file, ready to load into PowerPoint. Once you've saved the new file, to record you simply open Panopto, opt to record from PowerPoint, and click "Record".
- Capture PowerPoint: Select this option when using a PowerPoint presentation.
- Screen capture Resolution: To adjust the resolution of your screen capture select the Resolution drop-down menu.

- Starting, Stopping, and Pausing
- Click this button to Start your Recording. Note: Once you start 'recording' the Record button will automatically become the Stop and Pause buttons.
- Click this button to Stop your Recording.
- Click this button to Pause your recording. Note: To have a section of your recording automatically edited out
of the recording, select Pause. While the recording is paused, Panopto will continue
to record, but that section will be edited out of the final version of the recording.
Keep in mind you can always get this content back by using the editor.
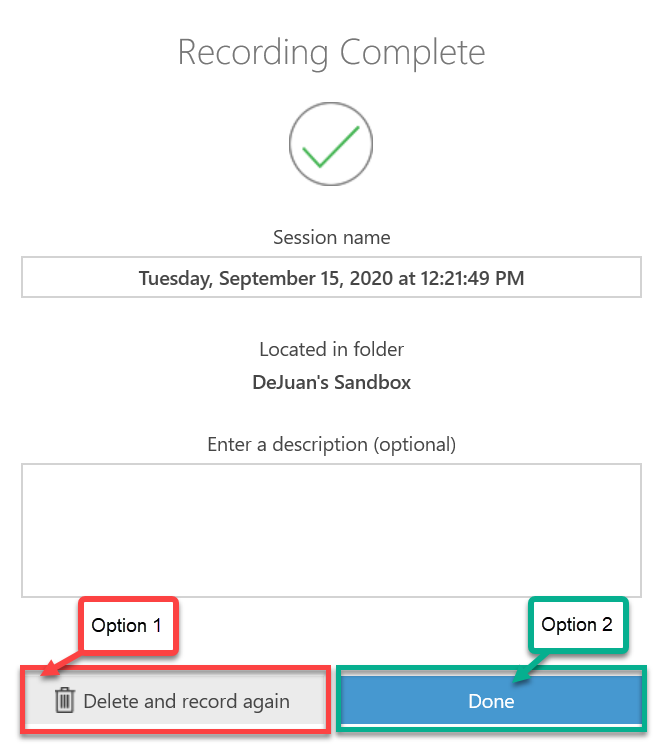
- When you are done recording, select "Stop" and you will have the option to "Delete
and Record Again" or keep the recording by selecting "Done".
- After Recording is Completed - Recording Statuses
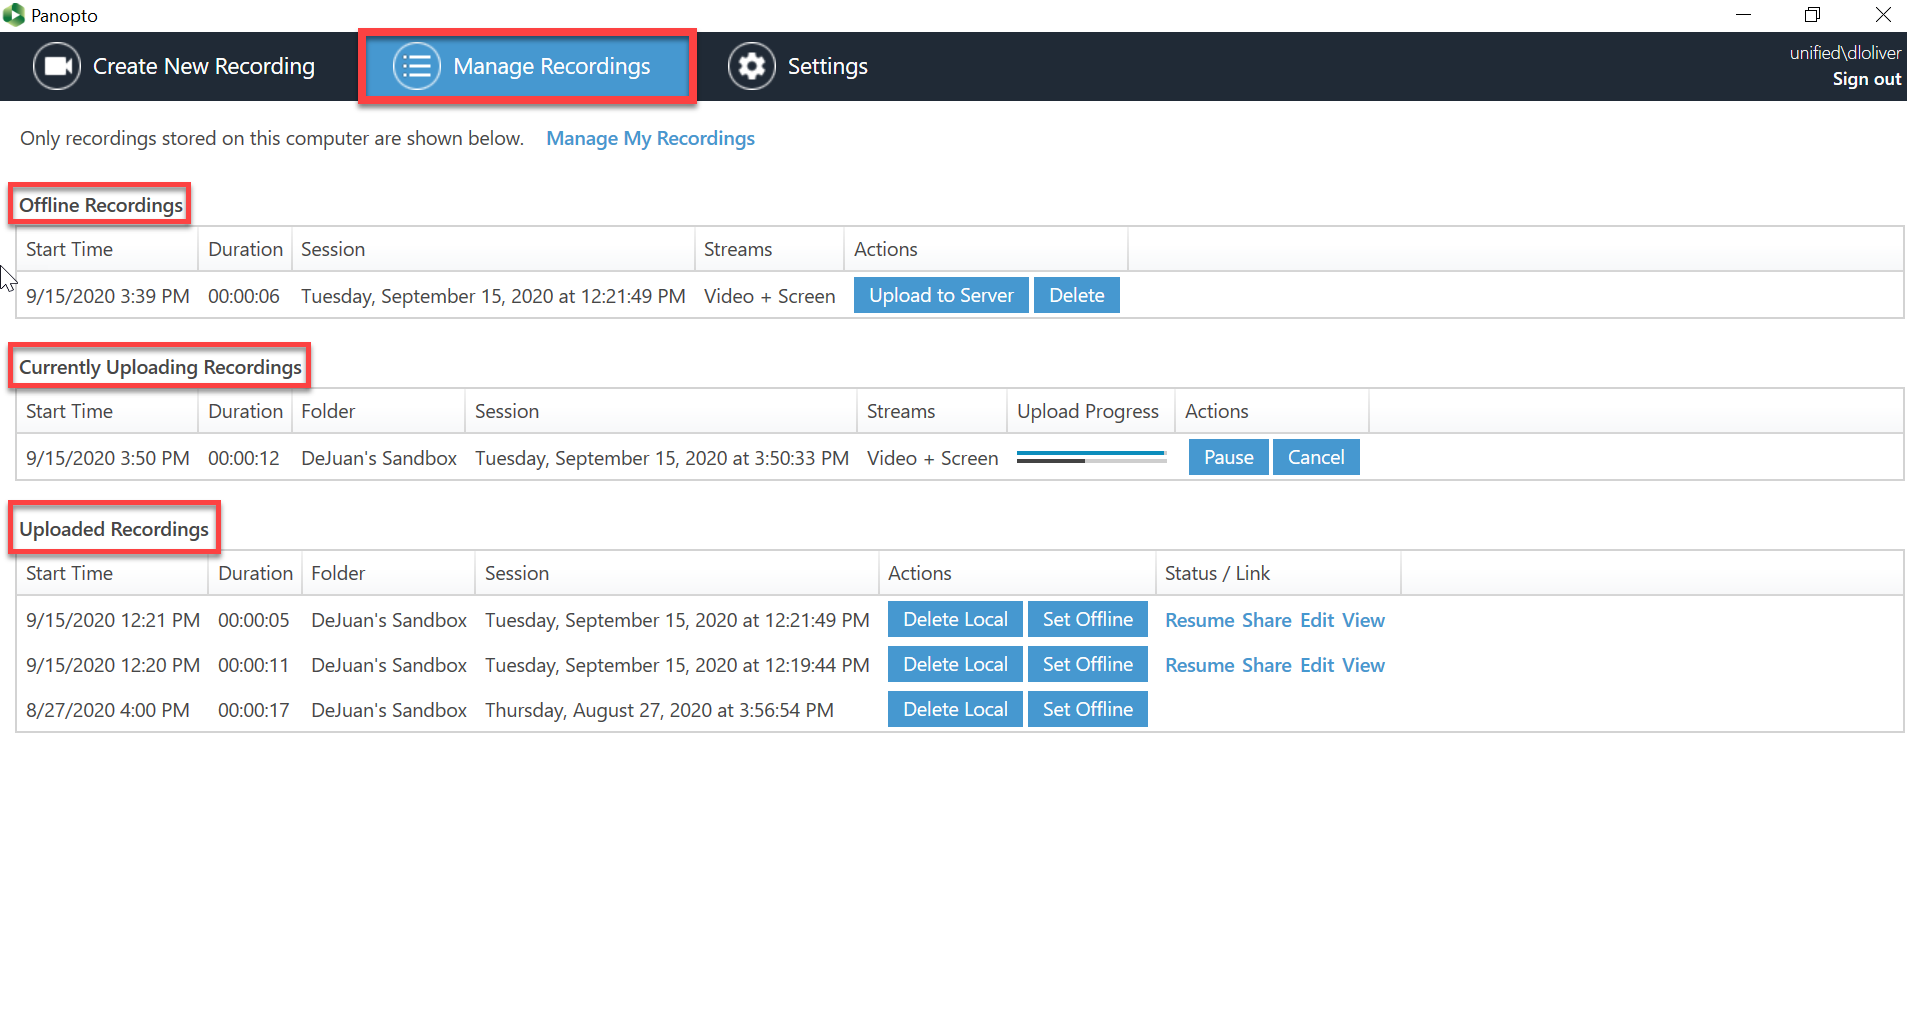
- Once you've stopped recording and clicked the "Done" button, you will be taken to
the Manage Recordings tab where you will find three sections of recordings.
- Offline Recordings do not have a folder selected in Panopto, so they are only stored to your computer. You can select Upload to Server to select a folder and add the video to your library.
- Currently Uploading Recordings will show the video that was just recorded and its upload status.
- Uploaded Recordings will show previous recordings and their assigned folder. If you
have access to the video in the library, you can open the video or settings using
View, Edit, or Share, and you can also continue recording to the same session by selecting
Resume. Note: If you need to free-up space on your computer, you can select Delete Local as
long as you no longer need the recording to be stored on your computer. If you delete
a recording that has not yet been uploaded to the server, that recording will be lost.
- Once you've stopped recording and clicked the "Done" button, you will be taken to
the Manage Recordings tab where you will find three sections of recordings.
- Resume a Recording
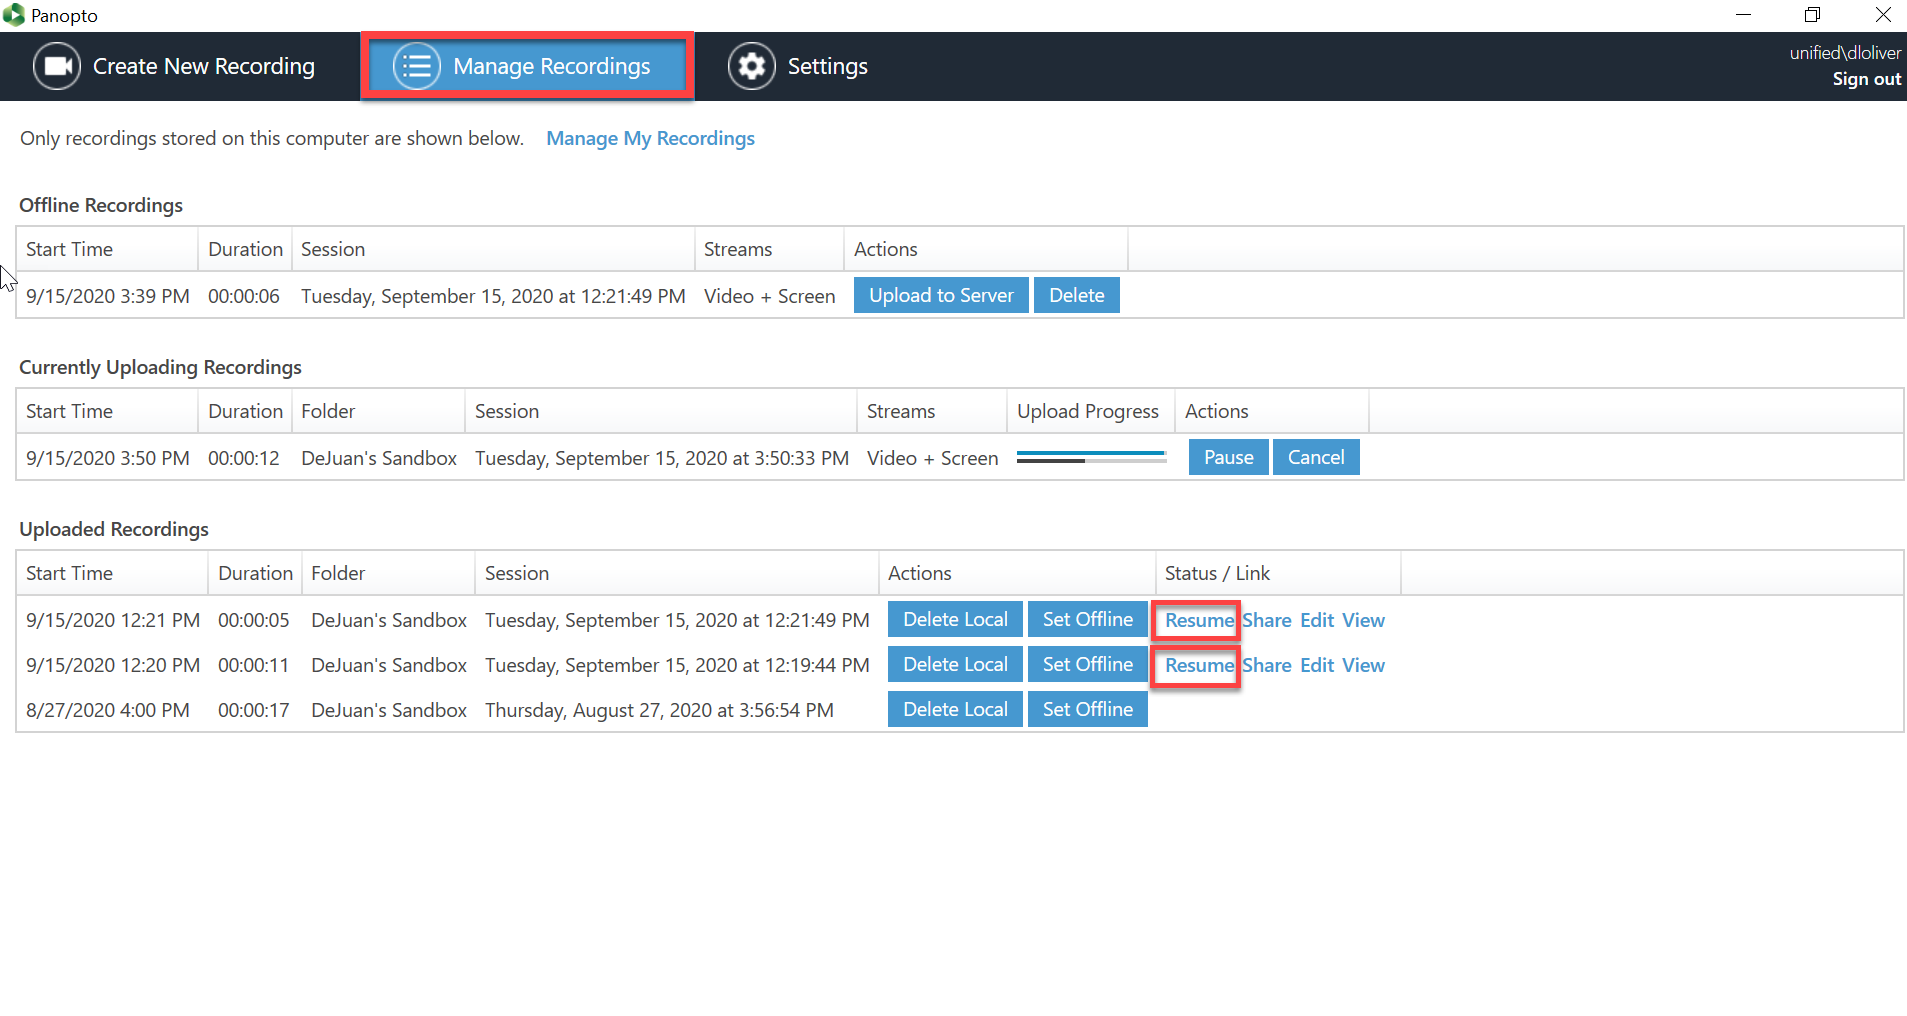
- If you were recording a session and stopped before you were finished recording, you
can resume the recording from within the Panopto recorder in the Manage Recordings
tab, as shown in the screenshot below.
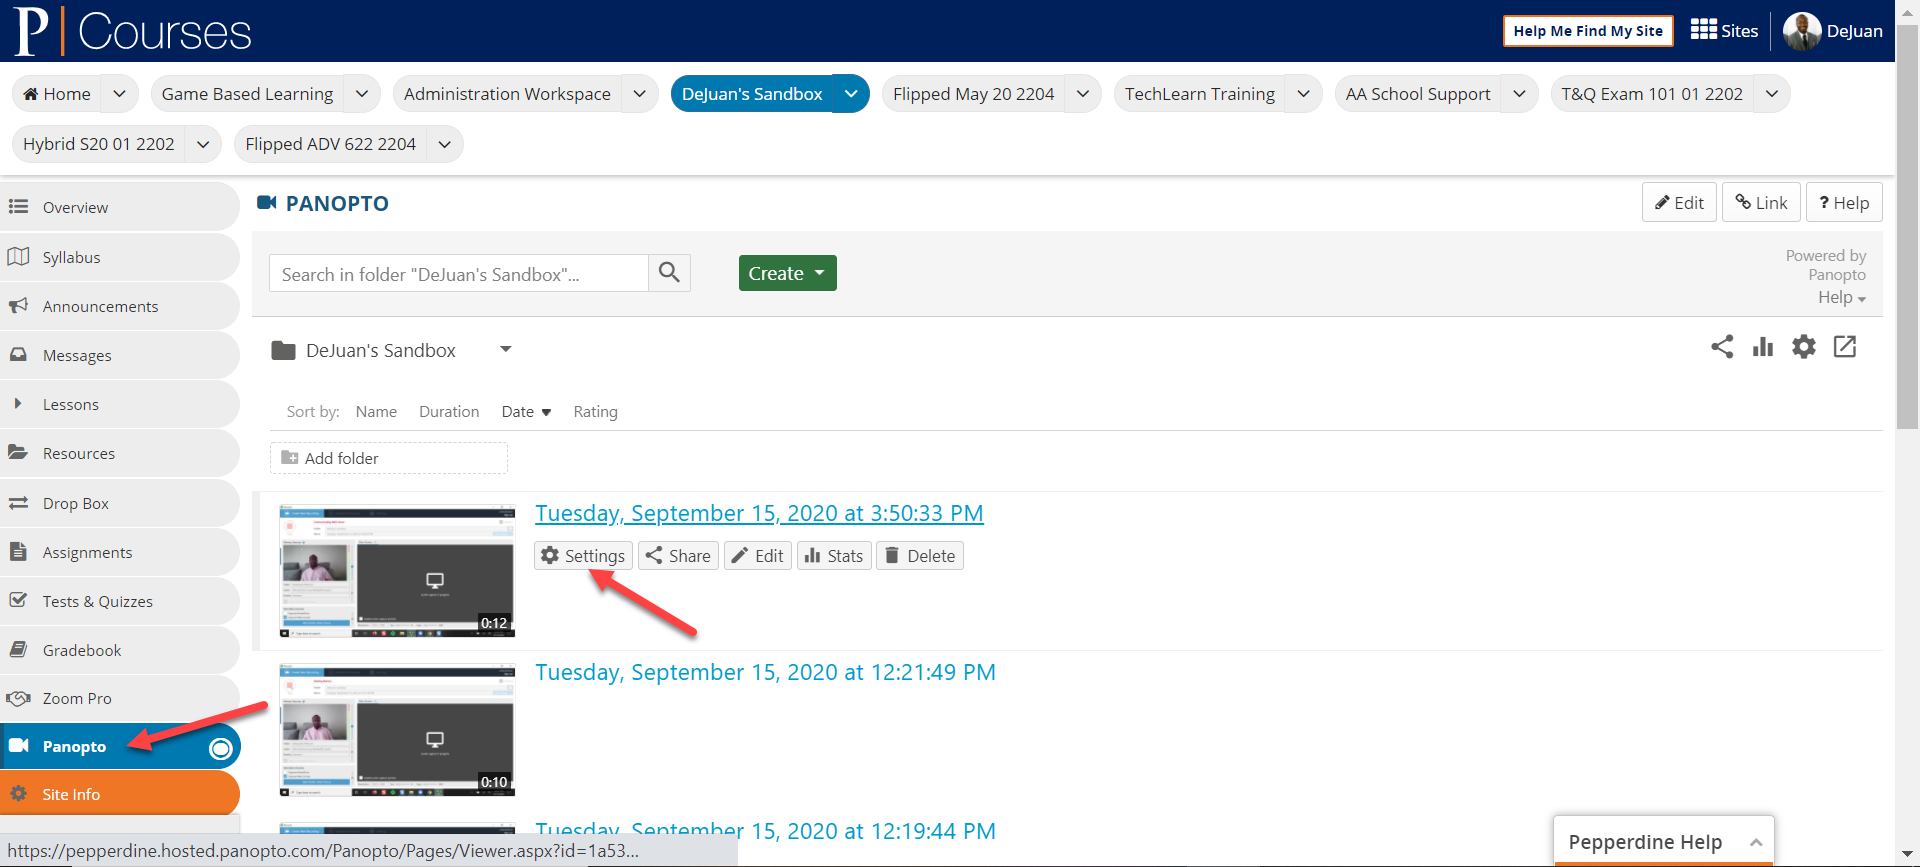
- You can also resume a recording from the Panopto tool in Courses (Sakai). In the
Panopto tool in your course site in Courses (Sakai), locate the session you want to
resume recording, hover over it, and click the "Settings" button that appears as shown
in the screenshot below.
- In the Settings window that appears, scroll down to the Actions section and select
"Resume" (see screenshot below). Note: You may be prompted by your browser to confirm that you would like the Panopto
application to open before it will launch.
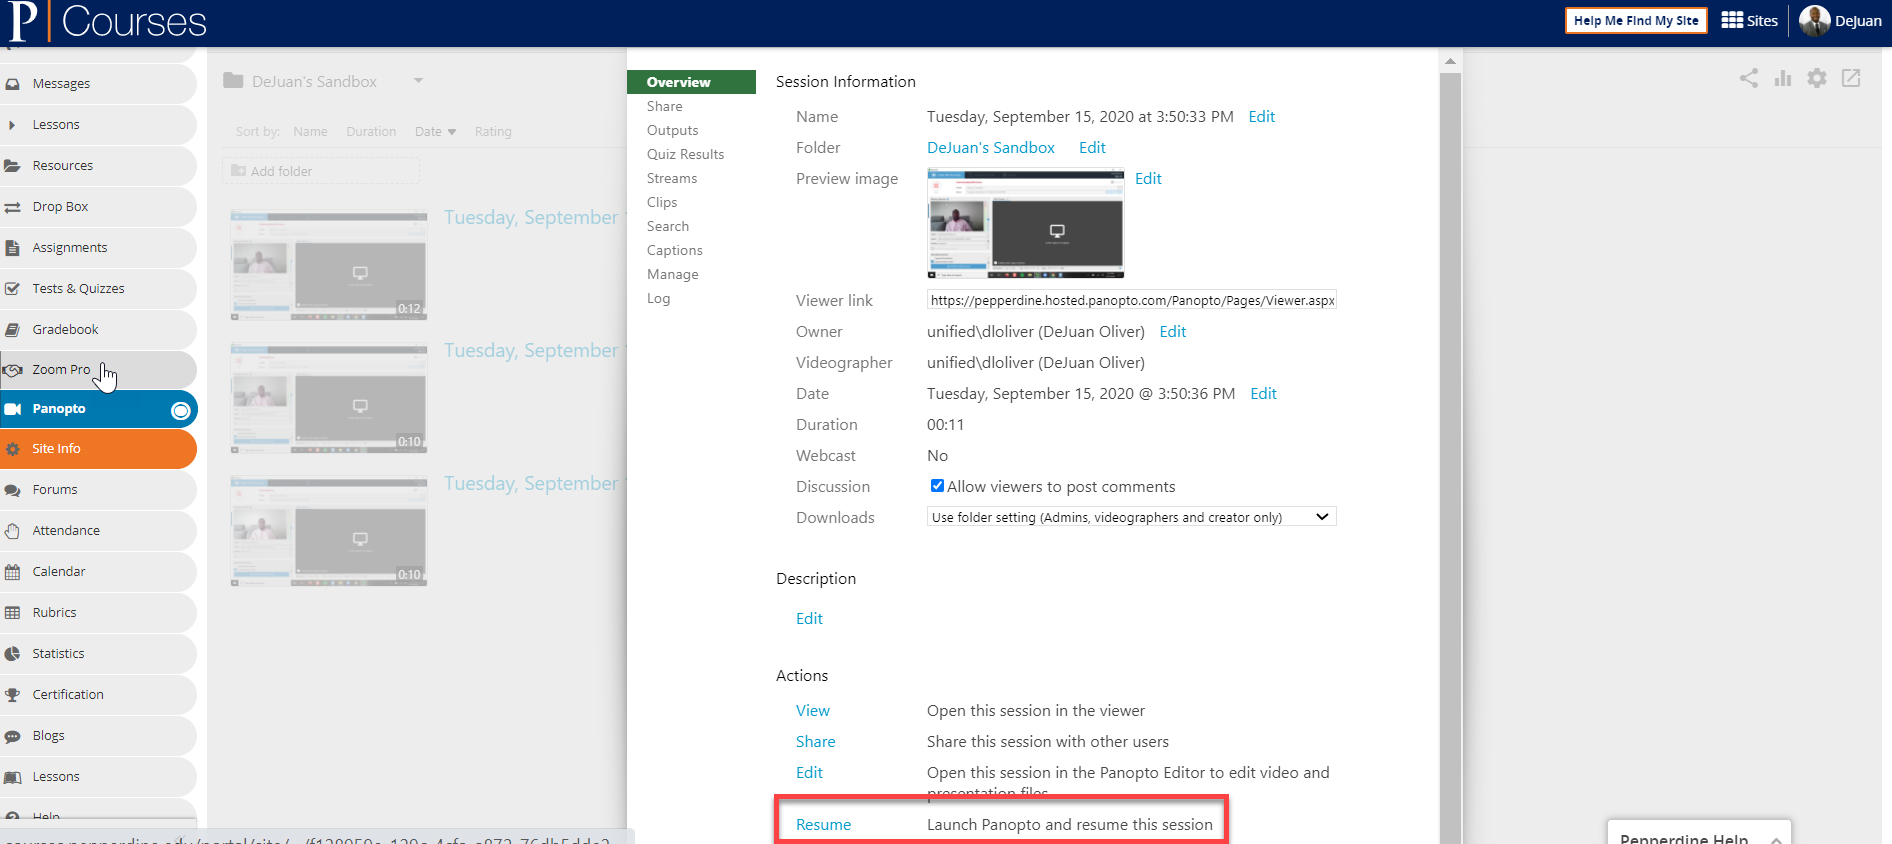
- After you click "Resume", the Panopto recorder will open and you can resume recording the session. Please be advised your new recording will be added to the end of the old one. Note: Panopto recommends waiting five seconds after you select the Record button and trimming out those five seconds in the editor when you are done recording to create a faded transition rather than one that gives the appearance that the video has skipped.
- If you were recording a session and stopped before you were finished recording, you
can resume the recording from within the Panopto recorder in the Manage Recordings
tab, as shown in the screenshot below.
- Warnings
- There are two different warnings that may appear while you are recording: low audio
and low disk space. These notifications exist to help you resolve the problem so
you can go back to recording a high quality video. For example, if your audio isn't
working properly, you will see a banner at the top of the recorder (see 1st screenshot
below) and a pop-up on the desktop (see 2nd screenshot below).
See Also:
- How to Publish Videos Using the Availability Workflow
- How to Publish Videos Using the Approval Workflow
- Panopto Recording with MAC in Courses
- Panopto Recording with Mobile in Courses
Back to Faculty Panopto Guides