Adding Web Content
What Does It Do?
Allows you to add website links in the left menu of your course or project site.
How You Can Use It
- Share key web resources with students
- Highlight specific resources within your class site (like a PDF form in Resources)
Instructions
The Web Content tool in Courses allows you to embed a web page in your Courses site. In contrast to other tools, the Web Content tool can be used to create multiple buttons in the left tool menu (all of which can link to different websites).
- Click the tab for your course or project site in your Favorites Bar, or click the "Sites" menu at the top right, and click the desired course.
- Click "Site Info" in the left menu.

- Click "Manage Tools."
- Scroll down and select the "Web Content" tool.
- Click "Continue."
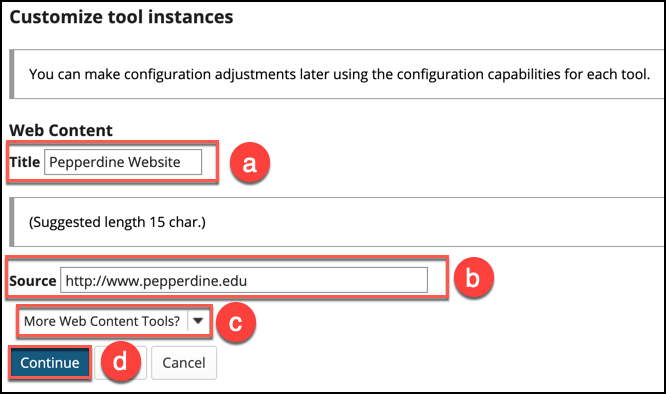
- On the resulting page:
a) Enter a "Title" for the name that will appear in the left tool menu (e.g. "Pepperdine website").
b) Enter the web address (URL) in the "Source" field (e.g. "https://www.pepperdine.edu").
c) If you want to add additional web links in the left tools menu, click "More Web Content Tools?" and select whether you want to add 1, 2, or 3 more web links to the menu.
d) Click "Continue."

- Confirm site tool edits and then click "Finish."
- Your new web content link(s) will appear in the left menu toolbar.
Content not displaying?
If you add a website address that begins with http, some web browsers will block this content. It's easy to fix, however. Simply edit the web content tool and either change the address to begin with https or select the option to "Open in new window." We recommend that you set the page to open in a new window for best results.
Remember, if opening in a new window, users may need to adjust their browser pop-up window settings.
Edit a Web Content Link
- Click the Web Content link in the left menu of the course or project site.
- If the link opened in a new window, click the browser tab or window to return to your site.
- At the top right of the Web Content page, click "Edit."

- Enter your desired changes:
- "Tool Title" - change the name of the link in the left menu.
- "Page Title" - change the name or heading of the page.
- "Choose Custom Icon" - select an icon, if desired (the default is a globe icon).
- "Frame Height" or "Custom Height" - adjust the height of the right-hand frame where the website will display. If scrollbars are appearing on the embedded page, you should increase the height.
- "URL" - modify the website address (e.g. change "http" to "https" to see if the site can appear within the page).
- "Open in new window?" - select whether you want to force the website to open in a new browser window or tab.
- Click "Update Options" to finish.
See Also: