Upload and Embed an Image in Courses
What Does It Do?
Articles with images get up to 94% more total views, and uploading and embedding an image allows you to share rich, visual media to suit your pedagogical objectives.
How You Can Use It
- Embed media in the Overview tool to spur interest and enthusiasm for your course
- Embed media in the Lessons tool to invigorate student engagement while learning
- Upload and embed a photo of yourself to personalize your course
Instructions
- Upload an Image
- Configure the Share Settings
- Embed your Image (Overview tool)
- Embed your Image (Lessons tool)
IMPORTANT NOTE: Before proceeding to the instructions, you may want to ask yourself if you plan on using your image again for a future course. Your answer will affect where you upload and store the image in Courses. Consider the following: If you upload an image to a current course site's Resources folder, how will students in a future (and different) course site access it?
Upload an Image
- Click the "Home" tab at the top left in Courses.
- Select the "Resources" tool. Note: This is your own personal Resources area.
- Click the "Actions" drop-down menu adjacent to the "Home" folder (or next to the folder into which you want to place the item(s), and select the "Upload Files" option.
- On the resulting screen, decide on an upload method:
- Drag-and-Drop Method:
- On your computer, select the desired files and drag them onto the gray "Drag files to upload" box. You can add multiple files at once. The quota for a single upload operation is 500 MB, so either one file of 500 MB, 20 files of 25 MB each, etc.
- Click "Continue" to finish.
- Traditional Method:
- Click anywhere in the box with the perforated edges to open the file browser window.
- Select the desired file on your computer and click "Open." To add another file, click the box again and repeat the selection process.
- Click "Continue" to finish.
- Drag-and-Drop Method:
Configure the Share Settings
- Click the "Actions" drop-down menu next to the image, and select the "Edit Details" option.
- On the resulting page, scroll down. Underneath the "Availability and Access" category, click the checkbox next to "This file is publicly viewable."
- Click "Update" at the bottom.
Embed Your Image (Overview tool)
- Click the tab for your course or project site, or click the "Sites" menu at the top right and click the desired site.
- Select the "Overview" tool in the left tool menu.
- Click the "Edit" button at the top of the "Welcome" container. Note: the "Edit" button is adjacent to the "Link" button.
- Place the cursor in the desired location in the text editor box.
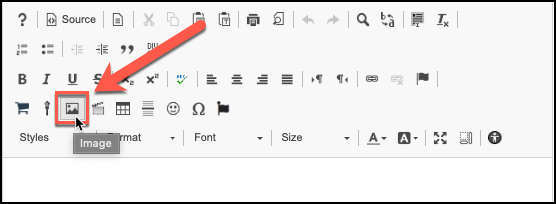
- Select the "Image" icon.

- Click "Browse Server."
- In the left hand menu, click "Home."
- Double-click the "Resources" folder to reveal its contents.
- Select the image file and click "Ok" at the bottom.
- Click "Ok."
- Click "Update Options" at the bottom of the page.
Embed Your Image (Lessons tool)
- Click the tab for your course or project site, or click the "Sites" menu at the top right and click the desired site.
- Select the "Lessons" tool in the left tool menu. (Note: the Lessons tool may need to be enabled by way of adding the tool).
- Navigate to the area or sub-page where you'd like to upload your image. (Note: see documentation on how to add sub-pages).
- Click the "Add Content +" tab at the top of the page.
- Select "Embed content on page."
- Click the "Select existing file from Resources" link.
- Click the "Select Resource(s)" link in the table. (Note: it may take a few moments to load all of your sites).
- Click the "Show other sites" link in the table.
- Select the "Home" folder and, if necessary, drill down into the sub-folder where the image is stored.
- Click "Select" next to the corresponding image file.
- Click "Continue" to finish the process.
See Also