Add Class Rosters to Combine Sections
What Does It Do?
Professors can merge student enrollments from multiple classes into one course site. This can be very helpful if you teach cross-listed classes or multiple sections of the same class but only want to manage materials for one class site. NOTE: You must be the primary instructor of the course to merge course enrollments (teaching assistants, secondary professors, and IT Support staff cannot combine rosters on behalf of instructors).
How You Can Use It
- Use Edit Class Roster(s) to centralize multiple sections and/or cross-listed courses of the same class into a single course site.
- Use the Manage Groups feature or Section Info tool to filter views in Assignments, Gradebook, and other tools.
- Use the Manage Groups feature or Section Info tool to send targeted Announcements or Messages to specific sections.
To merge or combine sections, there are a few "best practice" steps:
- Add the additional class roster(s).
- (Optional) Use the Section Info tool to make any manually adjusted sections. Note: The Section Info tool now automatically manages sections based on each added class roster in officially created class sites.
Considerations
It can be convenient to use one site for multiple sections. Be sure to consider these items when deciding whether you plan to add multiple class rosters to a single site:
- Communication is key. Be sure to notify your students that "they are in the right place." If they enrolled in a different section, they may become confused when they see another section's site in Courses. For example, if someone enrolls in section 02 and they only see section 01, then they may think that there is an enrollment glitch. Be sure to send a notice to all of your students at the start of the term to assure them that this is by design. You may also want to consider communicating this change to students on the Overview tool in your course site. This will help serve as a central location to communicate that students are indeed in the correct site.
- One Gradebook tool per class site. If the grading structure is identical for all of the combined sections, then you can enjoy a single site for multiple sections and leverage the groups or sections feature to filter the Gradebook by the different sections. If you devise different grading structures for each of the different sections (categories, weighting, points, drop lowest/highest, etc.) then you must use each class site separately to accommodate the unique grading structures.
- Be Mindful of Deadlines. Will each section have a universal deadline for class activities (e.g. all sections due by Sunday at 10:00 PM Pacific?) or unique deadlines for each section? Based on your choice, you may need to create multiple assignments or tests, and then leverage the group functionality to release each item to the intended section. In Tests & Quizzes, you can explore the exception feature to release tests or quizzes to each section with different open and due dates.
- FERPA: Respect student privacy. In an online, hybrid, or in-person class, there is no expectation of anonymity in
the same class section (see the U.S. Department of Education response to "A student has opted out of directory information and wants to be anonymous in an online
course. Are we required to allow the student to take the course anonymously?"). Cross-listed classes are considered the same class, even if they have different
subjects, so combining cross-listed classes does not require any extra permission
from students. However, the same rule does not apply to classes in which the student
is not enrolled (e.g. a different section of the same class). If you decide to combine multiple sections, you must consider FERPA and respect student
privacy.
- Approaches when combining multiple sections of classes:
- Option 1: Place a statement in the syllabus and announce to each class section your choice to combine multiple class sections into a single site, therefore they may see the names of other students that are enrolled in the different sections. Provide an opt-out option for students to write you requesting that their names not be shared. If that happens, then you must proceed to Option 2.
- Option 2: Hide select tools and leverage group functionality or modify special permissions
in other tools to prevent students from seeing the names of other students not enrolled
in their specific section.
- Hide Blogs, Chat, Commons, Email Archive, Messages, Section Info, Roster, Wiki, and Zoom Pro. You cannot expose the enrollments or student names for any students not enrolled in the same class section. Hide tools and separately share select items with specific groups, such as class recordings from Zoom.
- Use "Group" and/or Permissioning features in Assignments, Discussions (Forums), Lessons, and Tests & Quizzes. If you intend different deadlines for each section, you will use groups to create specific assignments or quizzes for each section. Use groups in Discussions (Forums) to segment topics by each class section. If using Student Pages or Comments features, limit access to specific pages by groups to prevent the exposure of student names or academic work.
- Approaches when combining multiple sections of classes:
Add Class Rosters
Using Zoom or Recorded "Live" Lectures? Consider FERPA!
Before you combine class sections, you must think through the pros and cons. This includes critical FERPA considerations, especially related to live Zoom class meetings or recorded Zoom class sessions. Remember, you must protect student privacy. Be prepared to hide some tools, separately share meeting and recording links, etc. You can comply, but you will need to make an extra effort. Please re-read the Considerations section before proceeding!
Instructions
- Click the tab for the course or project site, or click the Sites menu at the top right and click the desired site.
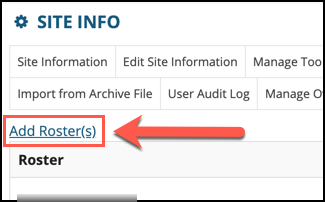
- Click Site Info in the left tool menu.
- Click Edit Class Roster(s).

- Click Add Roster(s).
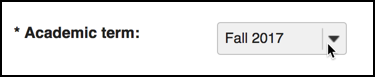
- Confirm the academic term (e.g. F19, Sp20, etc.).
- Review the list of courses in which you are enrolled as an active instructor.
- Locate the section you wish to add and then click the select anyway? link. Once clicked, the checkbox at the far left will be selected. (Ignore the
checkbox at the right for "Official Description.")
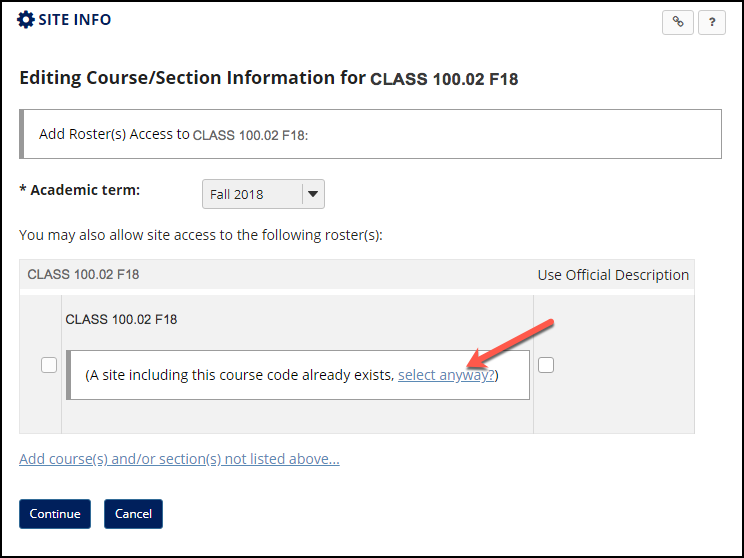
- Click Continue.
- Click Add Class(es).
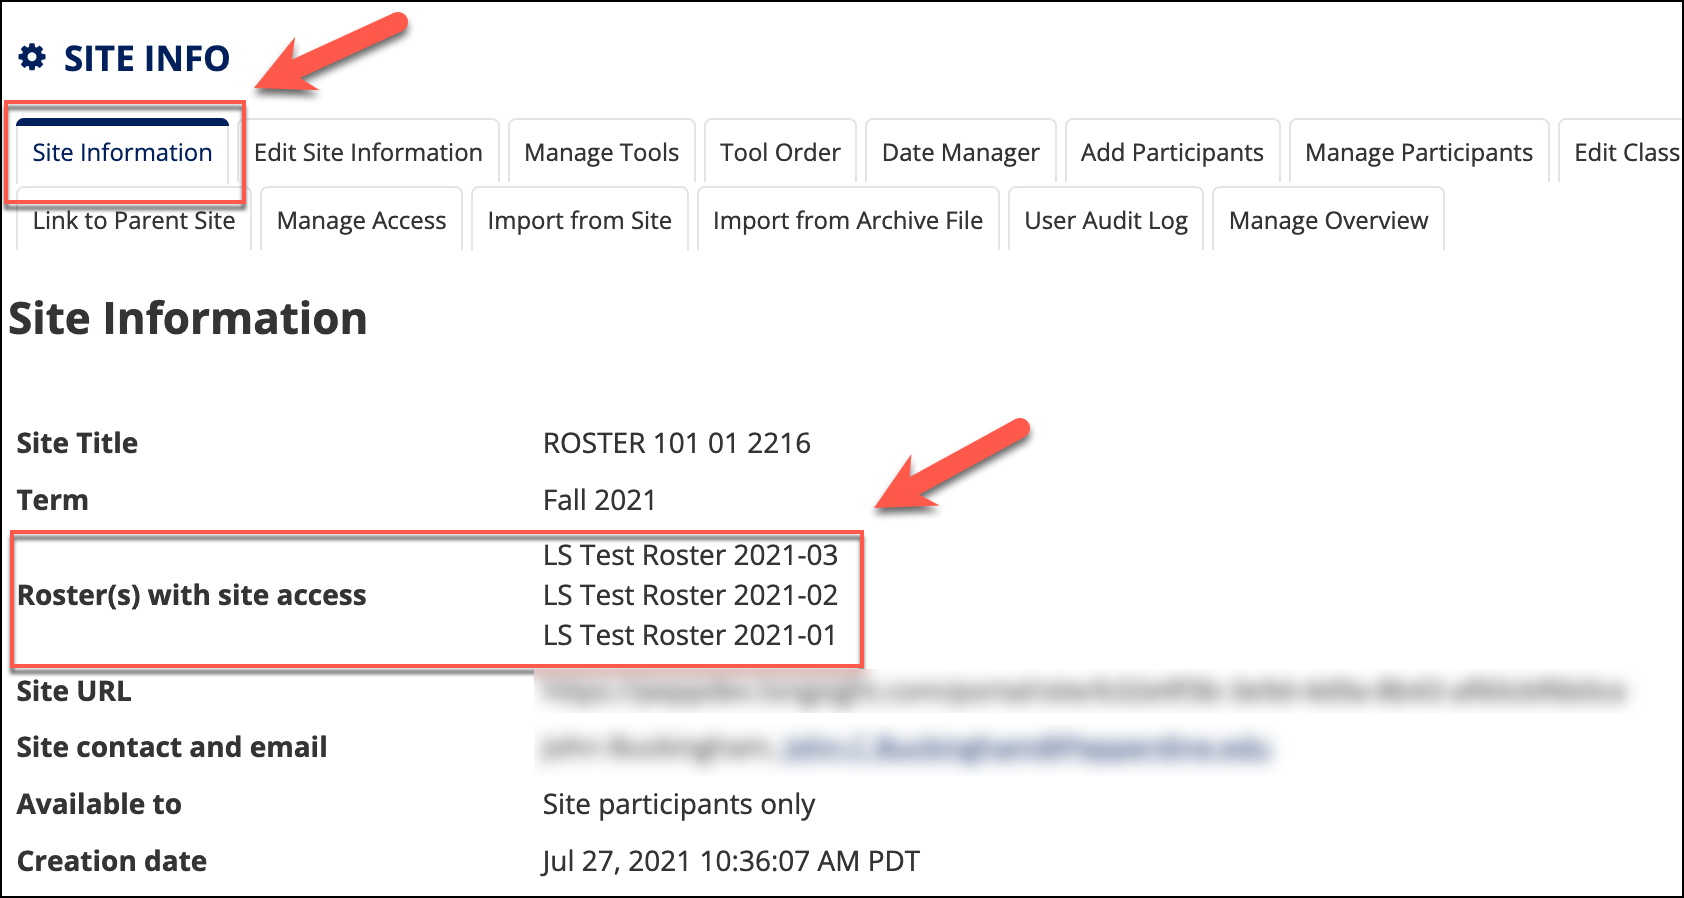
- Within Site Info > Site Information, verify that all desired rosters are listed with site access. If you need to make
changes, return to step three (3) above.
- Be sure to publish the course site with the combined enrollments. Do not publish (aka unpublish or leave as a draft) the other course sections. We recommend on the Overview tool that you modify the "Site Information Display" to explain that the site will serve all of the sections. Also, you may choose to "hide" the unused course sections from your "Sites" list.
See Also