Faculty Guide: Pepperdine Syllabus

Overview
Pepperdine Syllabus (powered by Simple Syllabus) allows professors to easily build, edit, and share class syllabi. The service pulls select information directly from WaveNet and also pre-populates required policy notices and statements. This way, professors save time and focus on the content related to their class requirements, assignments, and procedures.
Evaluating a New Service!
Pepperdine has launched an institutional evaluation of the Simple Syllabus platform.
Fully Adopted
- College of Health Science (PCHS): All courses and programs.
- Graziadio Business School (PGBS): All courses and programs.
Piloting
- Graduate School of Education and Psychology (GSEP): The Psychology Division is actively piloting in its on-ground PSY classes. The Education Division will launch a pilot for its Dissertation courses in Fall 2026.
- Caruso School of Law (CSOL): Select JD program faculty will pilot the service in Fall 2026.
We are in discussions with other schools and programs to explore Pepperdine Syllabus in stages during future academic terms. We hope that professors will enjoy the platform's many benefits for teaching and learning!
Quick Links
Training Video
Video: "Getting Started with Pepperdine Syllabus" (Pepperdine login required. Length: 24 min.)
Access Your Syllabus
Accessing your syllabus will depend on the LMS you use or your personal preference.
Pepperdine Canvas
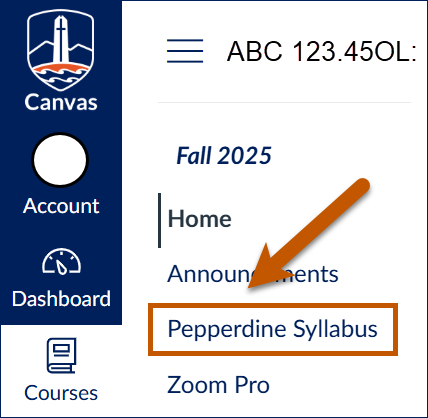
- Go to Pepperdine Canvas.
- Go to your class site.
- Select the Pepperdine Syllabus tool (or add the tool).
- Wait for the tool and syllabus to load.
Note: Adopting schools have the tool automatically placed in their class menu. Piloting schools or programs must add the tool (see below). Schools and programs not yet using Pepperdine Syllabus should wait for guidance from their Dean's Office.
Pepperdine Syllabus Portal

- Go to the Pepperdine Syllabus Web Portal.
- If displayed, select the "Click here to log in using your institution credentials" to authenticate with your Pepperdine NetworkID and password.
- Select the "Home" tool on the left side menu, if not displayed by default.
- Filter by Term if necessary.
- Select "Edit" for the desired class.
Add the "Pepperdine Syllabus" tool to Pepperdine Canvas
Watch the Add Tool Video (1 min)
(Pepperdine login required.)
Note: New PGBS and PCHS class sites (Fall 2025 and thereafter) have the "Pepperdine Syllabus" tool enabled by default in Pepperdine Canvas class sites. The following steps only apply to schools/programs/professors that are piloting the tool:
- Go to your class site on Pepperdine Canvas.
- Select "Settings" in the left navigation.
- Choose the "Navigation" tab.
- Scroll down and find the "Pepperdine Syllabus" tool in the list of hidden tools near the bottom of the page. Drag it to the top menu, such as below "Home" or "Announcements." It must be above the "Drag items here to hide them from students" section so that students can see the tool.
- Next to the standard "Syllabus" tool, select the 3-dots icon. Choose "Disable." (This will hide the standard Syllabus tool and avoid student confusion.)
- Scroll down and select "Save."
You are now ready to access the tool via the menu of your class site in Pepperdine Canvas.
Edit and Submit Your Syllabus
Watch the Edit Syllabus Video (2 min)
(Pepperdine login required.)
- Access your course syllabus:
- Pepperdine Canvas: Go to your class site on Pepperdine Canvas. Add the tool (if needed, see above) or select the Pepperdine Syllabus tool in your class site menu. Be patient and allow the syllabus to load.
- Other LMS (or no LMS): Visit the Pepperdine Syllabus Portal. Select the "Home" tool in the left menu. Select the "Edit" button for the desired syllabus.
- With the syllabus open, scroll to each editable section.
- Use the rich text editor to add and format your information.
- Simple Syllabus will auto-save content as you work.
- If your screen or window is narrow, select the blue expand button at the right to access Help Text about the syllabus section. (This auto-expands on larger screens.)
- Visible/Invisible: If a section in the template does not apply to your class, select the toggle icon next to "Visible" to set the section to "Invisible" (not shown to students). This section will not be displayed in your published syllabus.
- Public/Private: If you want to limit a section to only you and enrolled students, select the toggle icon next to "Public" to make that module "Private" to enrolled users only. For example, you can hide your contact information so that only your enrolled students can see it, not students browsing the syllabus library considering their future classes.
- Use the Accessibility Checker to review any issues or recommendations.
- Table Captions are recommended but not required. If there is a heading preceding the table or section, this provides adequate context.
- Dark background table headers with light text will meet accessibility, but may incorrectly be flagged for color contrast. If you are using Pepperdine Dark Blue (#00205c) and white text (#ffffff) in the header, then you are fine.
- Select "Preview" to see how your published syllabus would appear to your students.
- Select "Close" to save the work but not publish the syllabus.
- Select "Submit" to finish your edits.
- If your school has an approval process, the syllabus reviewers will receive a notice to publish your syllabus.
- If your school does not have an approval process, then once you "Submit" the syllabus, it will be published and ready for your students.
- Once approved/published,:
- Pepperdine Canvas: Direct students to go to your Pepperdine Canvas class site or "Share" process to share the "Syllabus URL" link.
- Other LMS (or no LMS): Use the "Share" process on the portal to share the appropriate link ("Syllabus URL" is best for monitoring student engagement).
Syllabus Styleguide
Normal Text
The standard for text content in school syllabi includes:
- Font: Arial
- Size: 11 pt.
Heading 3
Highlight your heading, and set the following for Heading 3 content:
- Font Weight: Bold
- Font: Arial
- Size: 14 pt.
Heading 4
Highlight your heading and set the following for Heading 4 content:
- Font Weight: Bold
- Font: Arial
- Size: 12 pt.
Check for Accessibility
Video: Instructor: Accessibility Quick Start Guide (4 minutes, 20 seconds)
Use the built-in accessibility checker to identify and resolve any issues.
Instructions
- Select the Accessibility Checker (bottom right).
- Walk through each issue or recommendation. Refer to the Common Fixes below.
- Save changes when done.
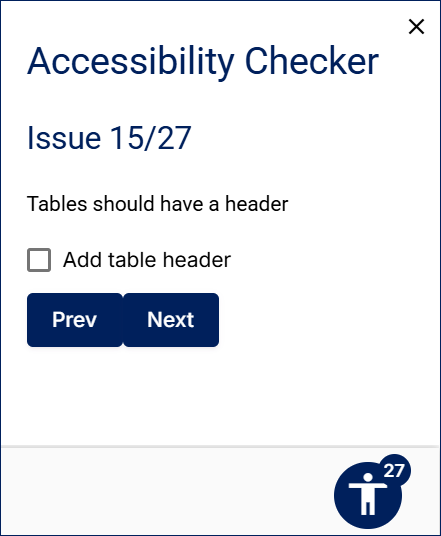
Known Issues
- Table Captions: Table captions are encouraged as titles for data tables, but are not mandatory to meet WCAG 2.1 Level AA.
- Lists and Abbreviations. The checker may misinterpret some abbreviations as unformatted lists (e.g., Dr., Mon., author initials). Either spell out the word or ignore the warning if the item is not a list.
- Color Contrast: Copying and pasting content from Microsoft Word or Google Docs may introduce some false positive color contrast warnings. Some link colors may be incorrectly flagged as not accessible. Some table headers (dark blue background and white text) may be incorrectly flagged as not accessible. Please verify that the colors are accessible or use the pre-populated data table examples as much as possible to reduce issues.
Common Accessibility Items to Fix
- Heading Levels: Use formal headings and follow a logical reading order.
- Font Sizes: Avoid using fonts smaller than 11 points. If text is 11- or 12-point, headings should be respectively larger, such as Heading 1 (18-20 point), Heading 2 (16-14 point), and Heading 3 (12-14 point).
- Colors: Use colors with high contrast and avoid using color for meaning alone.
- Images: Always provide text descriptions to communicate purpose or context, not just content.
- Links: Only place links on descriptive terms, not generic words like "website" or "click here."
- Lists: Use formal lists, not manually typed numbers or bullets.
- Tables: Only use tables for data, not layout. Use table header cells (not headings or manual formatting) with a defined scope.
Learn more by reviewing the Core Elements of Content Accessibility.
Add Component
Video: Instructor: Add and Reorder Components (4 minutes, 20 seconds)
The school templates will contain all of the necessary or required elements and sections for most class syllabi. If there is a special situation where a new heading/content area is needed, you can easily add one or more components to the syllabus.
- Go to your Pepperdine Syllabus.
- If the syllabus was published earlier, select Edit.
- Either select the "+ Add" button at the top left of the syllabus edit screen or scroll to the very bottom and select "+ Add new component."
- Enter the name that will be the heading for the section in the syllabus.
- Select Save.
- Your new component will be added to the bottom of the syllabus. To move it elsewhere, see Reorder Components below.
Reorder Components
The Reorder feature allows instructors to move components within the syllabus. Professors should limit reordering to any new components they add, and please keep the original template order as consistent as possible. Consult with your school, division, or program lead/chair/dean's office for guidance if necessary.
- Go to your Pepperdine Syllabus.
- If the syllabus was published earlier, select Edit.
- Select Reorder at the top left.
- Drag and drop headings, or use the up/down arrows on the screen next to each heading to move the component to a new location.
- When done, scroll down and select Close.
Track Student Views of the Syllabus

Once the term starts, professors can access a dashboard of the enrolled students and see who has opened the document and how much they have read. Students will also be presented with an option to acknowledge that they have read the syllabus, and professors can see who has signed off on reading the syllabus.
Prerequisites
- The academic term start date has begun
- Your class site is published (for Pepperdine Canvas)
- Your Pepperdine Syllabus is published
Instructions
- Access your course syllabus:
- Pepperdine Canvas: Go to your class site on Pepperdine Canvas. Select the "Pepperdine Syllabus" tool in your course menu. Wait for the syllabus to load.
- Other LMS (or no LMS): Visit the Pepperdine Syllabus Portal. Select the "Home" tool in the left menu. Select the "Edit" button for the desired Go to your class site on Pepperdine Canvas.
- Select the blue bar near the top of the syllabus, or select the "Student Engagement" or "View Report" links to access the Student Engagement module.
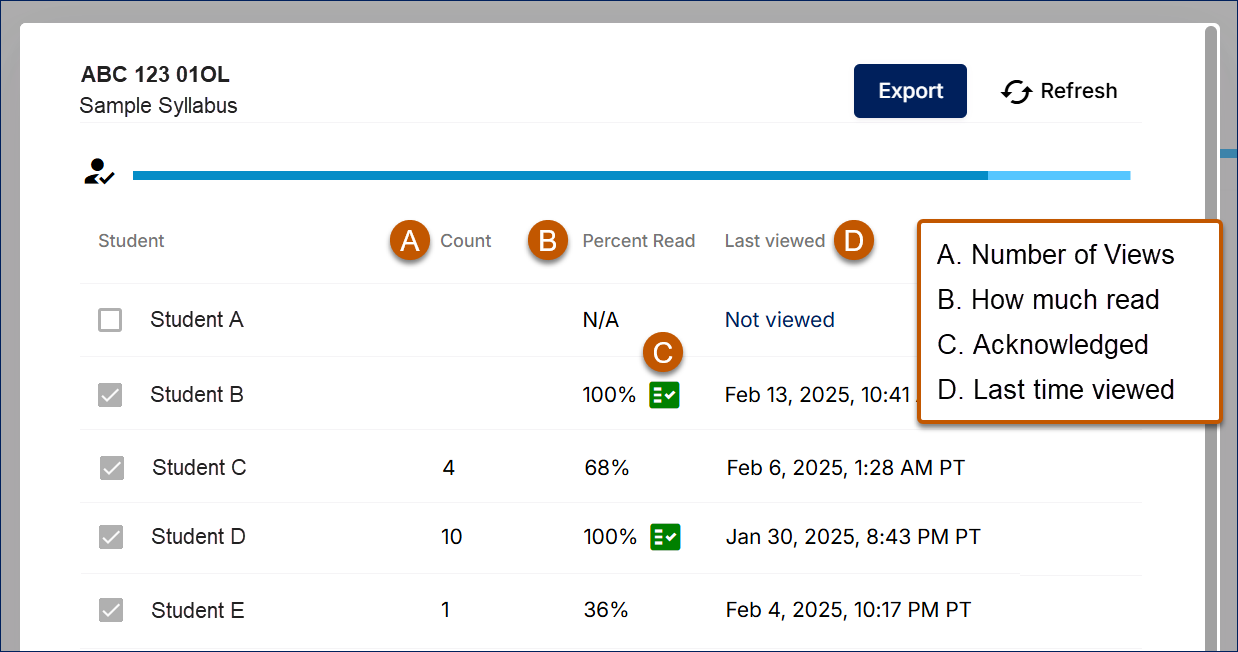
- Review the resulting list. Statistics for the online, published syllabus include:
- Count: How many times the student has opened/viewed the syllabus.
- Percent Read: How far the student has read/scrolled in the syllabus.
- Acknowledged: A green checkmark indicates the student acknowledged reading the syllabus.
- Last Viewed: When the student last opened the syllabus.
- To close the list, select any area on the page outside of the list (i.e., the grayed background of the page) or the close "X" icon.
Professors may also go to the main Pepperdine Simple Syllabus service and access the same details from the "Completed" syllabi in their instructor dashboards (select Edit Syllabus in Pepperdine Syllabus and then choose the link "View your Simple dashboard" near the top).
Import Syllabus into the Next Term

Reusing a prior syllabus within Simple Syllabus in a future academic term is easy.
Prerequisites
- The central University LMS course creation process has happened for the given academic term
- Your school has added you as an instructor to the class in WaveNet
Instructions
- Go to your new class site on Pepperdine Canvas (don't go to the old site).
- Select "Pepperdine Syllabus" in your left menu.
- Wait for your syllabus to load in the Canvas tool frame.
- Select the "Replace with a different syllabus?" option near the top of the page.
- Filter by academic term or search by class.
- Select the specific past syllabus to start the import.
- Warning: Be certain you selected the correct syllabus to import. You cannot undo or revert once imported.
- Edit the syllabus to update details for the current term dates.
Share Your Syllabus
Prerequisites
- You have published your class syllabus (or the school has approved your submitted syllabus).
Pepperdine Canvas
If your class is hosted on the Pepperdine Canvas LMS, you can use the "Pepperdine Syllabus" tool and direct students to go to your class site once the syllabus and the site are published. No special sharing process is necessary!
Share Syllabus Web Link (URL) with Students
If you need to share your syllabus with students, either before your class site is ready or if you are using another LMS other than Pepperdine Canvas, we recommend the following process:
- Go to the Pepperdine Syllabus Portal.
- Select the "Home" tool in the left navigation.
- Locate your published syllabus and select the "Share" button.
- Copy the "Syllabus URL" link (the first link).
- Use that link in an email or announcement to your class.
- Access to the syllabus requires a Pepperdine network account. Students will simply use CAS to authenticate and then view the syllabus.
Share the Syllabus with an Outside Person or an Alumnus
Access to "Pepperdine Syllabus" requires a Pepperdine login (limited to current faculty, staff, or students). If you need to share your syllabus with an outside party (such as an accrediting group) or a former student, consider the following steps:
- Go to the Pepperdine Syllabus Portal.
- Select the "Home" tool in the left navigation.
- Locate your published syllabus and select the "Share" button.
- Copy the "Syllabus PDF URL" link (the second link).
- Open the resulting link.
- Download the PDF version of your syllabus to your computer.
- Attach the PDF to an email or store it on Google Drive and share the file link accordingly.
Technical Support
Help for Instructors
For training or questions on the effective usage of Simple Syllabus, professors may contact TechLearn for a consultation.
Instructors may also contact Simple Syllabus for direct support with the platform:
- Open a Simple Syllabus Support Ticket
- Simple Syllabus Troubleshooting
- Simple Syllabus Faculty Guide
- Create a Simple Syllabus Support Account (to access additional help articles above from Simple Syllabus)
- Review the full Simple Syllabus Help Portal
For assistance with a Pepperdine University network account, computer support, or guidance on clearing browser cache, please contact Tech Central at 310.506.4357 (HELP).
Where to Direct Students
Students may reference the Pepperdine Syllabus Student Guide. They may also contact Simple Syllabus directly for assistance with the platform.
← Back to Pepperdine Canvas LMS