Saving and Optimizing Images for Web
Saving Images for Web
In Photoshop
- File – Export – Export As
- Select file format (JPG, PNG, GIF, SVG)
- On JPG, adjust the Quality to be as low as possible before altering the image appearance (60% is best all around)
- Make sure the image size (width and height) is small enough for web (see image size guide)
- Set Metadata to: "None"
- Set Color Space to: "Convert to sRGB"
- Click Export
- Save image filename in lowercases and dashes only.
Optimizing Images
Optimizing your images is a best practice for web usage because optimized images take up less disk space and load faster on a webpage. When you optimize an image you are not lowering the quality/appearance of the image, but rather just removing unnecessary data like comments and color profiles.
Using ImageOptim (for extensions: jpg, gif, png, jpeg)
- Download ImageOptim (for Macs only)
- Open ImageOptim
- Add images or folders by dragging and dropping in or by clicking the "+" button on the left
- Click "Again" until all files are at Savings 0%
- To remove files from the list just select and delete (backspace).
Uploading Images
How to upload and edit images in Modern Campus CMS
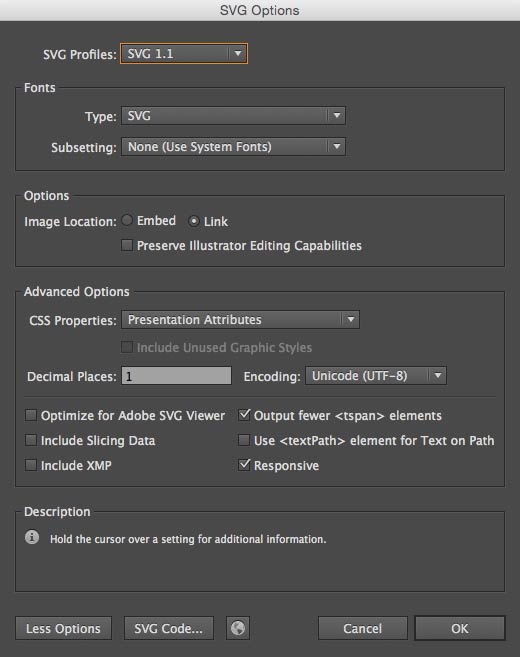
SVG Save Settings
SVGs can be very picky so please follow the exact instructions below in Adobe Illustrator.
- Create a new file in Illustrator as the final web size the graphic should be. You may need to start with just the width set (i.e. 300px or 630px).
- Drag the graphic (vector) into the new file and resize to fit the horizontal / width edges.
- Crop the excess vertical height out so the graphic fits edge-to-edge.
- If there are several SVGs that should align with each other in a row then use the same canvas (width and height pixels dimensions) for all of them and align the vectors to top, bottom, or center of the canvas.
- Remove all excess layers and convert all type layers to outline / vector format (select type and right click to see this option).
- This prevents the fonts from being unrecognizable by various computers & browsers.
- Save out the file as SVG and use the setting guides (see image below).
- Name the file in lowercase and dashes only.
- Upload the SVG into Modern Campus CMS in the desired image folder and publish.
- Add the SVG as a regular image inside of the editing area of a page.
- If the graphic has text on it is recommended to add all text into the alt Image Description.
- SVGs will expand to the full area width allowed so they display best inside of a grid snippet (i.e. Three Columns).
