Add a File, Folder, or Web Link to Resources Tool

What Does It Do?
Allows you to store files and web links to share with your students.
How You Can Use It
- Share files or website links with students in one, central place.
- Post lecture notes, PDF documents, or presentation files.
- Create an organized structure to store resources and links in a coherent manner.
- Release resources to specific groups or based on Gradebook conditions.
Note: The Resources tool limits single files to 250 MB and total site storage to 2GB max. If you would like to store more than 2GB, try using Google Drive and connecting it to your Resources tool with a web link. For documents, you can also optimize files before uploading them to Courses.
Instructions
The Resources tool is a storage place for all the files and direct website links (URLs) that you want to add to a course or project site. It is important to create an organized structure with clearly named folders for the content in your site.
- Click the tab for the course or project site, or click the "Sites" menu at the top right and click the desired site.
- Click "Resources" in the left tool menu.

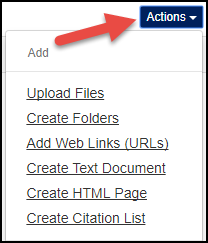
- Click the "Actions" drop-down menu at the top, or next to the folder into which you
want to place the item(s).

- Select the desired option:
- Upload Files: Browse your computer to upload a document, such as Word, PowerPoint, PDF, or other file.
- Create Folders: Organize your content by creating folders and then upload files into them.
- Add Web Links (URLs): Share links to relevant websites.
- Create Text Document: Create a simple text (.txt) document.
- Create HTML Page: Create a quick web page with the built-in rich text editor.
- Create Citation List: Share bibliographic details for multiple references in a citation list.
Upload Files
Drag-and-Drop Method
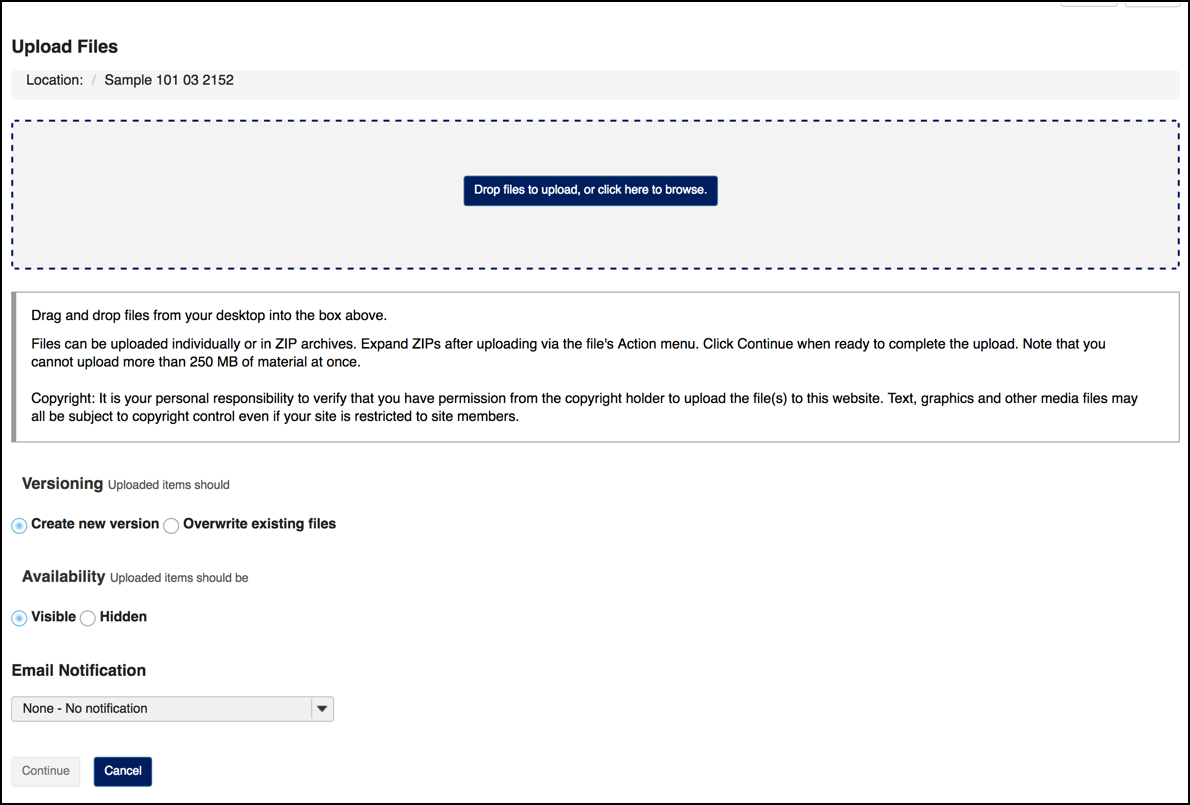
- From the "Actions" menu, select "Upload Files."
- On your computer, select the desired files and drag them onto the gray "Drag files to upload" box. You can add multiple files at once. The quota for a single upload operation is 250 MB, so either one file of 250 MB, 10 files of 25 MB each, etc. You can reduce the file size before you upload the documents if necessary.
- Set the optional settings for all files associated with this drag-and-drop operation:
- Select the "Copyright Status." The default selection is "Material is in the public domain." The option you select will apply to all files included with the drag-and-drop upload.
- Choose the "Versioning" option (whether to overwrite existing files with the same file name or create new versions).
- Set the "Visibility." The default is "Visible" but you can choose to hide all of the items.
- Click "Continue" to finish.
Traditional Method
- From the "Actions" menu, select "Upload Files."
- Drop and drag files into the gray field or select "Drop files to upload, or click here to browse" to open the file browser window.
- Select the desired file on your computer and click "Open."
- To add another file, click the box again and repeat the selection process.
- Set the optional settings (see the Drag-and-Drop Method) steps above for details.
- Click "Continue" to finish.

Bulk Upload
- In the Resources tool, click the "Transfer Files" tab.
- Follow the on-screen instructions to configure the WebDav protocol for your device.
Download Files
One-at-a-time
- Hover your mouse cursor over the name of any desired file, and then perform a left-click.
- Select the option "Save link as..."
- Specify the location/directory you wish to save to. You may also rename the file now if you prefer.
- Click Save/OK.
Bulk Download
Zip File
- Select the Actions menu for the top-level folder.
- Click on the Compress to Zip Archive item in the drop-down menu.
-
The zip file contains a copy of all of the subfolders and files inside the selected folder and is named the same as the Resource folder that was compressed. By default, the zip file is placed inside of the root folder of the site.
- Click on the zip file to download it to your computer.
Opening a .zip file on Windows is simple with the Extract All feature. When this happens the .zip file remains, and the contents are extracted in the same directory, or wherever you choose. You typically don’t need to keep .zip files once they’ve been extracted, so delete them to recover the storage space.
Opening .zip files on a Mac is just as simple. Double-click the .zip file and the uncompressed contents will appear next to it. If you do this in a Finder window and don’t immediately see the contents, try organizing by Name or Date Modified. The .zip versions are no longer needed once uncompressed and can be deleted to recover storage space.
WebDav Protocol
- In the Resources tool, click the "Transfer Files" tab.
- Follow the on-screen instructions to configure the WebDav protocol for your device. This will create a direct connection between your computer and your class site's Resources tool.
- When prompted for a username and password to verify the connection, enter your Pepperdine NetworkID and password as if you were logging into the Courses website.
- Once the connection has been established, drag and drop the files you would like to keep from your class site connection to your local computer.
Create Folders
- From the "Actions" menu, select "Create Folders."
- Enter the "Folder Name."
- (Optional) Click "Add details for this item" to enter a description, add date restrictions, or set other features.
- Click "Create Folders Now" to finish.
Add Web Links (URLs)
- From the "Actions" menu, select "Add Web Links (URLs)."
- Enter a title for the link in the "Website Name" field. The system will populate the web address by default, but you can add any description you prefer (e.g. Visit Pepperdine University's website).
- Enter a title for the link in the "Website Name" field. The system will populate the web address by default, but you can add any description you prefer (e.g. Visit Pepperdine University's website).
- (Optional) Click "Add details for this item" to enter a description, add date restrictions, or set other features.
- (Optional) Select whether you want to email site participants about this new resource.
- Click "Add Web Links Now" to finish.
Storage Limits on Courses
To improve system performance and be mindful that some students have internet bandwidth limitations, we have storage limits on Courses.
- Maximum Individual File Size: 250 MB
- Maximum Single Upload Operation Limit: 250 MB
- Maximum Resources Overall Site Size: 2 GB overall quota
TIP: Professors can check their class site quota by going to Resources > Check Quota to see how much storage they have used.
Reduce the File Size of Documents
Before uploading documents to Courses, we recommend that professors and students alike optimize the file size of the documents that they choose to share with others. A few simple steps can help students, professors, and colleagues better access documents more efficiently.
Microsoft Office for Windows
Microsoft Office for Mac:
Adobe Acrobat PDF
Store Video Files on Google Drive or Panopto
Courses can store many documents, but it is not intended as a streaming media server. Instead, be sure to link to videos that you have stored on our Pepperdine University Google Drive or Panopto services. With Google Drive, you can limit access to media to individual classes by sharing with the class distribution email list for your course. Likewise, you can use the Panopto tool within Courses to upload video files and limit access to just members of your class.
Adjust the Copyright Status of a File
When you upload files to the Resources tool, you can set the "Copyright Status" for the files at that time. The default setting is "Material is in the public domain."
If you need to adjust the copyright status for a file, refer to the following steps.
- Go to the class site.
- Go to Resources.
- Next to the file in question, select the "Actions" menu.
- Choose "Edit Details."
- Under the heading "Copyright Status," use the drop-down menu to choose the desired
option.
- Material is in the public domain.
- I hold the copyright.
- Material is subject to fair use exception.
- I have obtained permission to use this material.
- Copyright status is not yet determined.
- Use copyright below. (When selected, a description box will display so that you can enter the appropriate copyright status, such as a Creative Commons or other custom notice or status.)
- Decide whether to use the "Copyright Alert" option. If enabled, the student will be presented with a pop-up notice with the copyright status option and a notice that they may download the content but they are not permitted to share the content or resale the material. They must accept this notice in order to download the content.
- Select "Update" to finish.
Hide or Set Date Restrictions on a File
If you wish to hide a file before or after a date, you can adjust the availability settings for an item.
- Go to the class site.
- Go to Resources.
- Next to the item in question, select the "Actions" menu.
- Choose "Edit Details."
- Under the "Availability and Access" heading, choose the desired options.
- Next to "Show this item," select the appropriate checkbox(es).
- Select the "From" checkbox to set an open date for the item. The item will not be visible until after this date and time happen.
- Select the "Until" checkbox to set an ending date for the item. The item will automatically be unavailable or hidden after this date and time happen.
- Choose "Hide this item" to hide the content from all students immediately.
- Select the additional options to expand access beyond the scope of this site.
- "This file is publicly viewable" will allow a link to the file to be visible to anyone with the link (no login to Courses will be required).
- "This file is viewable to all logged in users" will allow a link to the file to be available to anyone with an active Courses user account (which would include official Pepperdine University community members with an active University NetworkID as well as any active guest user accounts on Courses). If the person is not already logged into Courses, the person will be prompted to authenticate before the file will be available.
- Next to "Show this item," select the appropriate checkbox(es).
- Select "Update" to finish.
See Also