ACCESS: Your Digital Accessibility Checklist
Overview
While required by both University policy and federal law, accessible design isn't just about compliance; it's about ensuring that every student—regardless of ability—can engage with your course materials. To make it as easy as possible, we have provided the "ACCESS" checklist below to help you remember the key requirements and simplify your content review process.
Many items below only take a few moments to implement. And if you take these items
to heart, then building or selecting new materials will be a breeze.
The A-C-C-E-S-S Checklist
"A" for Alternative or "ALT" Text Descriptions
Describe all visual or non-textual content.
This includes providing descriptions for all images, charts, or graphs. If an image is purely decorative (and serves no other purpose than a design element), be sure to mark it as decorative.
About Image Alternative Descriptions or Alt Text
For all images, you must provide a concise description to help someone who may not be able to perceive it. Namely, what does the image depict, and what is its purpose? A description may vary based on the context within the learning materials.
| Example Image | Example Description |
|---|---|
 |
A view of the Phillips Theme Tower on Pepperdine University's Malibu campus with the Santa Monica Mountains in the background. |
How to Add Alternative Descriptions to an Image
- Instructure Canvas LMS: "How do I manage alt text and display options for images embedded in the Rich Content Editor?"
- Microsoft Office: "Add alternative text to a shape, picture, chart, SmartArt graphic, or other object"
- Adobe Acrobat: "How to Add Alt Text in Adobe Acrobat: A Step-by-Step Guide"
- Modern Campus CMS (formerly OmniUpage or OU): "Insert/Edit Image"
Refer to the help documentation of any other tool or service.
About Alternative Descriptions for Charts, Graphs, or Infographics
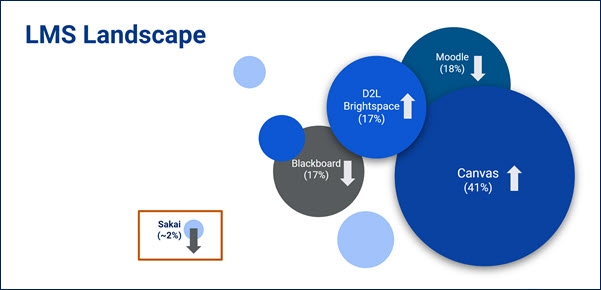
In addition to descriptions for photographs or illustrations, we need descriptions for other visual media, such as data charts, graphs, or infographics. These visualization graphics are often complex, so we may need to provide both an alternative (alt) description as well as a separate long description, data summary, or appendix to explain the graphic in detail. A long description may appear on the same page as the image or link to a separate page with the details.
| Example Image | Example Descriptions |
|---|---|
|
|
Image Alternative Description (Alt Text)A bubble chart of the LMS marketplace with Canvas as the major market leader and Sakai as a market laggard with limited adoption. Accompanying Long DescriptionThis bubble chart depicts the market share of common learning management systems (LMS) in the United States and Canada. The clear market leader is Canvas LMS with 41% market share and an upward arrow indicating increasing adoption. It is followed by Moodle LMS with 18% share, but decreasing adoption; Desire2Learn (D2L) Brightspace LMS with 17% share and increasing adoption; and Blackboard LMS with 17% share and decreasing adoption. An outlier on the chart is the Sakai LMS, highlighted in an orange box, with approximately 2% share and decreasing adoption. |
How to Add Alternative Descriptions for Charts, Graphs, and Infographics
- US Government Section 508: "Authoring Meaningful Alternative Text: Charts, Graphs, and Diagrams"
- Web Accessibility Initiative (WAI): "Complex Images"
- Harvard University: Data Visualizations, Charts, and Graphs
Learn more about ALT Text.
"C" for Contrast
Ensure that text is clearly readable against any background.
This means not placing dark text on a dark background, or light text on a light background. Use a tool like the WebAIM Color Contrast Checker to evaluate the contrast between foreground text and background color.
About Color Contrast
So that the human eye can perceive text, we must ensure adequate color contrast between the text and any background image or color. In general, we should place dark text on a light background, or light text on a dark background.
| Example Image | Example Description |
|---|---|
 |
Poor Contrast. In Example Image 1 (left), the letter "A" appears in black text on a dark gray background. Although the letter may be visible to some individuals, the subtle difference between the foreground and background colors makes it more challenging to read or perceive. In this example, the color contrast ratio is 2.86:1. The minimum color contrast requirement for standard text is 4.5:1, while large text requires a 3:1 ratio. |
 |
Good Contrast. In Example Image 2 (left), the letter "A" appears in white text on a dark gray background. The light color on a dark background makes the letter very easy to view. In this example, the color contrast ratio is 7.33:1. The minimum color contrast requirement for standard text is 4.5:1, while large text requires a 3:1 ratio. |
Learn more about Color, Contrast, and Meaning.
"C" for Color, Caps, and Meaning
Don't rely solely on visual style to convey meaning.
Be mindful of the use of color alone to convey meaning. Augment color with the appropriate text labels and/or icons to clarify your intent. Also, avoid using All Caps for long sentences or headings as this can be challenging for some people to read or process. Some assistive technologies may also interpret all capital letters as acronyms and try to speak each letter rather than say the words.
Learn more about Color, Contrast, and Meaning.
"E" for Explanatory Links
Make hyperlinks descriptive and unique. Never place links on generic words or phrases like "click here" or "this website."
To aid users of assistive technologies, place hyperlinks to websites and resources on wording that clearly communicates where the link will go or the action that will happen. At the same time, don't place links on full sentences or paragraphs; be clear and concise with your link terms. Links on the same page or in the same document should be unique. Avoid multiple "register here" or "learn more" links, for example.
Learn more about Meaningful Links.
"S" for Structure (Headings, Tables, and Lists)
Organize content with semantic headings, use formal headers in data tables, and use official lists (bulleted or numbered).
Apply the appropriate headings to organize your content in documents or web pages. Don't simply format content as bold with a large font; use the official styles or headings within the software or website (e.g., Heading 1 or H1). Headings must follow a logical reading order or outline. Don't skip levels or misuse headings simply to format plain text. Similarly, define the cell types (header or data) to describe elements of any data tables. Be sure that header cells or data cells are clearly indicated, along with the scope (such as a header that applies to a column or a row of information). Finally, structure your lists of information using formal bulleted or numbered lists. Do not bypass formal lists by manually entering numbers, hyphens, or indents to mimic lists.
Learn more about Structure with Headings and Structuring Data (Lists and Tables).
Other structural elements to consider:
- "Declare the language of documents" (let people know that a web page or document is in English or another language via document properties or HTML code)
- "Make math accessible" (help students using accessibility tools understand your formulas or equations with LaTeX or MathML)
"S" for Subtitles (Captions, Audio Descriptions, Transcripts)
Provide text for all recorded audio and video content.
Students may require audio or visual accommodations. For audio-only media, such as podcasts, provide a transcript of all spoken dialogue and important audio cues or sounds. For video-only (no audio) content, provide either a text transcript or audio descriptions with the media. For video with audio, provide captions and audio descriptions. Separate transcripts are not required for videos with audio (if captions and audio descriptions are provided), but can be helpful.
About Video Captions
To assist our learners, we need to supply the appropriate captions for video content. Typically, captions will identify the speaker and provide the dialogue for each person. Captions must be accurate. If you use automated captions for live or recorded meetings, for example, be sure to review and edit the captions before you share the media link with your audience. Closed captions are preferred over open captions. Closed captions can be enabled or disabled and offer better language translation options. Open captions are fixed with the media, cannot be edited, and cannot be translated.
If you are directing students to third-party video content, be sure that the source videos have captions. If the material is required and the source media does not offer captions, be prepared to provide a text transcript for the media as an alternative presentation for the content.
Example Video with Captions
The following video provides an option for Closed Captions. If it is not already selected by default, please select the "CC" button in the video player to enable the captions. A Pepperdine University NetworkID and password are required to view the video. Note: Deselect the "AD" button (audio descriptions) in the player to view with only captions.

Watch the Pepperdine Canvas Intro Video (3 minutes)
(Pepperdine login required; Closed captions and audio descriptions available.)
About Audio Descriptions
Many people are familiar with closed captions, but may not be familiar with audio descriptions. Audio descriptions fill a necessary gap to help people understand the action or sounds of a video that are often not captured or communicated with captions alone. If someone is unable to see the video, how will they know that a character is creeping up on the hero or that a telephone is ringing? In lecture videos, audio descriptions should alert students to computer actions, such as clicking buttons or scrolling; convey visual details, like slide content; and provide audio cues or important musical details that can help someone unable to perceive the content themselves.
Example Video with Captions
The following video provides both closed caption and audio description options. Select the "AD" icon in the player to enable the audio descriptions. The video will pause temporarily while audio descriptions are read, then proceed automatically. A Pepperdine University NetworkID and password are required to view the video.
Watch the "How to Edit Your Pepperdine Syllabus in Canvas" Video (2 minutes)
(Pepperdine login required; Closed captions and audio description options available.)
About Transcripts
A transcript is a separate file containing text descriptions of the audio and visuals of a media file, such as a film, lecture recording, audio recording, or similar. Transcripts are required for any audio-only media (e.g., podcasts, audio interviews, etc.). Transcripts are not required for videos that include both closed captions and audio descriptions; these meet WCAG 2.1 Level AA accessibility standards. Transcripts, however, can be helpful as a single source of alternative descriptions for media.
Transcript Best Practices
- Begin the transcript with details about the media, such as the title, release date, and other relevant information.
- Describe the important non-verbal elements of a video or audio file, such as visuals, actions, or sound effects.
- Provide the dialogue and identify each speaker.
- Avoid providing time stamps in the transcript. Write the action, descriptions, and dialogue in the same logical order as the original media.
- Where appropriate, provide accessible headings in the transcript to mark scene changes, lecture slide changes, or similar chaptering of the content.
- Provide the transcript in an accessible format, such as a web page or an accessible Microsoft Word file (.docx).
- Provide the transcript in proximity to the original media file, such as a link below an embedded video on a web page.
Example Video and Transcript
Video: YouTube: Pepperdine - Intro, The College Tour (1 minute, 24 seconds).
View the Transcript of Pepperdine - Intro, The College Tour.
About Online Class or Meeting Captions
Captions can be helpful for all participants in an online class or meeting. Beyond helping people with auditory accommodations, it can also help learners located in loud environments, learners whose primary language may not be English, and other use cases.
Automated captions are not perfect, but can be a helpful addition to an online meeting or class. For students with official accommodations, Pepperdine instructors have additional resources through the Office of Student Accessibility (OSA). Instructors should refer to the OSA Faculty Procedures for Accommodations for guidance related to classroom captioning. Consult with OSA as needed.
Reminders:
- Automated captions in class recordings will not meet accessibility guidelines if they are inaccurate. Carefully review and edit automated captions to ensure accuracy.
- Zoom cloud recordings have a six-month retention period.
- Panopto recordings have a 13-month archive period (videos not watched after 13 months will be auto-archived but can be retrieved).
Meeting Caption Resources
Learn more about Video Accessibility.
Strategies for Success
- Building is Easier than Remediating. If you create content with accessibility in mind, you'll save time compared to fixing issues down the road.
- Start with Structure. Outline your document or web page with headings. Use keyboard shortcuts like Control-Alt-1 (Windows) or Command-Alt-1 (Mac) to quickly apply Heading 1. Change the numbers to 2 or 3 to apply Heading 2 or 3. If building an LMS page, remember that your first heading will be Heading 2, not Heading 1.
- Adopt Healthy Habits. Over the years, we tend to pick up a bad habit here and there. Switch bad linking habits to healthy habits by placing web links on unique, descriptive words that guide people appropriately. Convert any old, scanned documents to OCR, text-searchable, and tagged versions of the content. Expand any use of color by adding words or icons to ensure the message is received by everyone. Consider applying All-Caps in moderation, and kindly reserve underlining for web links only.
- Move from Small to Large. If the full ACCESS Checklist feels a little daunting, you can approach your review
in smaller stages.
- For quick wins, HEAL your content: Headings, Explanatory Links, Alternative Text Descriptions, and Lists.
- From there, our Malibu campus faculty will appreciate "walking to the TCC": Tables, Contrast, and Color/Caps.
- Finally, focus on media with a CAT scan: Captions, Audio Descriptions, and/or Transcripts.
- Enjoy the Added Benefits. Did you know that by using formal headings in Microsoft Word or a Google Doc, you
can easily build a Table of Contents? Also, by using formal headings, you can change
the format in one place and automatically apply it to all instances of the same heading
(a huge time saver!).
Check Your Work! Use Accessibility Checkers.
Use the built-in tools within websites, word processors, and other software to verify that your content meets basic accessibility guidelines:
While not an exhaustive list, the checklist above will help you address the top digital accessibility issues that often affect course content. Thank you for supporting all learners!
← Back to Faculty Resources for Digital Accessibility