Overview
The Canvas LMS has a built-in accessibility checker that is part of the rich content
editor (RCE). Faculty should always check and resolve accessibility issues with their
content.
What Does It Do?
As you add content to an activity in Pepperdine Canvas, the rich content editor will
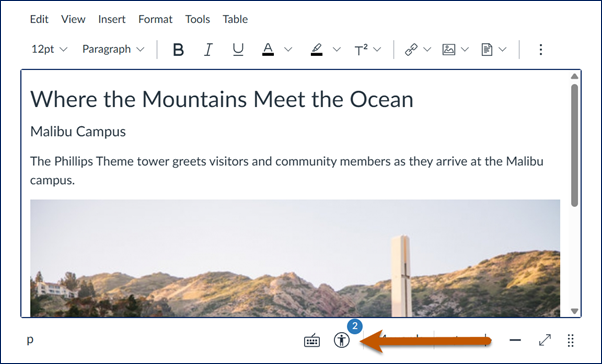
scan for possible accessibility issues. When an issue is detected, it adds a number
to the accessibility checker icon (the person in a circle icon). The number represents
the number of issues to review and resolve. When you open the accessibility checker,
it will highlight the content with the issue and explain the problem. It often presents
an option to fix the issue, such as adding an alternative text description to an image.
The Canvas LMS community is committed to accessibility. Visit the Canvas accessibility standards page to learn more. Canvas regularly reviews the platform for compliance and works with
institutions and vendors to address any issues that are discovered so the service
is usable by people with different abilities.
How You Can Use It
- Help your course meet accessibility standards and reach all learners.
- Quickly fix common problems, such as:
- Color Contrast: Identify and fix poor color contrast, such as light text on a light background.
- Headings: Identify and fix skipped headings (e.g., Heading 2 to Heading 4) and long headings that are more than 120 characters.
- Images: Identify and fix missing alternative text, filenames used as alt text, or long alt text more than 120 characters.
- Links: Identify and fix adjacent links that point to the same destination, aka split links that should be a single link.
- Lists: Identify and fix manual lists that should be formatted as formal lists (Numbered or Bulleted).
- Tables: Identify and fix missing header cells, missing header scope, and missing table captions.
Instructions
Important: The Canvas Accessibility Checker is very helpful, but does not test or catch everything.
Professors must conduct manual reviews in addition to the accessibility checker.
- Look for the accessibility checker icon near the bottom of the rich content editor.
- If there is a number present, select the icon to open the accessibility checker tool.
- Review the notice and the options available.
- Make the correction. In the above example, the professor would enter a meaningful
description of the image into the "Change alt text" box.
- Select Apply to fix the specific issue, if the button is present.
- Use the Next and Previous buttons to navigate through other issues (if applicable).
- Close the checker when done by selecting the close ("X") icon at the top right.
- Continue editing your activity and save your work.
For more information, see Canvas’ documentation:
Common Problems and Resolutions
Select a topic below for details and instructions.
Color Contrast
Poor Color Contrast
As content creators, we must balance our personal design preferences with usability
and accessibility. All text must be readable by our learners. To that end, we must
ensure that we avoid using light-colored text on a light background, or dark text
on a dark background.
Steps to Resolve
- Go to the page, activity, quiz, etc., and "Edit" the item to open the rich content
editor.
- Select the "Accessibility Checker" icon near the bottom (the person in a circle icon).
- For the warning "Text larger than 18pt (or bold 14pt) should display a minimum color
contrast ratio of 3:1" or "Text smaller than 18pt (or bold 14pt) should display a
minimum contrast ratio of 4.5:1," select a color that meets accessibility standards.
- Color Palette: Use the color palette to select a more readable color. Drag the circle to a darker
(or lighter) color as needed. Use the lower bars to change the color hue or opacity/transparency
levels.
- RGBA Code: Enter the RGBA code value for the desired color. You can use the W3 Schools Color Converter to convert a hex value to an RGB value, and enter "1" as the last number for RGBA.
Example:
- Pepperdine Dark Blue is #00205c (hex), which is rgb(0,32,92), and thus rgba(0, 32, 92, 1), by adding "1"
as the fourth value.
- Select Apply in the checker window.
- Continue fixing issues and close the checker when done.
- Save the specific page or activity to complete your edit.
Note: The WebAIM Color Contrast Checker can help evaluate a HEX value color. Use the W3 Schools converter (above) to identify
the RGB value, then add "1" as the fourth value in the parentheses to complete the
RGBA code.
Learn more about Accessible Colors.
Headings
Manually Formatted or Missing Headings
Structuring your document with headings helps all users. It also allows people using
assistive technologies to navigate the page and "skim" content to get to what they
need. To accomplish this, we must use the formal heading styles (e.g., Heading 2-4).
Sometimes we make the mistake of simply bolding text and increasing the font size,
which is not the same as a true heading. As the content creator, you should always
use the appropriate heading style by selecting it from the drop-down menu in the editor.
Steps to Resolve
- The Canvas RCE Accessibility Checker cannot find these issues. The professor must manually evaluate the content and apply the appropriate heading
level(s) to all headings in their rich text content.
- Go to the page or activity and "Edit" the item to open the rich content editor.
- Identify text intended as a heading, and verify that it has the appropriate heading
style, not "Paragraph." (Simply increasing the font size and/or making it bold does
not communicate that the content is a heading to people who use screen readers.)
- Separate headings from text. If the content is intended as a heading, it should be
on its own line and use the appropriate heading level (Heading 2-4).
- Select Save to finish editing the item.
Skipped Headings
When applying headings, they must flow in a logical reading order. Do not skip heading
levels simply for a formatting preference. Instead, apply the correcting heading and
then manually format the text if you wish to change the color, size, or font for the
specific heading.
Steps to Resolve
- Go to the page, activity, quiz, etc., and "Edit" the item to open the rich content
editor.
- Select the "Accessibility Checker" icon near the bottom (the person in a circle icon).
- For the warning "Heading levels should not be skipped," choose the appropriate option:
- Leave as is: This ignores the warning. Please do not choose this unless absolutely certain.
- Fix heading hierarchy (recommended): It will automatically apply the next heading level based on the preceding heading.
If you accidentally jumped from Heading 2 to Heading 4, then it would apply Heading
3 instead.
- Remove heading style: This changes the text to Paragraph style, removing the heading style. If you selected
the heading simply to make the text bigger and bold, choose this option to remove
the heading and then manually format the text to meet your design preference.
- Select Apply in the checker window.
- Continue fixing issues and close the checker when done.
- Select Save to finish editing the item.
Learn more about Accessible Headings.
Images
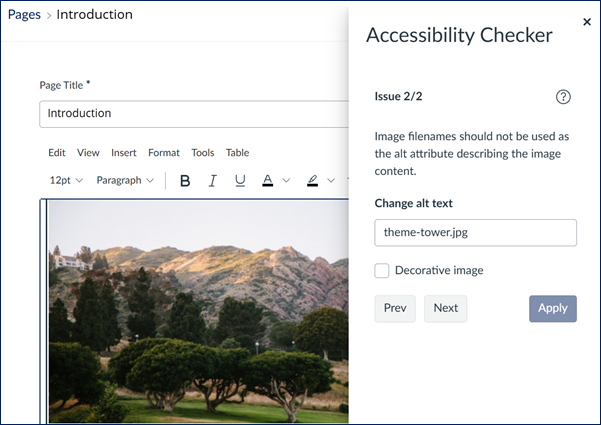
Images without Descriptions (or Filename Descriptions)
All images need to have an alternative description (or ALT text) to explain the purpose,
context, or content of the image. Do not start the description with an opening like
"Image of" or "Picture of." A screen reader will introduce the object as an image,
so you will produce redundancy for those using assistive technologies. Focus on the
context. For longer descriptions, consider whether it would be best to introduce the
image, art, or photograph with the text on the page to benefit all learners.
The exception to the rule is a picture or image that serves a purely decorative purpose
with no meaning or value other than aesthetic appeal. Decorative images should have
a blank description so that assistive technology will skip over the object on the
page. An example of a decorative image might be an image of a fancy scribble to act
as a visual separator on a page. Other than being a design element, it offers no substance
or value.
Steps to Resolve
- Go to the page, activity, quiz, etc., and "Edit" the item to open the rich content
editor.
- Select the "Accessibility Checker" icon near the bottom (the person in a circle icon).
- For the warning "Image should include an alt attribute describing the image content"
or "Image filenames should not be used as the alt attribute describing the image content"
(or similar notice), enter the appropriate description in the "Add alt text for the
image" box or select the box "Decorative image" if the content is purely cosmetic.
Alt text should be concise and accurate to convey the purpose, context, and/or content
of the image.
- Select Apply in the checker window.
- Continue fixing issues and close the checker when done.
- Select Save to finish editing the item.
Note: You may also select the image and then choose "Image options." Enter the description
in the "Alt Text" field. Select "Done" when finished. Don't forget to save the page
or activity!
Excessive Image ALT Text
Alternative descriptions for images should be accurate and concise, conveying the
purpose or intent of the image within the context of the material. The accessibility
checker will flag ALT text that is more than 120 characters long. This is a recommendation, not an accessibility violation. This is simply a warning to review the description for accuracy and length.
- Go to the page, activity, quiz, etc., and "Edit" the item to open the rich content
editor.
- Select the "Accessibility Checker" icon near the bottom (the person in a circle icon).
- For the warning "Alt attribute text should not contain more than 120 characters,"
evaluate the content. This is a courtesy notice, not necessarily an error.
- If the description is accurate and as concise as possible, feel free to ignore the
alert.
- If the description can be trimmed, please do so.
- If it may be better to accompany the image with an on-page image caption and/or surrounding
explanation (before or after the image), consider this approach to assist all learners
(not just people using screen readers). In that situation, trim the ALT text accordingly
and place the appropriate explanations on the page to better describe the purpose
of the image.
- Select Apply in the checker window.
- Continue fixing issues and close the checker when done.
- Select Save to finish editing the item.
Learn more about Accessible Image Descriptions.
Links
Don't Use Generic Links (like Click Here)
Web links must clearly communicate the purpose of the link on their own without any
other context from surrounding text or images. Never use generic language like "here,"
"click here," "website," etc. Similarly, don't place links on too many words and never
on an entire paragraph of text. Only use descriptive text for web links, and try to
keep the link term(s) clear and concise.
Steps to Resolve
- The Canvas RCE Accessibility Checker cannot find these issues. The professor must manually evaluate the content and fix any web link language as
needed.
- Go to the page or activity and "Edit" the item to open the rich content editor.
- Locate the web links in your content and verify that each link clearly explains the
purpose or destination of the link on its own. A good rule of thumb is to place the
web link on the subject, direct object, or verb and object of the sentence. Also,
links should be on roughly 1-5 words at most.
- Subject Example: Tech Central provides technical support for Pepperdine students, faculty, and staff.
- Direct Object Example: Information Technology offers technical support through the Tech Central department.
- Verb and Object Example: If you are looking for technical support with Pepperdine services, please submit a support request.
- Fix the impacted web links.
- Select Save to finish editing the item.
Adjacent or Split Links
Mistakes happen. Sometimes a web link may become "split" after an edit, or perhaps
you hyperlinked one word but meant to place it on two words, so you repeat the process
of adding the link on the second word. This creates two links going to the same place,
when only a single link is merited. We need to fix these redundant links.
Steps to Resolve
- Go to the page, activity, quiz, etc., and "Edit" the item to open the rich content
editor.
- Select the "Accessibility Checker" icon near the bottom (the person in a circle icon).
- For the warning "Adjacent links with the same URL should be a single link," evaluate
the item. Select "Merge Links" to create one link instead of two or more of the same
link on nearby content.
- Select Apply in the checker window.
- Continue fixing issues and close the checker when done.
- Select Save to finish editing the item.
Learn more about Accessible Links.
Lists
Manual Lists
Lists help us process sequences or groups of items in a logical manner. When writing
lists, always use the formal list options in the rich content editor (e.g., Numbered
Lists or Bulleted Lists).
Steps to Resolve
- Go to the page and select "Edit" to open the rich content editor.
- Select the "Accessibility Checker" icon near the bottom (the person in a circle icon).
- For the warning "Lists should be formatted as lists," confirm that the content is
intended as a list. If so, select "Format as a list." It will automatically apply
either a numbered or bulleted list to the text.
- Select Apply in the checker window.
- Continue fixing issues and close the checker when done.
- Select Save to finish editing the item.
Note: The checker may flag some false positives, such as abbreviations (e.g., W. Wave).
Please evaluate and ignore those warnings as appropriate.
Learn more about Accessible Lists.
Tables
Tables Missing Headers, Header Scope, or Captions
All data tables need clear headers that explain the data or information expected within
each column, row, or both. This helps all learners since it eliminates a fundamental
assumption that the content and structure are "obvious." A "horizontal" header sets
the first row as the header row, which defines the content for each column. A "vertical"
header sets the headers in the first column that explains the contents for each row.
The choice of "both" allows you to define the first row (column headers) and first
column (row headers).
Steps to Resolve
- Go to the page and select "Edit" to open the rich content editor.
- Select the "Accessibility Checker" icon below the editor.
- For the warning "Tables should include at least one header," choose the desired header
position (e.g., Header Row, Header Column, Header Row and Column).
- Header Row (most common) will turn the first row into the column headers.
- Header Column will turn the first column into the row headers.
- Header Row and Column will make the first row and the first column headers.
- Select Apply when done.
- For the warning "Table headers should specify scope," choose the appropriate option:
- Row declares that the row headers (each cell in the first column of data) will represent
the category of information for the respective date in each row (data is organized
horizontally)
- Column (most common) declares that the column headers (each cell in the first row of data) will represent
the category of information for the respective data in each column (data is organized
vertically).
- Row Group declares that a merged cell in the first column represents multiple subcategories
of information in each row.
- Column Group declares that a merged cell in the first row represents multiple subcategories of
information in each column (e.g., the first row as a merged cell across 3 columns
for West Coast, and it has a group of subheaders for CA, OR, and WA below it that
define the data in the respective vertical columns).
- Select Apply when done.
- For the warning "Tables should include a caption describing the contents of the table,"
enter the appropriate caption title in the "Add a caption" box.
- Close the accessibility checker when done.
- Select Save to finish editing the item.
Note: You may also apply headers to your data table directly. Right-click the table
in the rich content editor. Select "Table Properties." From the "Headers" drop-down
menu, select "First Row," "First Column," or "Both", and then select "OK." We also
recommend entering a "Caption" in the Table Properties to act as a title for your
data table and provide the purpose of your table.
Learn more about Accessible Tables.
Other Accessibility Items to Check
While the accessibility checker is very helpful, it does not catch everything. As
instructors, we must follow best practices and check for common issues manually by
reviewing our own content.
| Item |
Short Description |
Long Description |
| Logical Reading Order |
Verify that headings are used and flow in a logical reading order that aligns with
the content. |
When we structure our content on web pages, we need to use heading styles (e.g., "Heading
2" (H2), "Heading 3" (H3), etc.). Headings must flow logically, and when moving downward,
we cannot skip heading levels; we cannot jump from Heading 2 to Heading 4, for example.
If we have multiple rich text objects on a page, we need to verify that the headings
flow logically. Headings also must stand apart, existing on their own line (not inline
with other text). Use the "Blocks" drop-down menu of the rich content editor to set
or change headings on text.
Learn more about accessible headings.
|
| Place Links on Descriptive Text |
Avoid placing links on generic text like "click here" or "website." Place links on
meaningful text that helps someone understand where the link will take them, the content
they should expect to reach, or the action they'll take at the destination via the
link. |
When you link to other websites or locations, never place the link on generic language
like "click here," "this website," or "learn more." Instead, place the web link on
descriptive text that explains the destination or action of the link. Consider rewriting
sentences so that the link is placed on the subject, direct object, or verb and object
of the sentence. Example: Learn how to add a teaching assistant to Pepperdine Canvas.
Learn more about accessible links.
|
| Use Formal Lists |
Use the numbered or bulleted list options in the rich content editor. |
Did you manually type in a list of items, such as 1), 2), 3); 1., 2., 3.; or *, *,
*? Instead of manual lists, be sure to use either the numbered or bulleted list options
in the rich content editor to help users of assistive technologies navigate and understand
the content more easily.
Learn more about accessible lists.
|
| Verify Color Contrast |
Avoid placing light text on a light background or dark text on a dark background. |
If we place light-colored text on a light background (or dark on dark), then some
of our learners may not be able to see the content or will have challenges reading
it. We must make sure that the colors have adequate contrast and meet minimum accessibility
standards.
Use a tool like WebAIM's Color Contrast Checkerand Link Color Contrast Checker. Modify any colors as needed.
Learn more about accessible colors.
|
| Color and Meaning |
Combine the color with a text label and/or icon to help all learners understand the
context or meaning of the formatting. |
We need to be mindful that many people perceive colors in different ways. Some community
members have color blindness which may impact their abilities to discern red, green,
or other color variations. If we are using color to express meaning (e.g. good/bad,
complete/incomplete), we need to include another element such as the verbose text
label (meets criteria/does not meet criteria) along with the color so that we reduce
the chance that someone without a visual color challenge can still benefit from the
context or meaning of the color.
Learn more about accessible colors.
|
| Video Captions/Transcripts |
Verify or provide captions and audio descriptions for all videos. |
When we embed or link to video content from our web pages, we need to be sure that
each video has at least accurate closed captions that convey the content of the video
(audio and video). The best practice is to verify that the videos have the following:
- Captions: Text descriptions or transcriptions of what each person says in a video. The captions
should identify each speaker and include appropriate punctuation and spelling. While
automated captions are very good, they often fail to pick up nuances or specialty
terms within academia. Review and edit the captions of your own videos for accuracy.
- Audio descriptions: Additional details about the video to explain visual and auditory items in addition
to the speech of individuals within the video. This can include descriptions of content
visually displayed on a presentation slide or actions taken by people in the video,
such as "Sally enters the room looking agitated." We must provide an equivalent experience
by providing information and context to someone that might not be able to see or hear
the video. Some platforms support both captions and audio descriptions as separate
features, such as Panopto. For platforms that only support captions, then enter the
appropriate audio description into the captions themselves or work with the source
of the video to augment the captions.
- Transcript: This is a document or other content that exists outside of the video itself, such
as a Word document or PDF. It would contain both the captions of all speakers and
the audio descriptions for visual and auditory content from the video.
- Link to External Source: If the embedded content is a video located externally, such as YouTube, Panopto,
or Vimeo, please provide a direct link to the video on the page. This can help anyone
that may be experiencing browser or other issues that may prevent an embedded video
from playing.
Learn more about accessible videos.
|
The above items are the most common issues to review, but this is not an exhaustive
list.
See Also
← Back to Pepperdine Canvas Faculty Guides
← Back to Pepperdine Canvas Home