HEAL Your Digital Content
Overview
Digital accessibility is a shared responsibility across the organization. It is not just about compliance. It is about creating digital experiences that are usable, inclusive, and welcoming for all members of our community.
We developed the HEAL framework to focus on four foundational accessibility practices that can make a meaningful difference in emails, LMS courses, websites, documents, presentations, and other digital materials. It is an introductory approach to evaluating content and forms basic skills every professor should know and use regularly.
Many of the items below only take a few moments to implement! If you take these items to heart, then building or selecting new materials will be a breeze!
The HEAL Framework
"H" for Headings
Organize content with formal, semantic headings.
Headings provide the structure or logical reading order for a document. Simply applying bold formatting or increasing the font size of text is not enough. We must use the formal or official heading styles. These headings are vital so that people using assistive technologies can understand and navigate the structure of a paper, web page, or application.
It is easy to apply formal headings in Microsoft Word, Google Docs, and Pepperdine Canvas using the ribbon, menu bar, or rich text editor.
Learn more about Headings.

"E" for Explanatory Links
Make hyperlinks descriptive and unique. Never place links on generic words or phrases like "click here" or "this website."
To aid users of assistive technologies, place hyperlinks to websites and resources on wording that clearly communicates where the link will go or what action will occur. At the same time, don't place links on full sentences or paragraphs; be clear and concise with your link terms. Links on the same page or in the same document should be unique. Avoid multiple "register here" or "learn more" links, for example.
Learn more about Meaningful Links.
"A" for Alternative Text
Describe all visual or non-textual content.
We need to help anyone who may need visual accommodations by providing text descriptions of elements such as images, charts, and graphs. If an image is purely decorative (and serves no other purpose than as a design element), be sure to mark it as decorative. When describing visuals, focus on the instructional purpose of the object.
About Image Alternative Descriptions or Alt Text
For all images, you must provide a concise description to help someone who may not be able to perceive it. Namely, what does the image depict, and what is its purpose? A description may vary based on the context within the learning materials.
| Example Image | Example Description |
|---|---|
 |
A view of the Phillips Theme Tower on Pepperdine University's Malibu campus with the Santa Monica Mountains in the background. |
How to Add Alternative Descriptions to an Image
- Pepperdine Canvas LMS: "How do I manage alt text and display options for images embedded in the Rich Content Editor?"
- Microsoft Office: "Add alternative text to a shape, picture, chart, SmartArt graphic, or other object"
- Adobe Acrobat: "How to Add Alt Text in Adobe Acrobat: A Step-by-Step Guide"
- Modern Campus CMS (formerly OmniUpage or OU): "Insert/Edit Image"
Refer to the help documentation of any other tool or service.
About Alternative Descriptions for Charts, Graphs, or Infographics
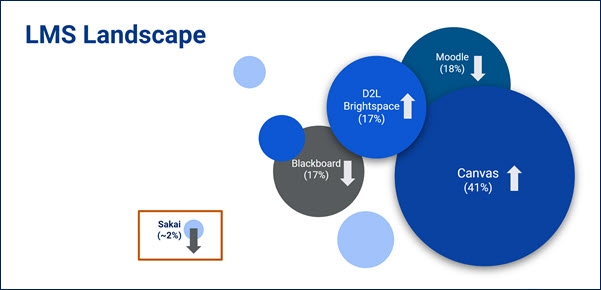
In addition to descriptions for photographs or illustrations, we need descriptions for other visual media, such as data charts, graphs, or infographics. These visualization graphics are often complex, so we may need to provide both an alternative (alt) description as well as a separate long description, data summary, or appendix to explain the graphic in detail. A long description may appear on the same page as the image or link to a separate page with the details.
| Example Image | Example Descriptions |
|---|---|
|
|
Image Alternative Description (Alt Text)A bubble chart of the LMS marketplace with Canvas as the major market leader and Sakai as a market laggard with limited adoption. Accompanying Long DescriptionThis bubble chart depicts the market share of common learning management systems (LMS) in the United States and Canada. The clear market leader is Canvas LMS with 41% market share and an upward arrow indicating increasing adoption. It is followed by Moodle LMS with 18% share, but decreasing adoption; Desire2Learn (D2L) Brightspace LMS with 17% share and increasing adoption; and Blackboard LMS with 17% share and decreasing adoption. An outlier on the chart is the Sakai LMS, highlighted in an orange box, with approximately 2% share and decreasing adoption. |
How to Add Alternative Descriptions for Charts, Graphs, and Infographics
- US Government Section 508: "Authoring Meaningful Alternative Text: Charts, Graphs, and Diagrams"
- Web Accessibility Initiative (WAI): "Complex Images"
- Harvard University: Data Visualizations, Charts, and Graphs
Learn more about ALT Text.

"L" for Lists
Use formal bulleted or numbered lists, not manual lists.
Structure your lists of information using formal bulleted or numbered lists. Do not bypass formal lists by manually entering numbers, hyphens, or indents to mimic lists. These manual edits do not communicate to people using assistive technology that there is a list, how many items are on the list, and which item they are currently accessing. For this and other reasons, we should use the formal list options in word processors and websites to create ordered (e.g., numbered) and unordered (e.g., bulleted) lists.
Learn more about Structuring Data (Lists and Tables).
Check Your Work! Use Accessibility Checkers.
Use the built-in tools within websites, word processors, and other software to verify that your content meets basic accessibility guidelines:
Try Grackle Docs Now
We created a small Google document with multiple accessibility errors. Engage in active learning with the button below:
Note: Requires a Pepperdine Google account. Refer to the Grackle Docs prerequisites.
Strategies for Success
- Building is Easier than Remediating. If you create content with accessibility in mind, you'll save time compared to fixing issues down the road.
- Start with Structure. Outline your document or web page with headings. Use keyboard shortcuts like Control-Alt-1 (Windows) or Command-Alt-1 (Mac) to quickly apply Heading 1. Change the numbers to 2 or 3 to apply Heading 2 or 3. If building an LMS page, remember that your first heading will be Heading 2, not Heading 1.
- Adopt Healthy Habits. Over the years, we tend to pick up a bad habit here and there. Switch bad linking
habits to healthy habits by placing web links on unique, descriptive words that guide
people appropriately. Other considerations:
- Limit the use of ALL CAPS to acronyms or use sparingly to draw attention.
- Reserve underlining for web links only. Use italics or bold for emphasis.
- Choose colors wisely. Ensure adequate color contrast and don't rely on color alone to convey meaning, like green for good.
- Convert any old, scanned documents to OCR, text-searchable, and tagged versions of the content.
- Move from Small to Large. Tackle the quick wins first, such as headings and lists. Then focus on explanatory links and alternative text. You may then want to expand to more advanced elements, such as data tables or captions. Refer to the full ACCESS Checklist for guidance.
- Enjoy the Added Benefits. Did you know that by using formal headings in Microsoft Word or a Google Doc, you
can easily build a Table of Contents? Also, by using formal headings, you can change
the format in one place and automatically apply it to all instances of the same heading
(a huge time saver!).
Remember, the HEAL Framework is the entry point for addressing common and easy digital accessibility issues. After mastering these items, graduate to the full ACCESS Checklist for a more comprehensive set of accessibility skills. Thank you for supporting all learners!
See Also
- Pepperdine Web Accessibility Policy
- Blog: The H.E.A.L. framework focuses on four simple accessibility practices
- Blog: Please Stop Saying "Click Here"
- Blog: Three Easy Ways to Improve Accessibility for Everyone
Jump Links
#h-headings, #e-links, #a-alt, #l-lists
← Back to Faculty Resources for Digital Accessibility