Faculty WaveNet Guide: Class Management
Overview
On this page, you will find guides on how to utilize class management services on the WaveNet system. Click the appropriate links below for step-by-step instructions on how to view class rosters, post grades, and complete other essential tasks.
Quick Links
- View Class Roster and Photo Roster
- Print Class Roster
- Download Class Roster to Excel
- Email Students in WaveNet
- Class Roster Audit
- Post Final Course Grades
- How to Access Grade Adjustment Form
- How to Submit Grade Adjustment Form
View Class Roster and Photo Roster
- In WaveNet, select the Faculty tab.
- Select the Faculty Center link under the "Faculty Services" section.
- Verify that the correct academic term is selected. If necessary, click "Change Term."
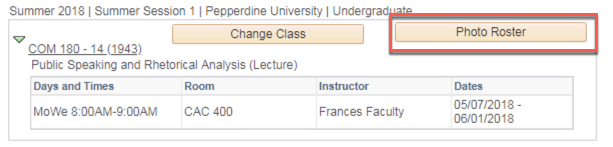
- On the Faculty Center tab, click the Class Roster icon to the left of the specific class you wish to view.

- You can view individual photos of the students enrolled in your class by clicking
the Person icon to the left of an individual student's ID in your class roster. Note: The individual photo page lists additional details for the student, including Emergency
Contact information.

- You can also view photos of all of your students by clicking on the Photo Roster button near the top of the page.
- Click the Return button to return to the main roster of the class.
- Select the Faculty Center tab near the top of the page to return to the list of all of your classes for the academic term.
- If you are done using WaveNet, select the Log Out link at the top right to end your session. Close your browser window.
Print Class Photo Roster
- In WaveNet, select the Faculty tab.
- Select the Faculty Center link under the "Faculty Services" section.
- Verify that the correct academic term is selected. If necessary, click "Change Term."
- To view your class roster, click the Class Roster icon to the left of the specific class you wish to view.

- Select the Photo Roster button near the top of the Faculty Center.
- Scroll to the bottom of the Photo Roster. Click in a white space and drag up to highlight the complete photo roster (including all names and photos).
- Do not skip this step! Highlighting the names and photos is critical to printing this information only.
- Refer to these steps to print your roster after you highlighted the roster:
- In Google Chrome, select the three-dots icon at the top right. Select Print. Verify that the correct printer has been selected. Review the preview of the content. If necessary, select More Options and adjust the checkboxes as needed (i.e. "Selection only"). Click Print.
- In Mozilla Firefox, select the three-lines icon at the top right. Select Print. Verify that the correct printer has been selected. Review the preview of the content. If necessary, select More Settings. Under the "Format" heading, choose Selection. Click Print.
- Click the Return button to return to the main roster of the class.
- Select the Faculty Center tab near the top of the page to return to the list of all of your classes for the academic term.
- If you are done using WaveNet, select the Log Out link at the top right to end your session. Close your browser window.
Download Class Roster to Excel
- In WaveNet, select the Faculty tab.
- Select the Faculty Center link under the "Faculty Services" section.
- Verify that the correct academic term is selected. If necessary, click "Change Term."
- To view your class roster, click the Class Roster icon to the left of the specific class you wish to view.
- When the selected roster pops up, click the download icon in the table heading. If your web browser's pop-up blocker is enabled, you may need
to press CTRL (Windows) or Command (Mac) while clicking the icon.

- Your browser's download process should start. Each browser will be different or act based on the download preferences you have set. If prompted to save the file, place it in an appropriate folder and provide a meaningful name so that you can find it later. If prompted to open the file, the file should open with Microsoft Excel.
- Select the Faculty Center tab near the top of the page to return to the list of all of your classes for the academic term.
- If you are done using WaveNet, select the Log Out link at the top right to end your session. Close your browser window.
Email Students in WaveNet
- In WaveNet, select the Faculty tab.
- Select the Faculty Center link under the "Faculty Services" section.
- Verify that the correct academic term is selected. If necessary, click "Change Term."
- To view your class roster, click the Class Roster icon to the left of the specific class you want to view.

- To email all students, scroll down to the bottom of the roster and select Notify All Students. Type your message into the subsequent email form and click Send Notification.
- To email specific students, click the checkbox next to the names of the students you wish to contact. Scroll down to the bottom of the roster and select Notify Selected Students. Type your message into the subsequent email form and click Send Notification.
- If necessary, close the "Send e-mail" window or click Return to Class Roster.
- Select the Faculty Center tab near the top of the page to return to the list of all of your classes for the academic term.
- If you are done using WaveNet, select the Log Out link at the top right to end your session. Close your browser window.
Submit Final Course Grades
Note: The presence of this feature will depend on the grading window set by each school. The Grade Roster icon will not appear if the grading period is not open. If you do not see the Grade Roster icon and you feel that the grading window is open, please contact your school program or division office for assistance.
- In WaveNet, select the Faculty tab.
- Select the Faculty Center link under the "Faculty Services" section.
- Verify that the correct academic term is selected. If necessary, click "Change Term."
- Click the Grade Roster icon to the left of the specific class for which you wish to submit final grades.

- For each student, select the appropriate grade from the Roster Grade drop-down menu to the right of their name. Use caution when
assigning grades. The grades are listed in alphabetical order, not in score order.
For example, the letter grade "B" appears before the "B+" in the list. Grades for
Incomplete ("I"), Withdraw-Pass ("WP"), and Withdraw-Fail ("WF") are special grades.
Consult with your program office or the Registrar's Office for more information.
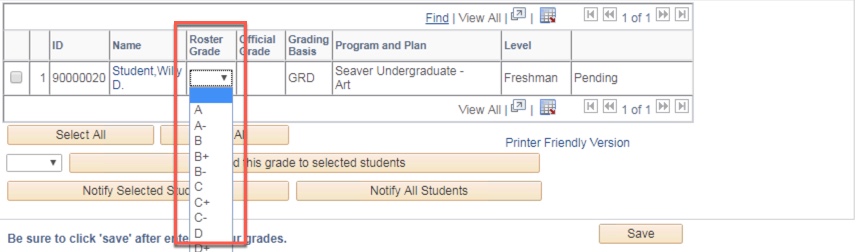
- After all the grades have been entered, click the Save button at the bottom of the roster. The status column will show a status of "Pending"
until the Registrar's Office has posted the grades. Verify that the grade(s) you assigned
are accurate. You may make changes on the grade roster until the grades have been
posted.

- Each night during the grading period, the system will automatically post all saved
grades. After your grades have been posted, your roster will state "Posted" in the
Status column. Once grades have been posted, you will be unable to make any changes
online; you must contact the Registrar's Office to submit a grade adjustment form.
If you accidentally assign an incorrect grade to a student, you must notify the Registrar's
Office immediately. Please contact Eva Reid, grade services supervisor, by email at
eva.reid@pepperdine.edu or by phone at 310.506.6151.

- Select Change Class or the Faculty Center tab near the top of the page to return to the list of all of your classes for the academic term.
- If you are done using WaveNet, select the Log Out link at the top right to end your session. Close your browser window.
Grade Correction
If an instructor has accidentally saved the wrong grade for a student in WaveNet and it has been posted via the overnight process, the instructor must contact the Office of the Registrar immediately:
- Eva Reid (eva.reid@pepperdine.edu), Grades Services Supervisor
- 310.506.6151
The Office of the Registrar can guide the instructor on the process of correcting a grade (during the open grading period) or when a formal Grade Adjustment Form is required.
Class Roster Audit
- In WaveNet, select the Faculty Tab. Under the "Faculty Services" section, select the "Faculty Center" link.
- Verify that the correct academic term is selected. If necessary, click "Change Term."
- Within the "My Schedule" tab, click the "Class Roster Audit" icon to the left of the
specific class you wish to review.

- Note: The Class Roster Audit icon will only be available during specified times set
by your respective school. The Class Roster Audit page displays real-time enrollment
information for your course.
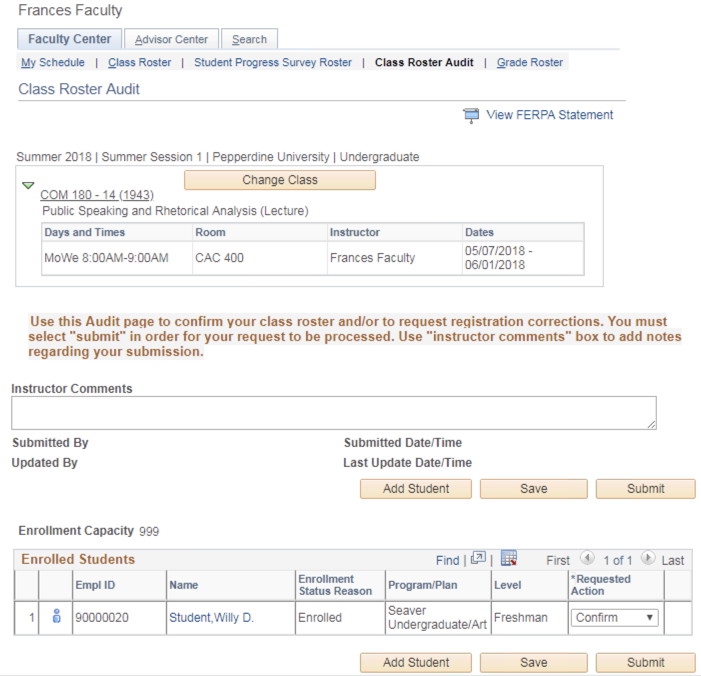
- Review the Class Roster Audit and confirm that it reflects your current course attendance
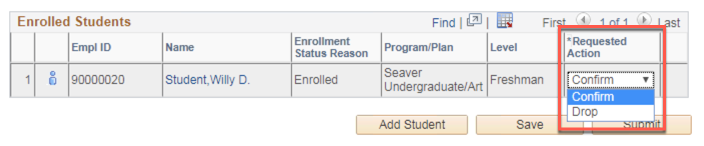
by selecting an appropriate action in the Requested Action column. If a student on
the roster is attending your course, you may leave the default "Confirm" action selected
(note that the roster defaults to a "Confirm" status for all students). If a student
on the roster has never attended your course, select a "Drop" action. If there are
no changes, click the "Submit" button (which will "Confirm" all listed students).
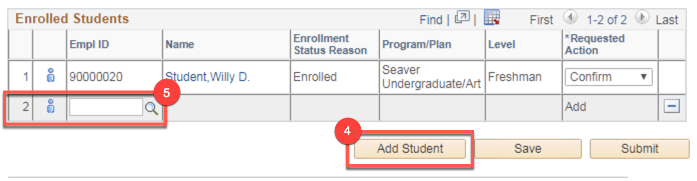
- If a student is attending your course but is not listed on the roster, click the "Add Student" button at the top or bottom of the roster.
- When clicking the "Add Student" button, a new row is added to the grid. Enter the
CWID/Empl ID of the student whom you wish to add to your course, or click the magnifying
glass icon in the Empl ID field to look up the student by name.
- Use the Instructor Comments box towards the top to add any notes regarding your submission.
Notes will be reviewed by the Registrar's Office.

- Once you have indicated a Requested Action for all students, click the "Submit" button
to submit your Class Roster Audit to the Registrar's Office for processing. Once submitted,
you will receive a confirmation message. Note that clicking the "Save" button will
only save changes to your Class Roster Audit. You must submit the Class Roster Audit in order for it to be received and processed by the
Registrar's Office.

- Once the Registrar's Office has processed any "Add" or "Drop" Requested Actions from
your Class Roster Audit, you will see updated enrollment statuses in the "Enrollment
Status Reasons" column.

- You may continue to submit any changes to your Class Roster Audit throughout the Class Roster Audit period. The last date to request changes is listed in the Confirmation of Submission message. If you have any questions about your Class Roster Audit, please contact Eva Reid, Grades Services Supervisor, at Eva.Reid@pepperdine.edu, or at 310.506.6151. Once the audit period has closed, a history of Class Roster Audit information will be available for review in your Faculty Center via the "Class Roster Audit" tab.
- To return to the Faculty Center, click the "Faculty Center" tab at the top of the page. Otherwise, to end your WaveNet session, click "Logout" in the upper right corner of the screen. Close your browser window.
How to Submit the Grade Adjustment Form
Complete the Form
- Visit the Grade Adjustment Form on Etrieve (Pepperdine login required).

- Fill out the form fields.
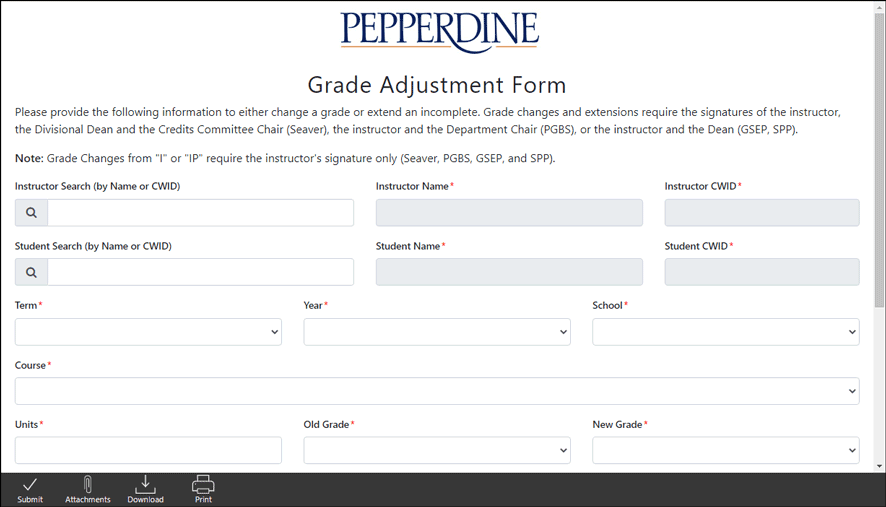
- Instructor Search: Type the Name or campus-wide ID number (CWID) of the instructor. To choose the name, select the matching name from the list and click Enter. Note: The Instructor Name and CWID will populate automatically when you click Enter.
- Student Search: Type the Name or CWID of the student. To choose the name, select the matching name from the list and click Enter. Note: The Student Name and CWID will populate automatically when you click Enter.
- Class and Grade Details: Enter the Term, Year, School, Course, Units, Old Grade, and New Grade information.
- Approver: Select the appropriate person for your school or class, such as the Divisional Dean (Seaver College), Department Chair (PGBS), Academic Division (GSEP), or Dean (SPP).
- Work Completed Date: For prior Incomplete grades, this is the date that the student completed the work. If not applicable, enter today's date.
- Reason for Grade Change/Extension: Provide the details needed for the approver and Registrar's Office.
- Select Submit at the bottom of the page to send the form for "Approval" by the other staff member(s)
in the workflow.

Next Steps
The Grade Adjustment form will be sent to each signer in the approval workflow. The individuals will receive an email notifying them that the form is ready for review. The workflow includes the following persons:
- Instructor
- Approvers (e.g., Seaver Divisional Dean, PGBS Academic Chair, GSEP Academic Chair, SPP Dean)
- Registrar's Office/Grade Services Supervisor
Each signer can access their Etrieve Inbox through this link: https://etcentral.pepperdine.edu/#/inbox .

How to Access the Grade Adjustment Form
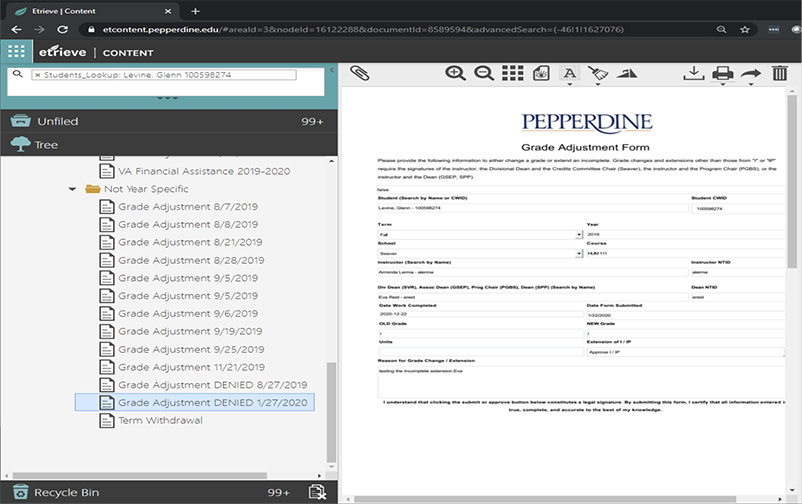
The completed form is filed in the Etrieve Content area under the Student's name. You can access Etrieve Content through this link: https://etcontent.pepperdine.edu/# .
- In the top-left Search bar, search for a student by name (i.e., "Lastname, Firstname").
- Select the student from the matching results. Click on any document to view it.
- You can also access the Etrieve Content and the Etrieve Central areas by clicking
on the "waffle" icon in the top left of the page and selecting "Content" or "Central."
These are direct links to each of these areas.

- If you would like to see the workflow "Package History" for your form, select it in
the "Activity" tab at https:// etcentral.pepperdine.edu/#/activity.

- Click on "History" at the bottom of the displayed form. This lists the actions made
by each "Approver" throughout the workflow.
- Another method to see the "Package History" for a completed form is to search for
the Student and click on the document in the "Student" area: https://etcontent.pepperdine.edu/#.

- Scroll to the bottom of the form to see its workflow "Package History."
