WaveNet for Students – Personal Information Guide
Overview
On this page, you will find guides on how to change personal information on the WaveNet system. Click the appropriate links below for step-by-step instructions on how to change both contact and emergency information.
Skip to Instructions on How to Change Your Personal Information:
Change address
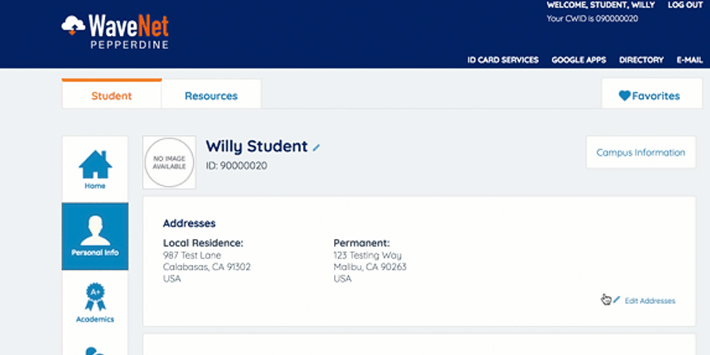
- Select the "Personal Info" icon. Your current addresses will be displayed in the Addresses section. To change an address, click the "Edit Addresses" link.
- In the pop-up window, click the "Edit" button in the row of the address you wish to change or click the "Add New Address" button on the bottom of the table to add a new address.
- Make your changes and click the "Ok" button. Then, verify all changes or change this
address' type. When you are done, select "Save". You will then be sent to a page
confirming the information is now saved. Select "Ok".
- To return to the Student Center, close the pop-up window. To end your session, click "Logout" in the upper right-hand corner of the screen to end your WaveNet session. Close your browser window.
Change phone number
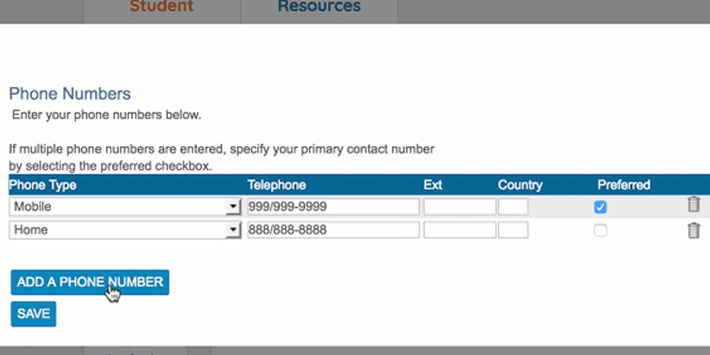
- Select the "Personal Info" icon. Your current phone numbers will be displayed in the "Phone Numbers" section. To change or add a phone number, click the "Edit Phone Numbers" link.
- In the pop-up window, edit the fields provided to change your existing contact phone
number or click the "Add New Phone Number" button to add additional phone numbers.
- After making your changes, click the "Save" button to save. A confirmation window will open. Select "Ok" and close the pop-up window to return to the Student Center. To end your session, click "Logout" in the upper right-hand corner of the screen to end your WaveNet session. Close your browser window.
Change contact email
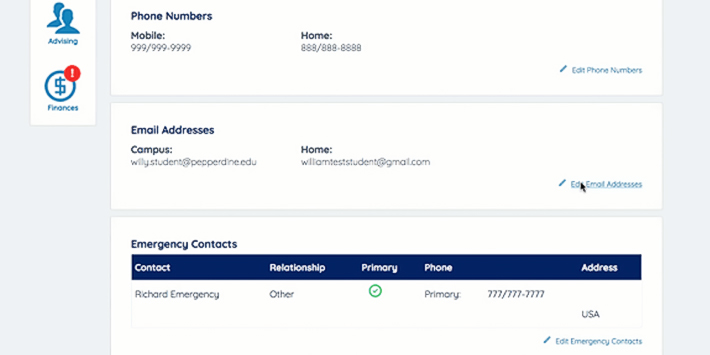
- Select the "Personal Info" icon. Scroll down to the "Email Addresses" section and click the "Edit Email Addresses" link.
- In the pop-up window, edit the fields provided to change your email address. You can
also click the "Add an Email Address" button to add additional email accounts.
- Make your changes, then click the "Save" button to save. A confirmation window will open. Select "Ok" and close the pop-up window to return to the Student Center. To end your session, click "Logout" in the upper right-hand corner of the screen to end your WaveNet session. Close your browser window.
Change emergency contact
- Select the "Personal Info" icon. Scroll down to the "Emergency Contacts" section and click the "Edit Emergency " link.
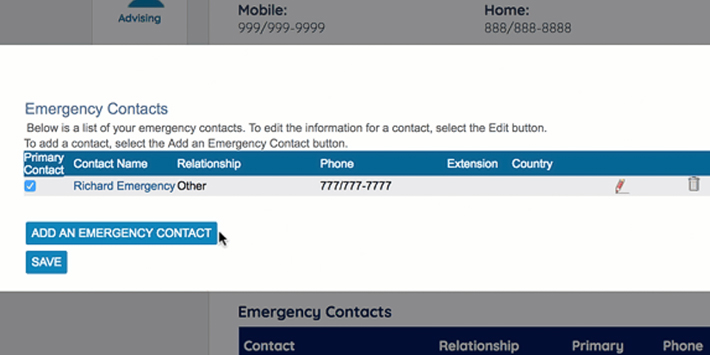
- In the pop-up window, you can edit or delete existing contacts by clicking the corresponding
links, and change your primary emergency contact by clicking the checkmark box in
the "Primary Contact" column. You can add emergency contacts by clicking the "Add
An Emergency Contact" button.
- Make your changes, then click the "Save" button to save. A confirmation window will open. Select "Ok" and close the pop-up window to return to the Student Center. To end your session, click "Logout" in the upper right-hand corner of the screen to end your WaveNet session. Close your browser window.
Change preferred name
You may set a preferred name in WaveNet. When you make this change, your name in WaveNet will appear as you have indicated. (A student's preferred name in WaveNet should also update Pepperdine Canvas after 1 business day.)
A WaveNet preferred name change is not a formal or official name change. To submit a formal name change, students should contact the Registrar's Office, and faculty or staff should contact Human Resources. The appropriate department (Registrar or HR) must complete the full PeopleSoft name change process in order for the change to affect other University-managed tools like Pepperdine Email. Formal name changes can take up to one business week (5 business days) for processing.
- Select the "Personal Info" icon. Select the pencil icon next to your name.
- On Mobile: Click "Names" under the Personal Information Section
- In the pop-up window, you can edit, delete, or add names by clicking the corresponding
"Edit" button.
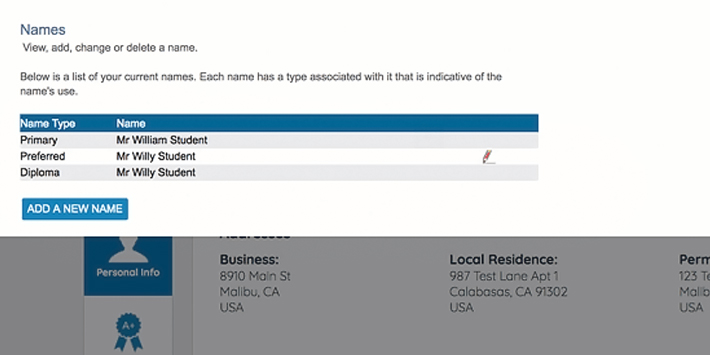
- On Mobile: You can not edit your primary name.
- Make your changes, then click the "Save" button to save. A confirmation window will open. Select "Ok" and close the pop-up window to return to the Student Center. To end your session, click "Logout" in the upper right-hand corner of the screen to end your WaveNet session. Close your browser window.