Standard Classroom AV Guide
Overview
Use the following step-by-step instructions to use a standard button controller to interact with classroom AV technology.
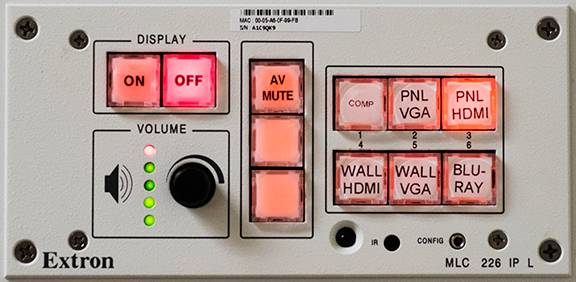
Example Wall Panel
Below, please review a photo of a standard room control panel with labeled buttons. The button labels may vary based on the specific classroom setup or equipment.
Basic Operations
- Press the ON button located at the upper left of the controller.
- Wait for the button to stop flashing as the system warms up.
- Control screen up and down movement (for electric screen only) using the SCREEN UP and SCREEN DOWN buttons located at the center of the controller.
- Select the appropriate input using the buttons located at the right of the controller.
Note: You will need a Pepperdine network account to log in to the classroom PC.
- Verify the PC and the monitor are turned on.
- Press Enter to bring up the Sign-In screen.
- Sign in using your Pepperdine credentials (note: students will need to use the student\ domain).
- Verify the PC input is selected on the controller.
Note: Not all academic groups allow students to log in to classroom computers. If
your student credentials do not work, you will need to bring a laptop.
- Verify the volume light levels move up and down as you turn the volume knob right and left, respectively.
- Adjust the volume knob to the desired level.
- To mute the sound, press the MUTE button located at the center of the controller.
- To unmute the sound, press the MUTE button again.
Connecting Your Own Device
Note: Most classrooms have multiple VGA and HDMI cables located at the podium, AV rack, and/or wall plate at the front of the room. Device outputs like USB-C will require an adapter.
- Plug the desired cable into your device.
- Verify the appropriate input is selected on the controller.
- Verify the media player is powered on.
- Press the eject button on the media player to open the tray.
- Load your disc onto the tray and press the eject button again to close the tray.
- Verify the Blu-ray input is selected on the controller.
- Use the media player controller or remote to navigate the disc's menus and control playback.
- Be sure to take your discs when you leave.
- Press the AV MUTE or PIC MUTE button located at the center of the controller to temporarily
block the video and/or audio signals from playing.
- The button will illuminate
- Press the AV MUTE or PIC MUTE button again to restore the video and audio signals.
- The button will not illuminate
Troubleshooting
- Verify all cables are firmly secured.
- Verify cables have no bent pins.
- Verify the projector is turned on.
- Verify cables and adapters are firmly secured.
- Verify the appropriate input is selected on the controller.
- Verify the device's display settings are appropriately configured.
Windows Instructions
- Right-click on an empty area of the desktop.
- Select Display Settings.
- Click on Detect Displays (or similar).
- Check the Multiple Monitors drop-down to make sure the signal is set to display on both the monitor and the projector screen.
Mac Instructions
- Open System Settings.
- Select Displays.
- Select the display to change.
- Select the drop down and choose the appropriate setting.
- Verify the PC's display settings using the "Windows+P" shortcut.
- Select whether the PC content should be mirrored or duplicated to the projector screen.
Classroom PC Is Locked/Another User Is Signed In
To sign another user out of the PC:
- Click the Windows () button.
- Select the username at the top of the start menu.
- Select Sign Out.
To leave the other user signed in and simultaneously sign in to your account:
- Click the Windows () button.
- Select the username at the top of the start menu.
- Select Switch account.
- Sign in using your credentials.
To sign in to a locked computer:
- Click "Other user" in the lower left of the Sign-in screen.
- Sign in using your credentials.
- Right-click on an empty area of the desktop.
- Select Display Settings.
- Select Advanced Display Settings.
- Adjust the Resolution as needed.
- Select Apply to verify the new resolution.
- Repeat as necessary.
- Verify all cables are firmly secured
- If using a VGA cable, verify the 3.5mm audio cable is connected to the computer's headphone output
- Verify the volume on the desired software is not muted and volume levels are sufficient.
- Verify the computer audio is not muted and the volume levels are sufficient.
- Verify the appropriate output device is selected on the computer.
- Verify the controller is not muted and the volume levels are sufficient.
Contact Us
AVT
Business Hours: 8 AM-5 PM, Monday-Friday
Thornton Administrative Center (TAC) 177
Tech Central
Phone: 310.506.4357 (HELP)
Hours: 24 hours a day, 7 days a week, 365 days a year
Have A Suggestion for IT?
Click to share your suggestion, anonymously if preferred, to improve Pepperdine IT.
