Host a Meeting
Overview
When hosting a meeting or class session in Zoom, you have many features and options to communicate, collaborate, and engage with attendees and students.
Important Reminder: Sign In with the Zoom App
If you have the Zoom app installed, open the app, select the "Sign in with SSO" button, and enter "Pepperdine" as the Company Domain. Click "Continue" and then enter your NetworkID and Password. This will open the Zoom app homepage and from here you can start a new meeting. If you do not have the Zoom App installed, learn more about installing and signing in to a Pepperdine Zoom account.

Quick Links

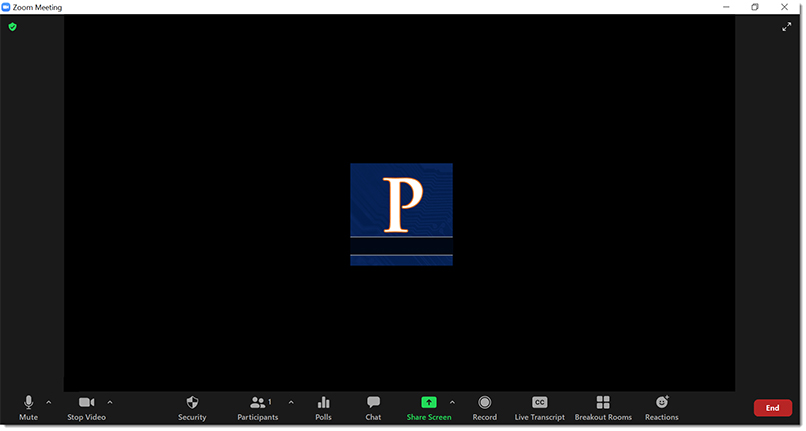
1. Mute/Unmute
Control audio output by clicking "Mute" to disable the audio or "Unmute" to enable your audio. Learn more about testing your audio for a Zoom meeting.
2. Start Video/Stop Video
Control video output by clicking "Start Video" to enable your webcam or "Stop Video" to disable your webcam. Learn more about testing your video for a Zoom meeting. Learn more about testing your video for a Zoom meeting.
3. Security

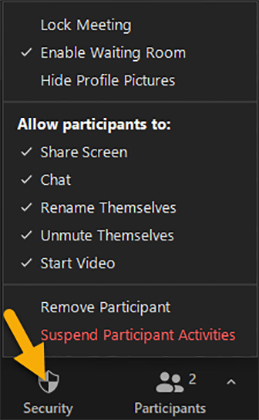
You can enable or disable various security features during a live meeting.
- Use the "Lock Meeting" option to block new meeting attendees from joining. Make sure the participants you expect are in the meeting before you lock it.
- The "Enable Waiting Room" feature requires the host to admit attendees to the live meeting. It is required that all meetings have a Passcode or a Waiting Room enabled. Zoom Waiting Rooms are an effective strategy to prevent uninvited guests from gaining entry into your Zoom meeting or classroom.
- Allow participants to "Share Screen", "Chat", or "Rename Themselves." The host has the ability to enable or disable these options for attendees.
For a full list of security setup and in-meeting options, please review the steps to Safeguard Your Online Classes and Meetings. You may also refer to Zoom's In-Meeting Security Options.
Note: You must have the desktop Zoom application version 4.6.10 or later. Please check for updates.
4. Participants

As the host of a meeting, you can manage the access and permissions of your participants.
- Confirm and then admit attendees by enabling the Waiting Room feature. To begin managing
the waiting room, click "Participants."
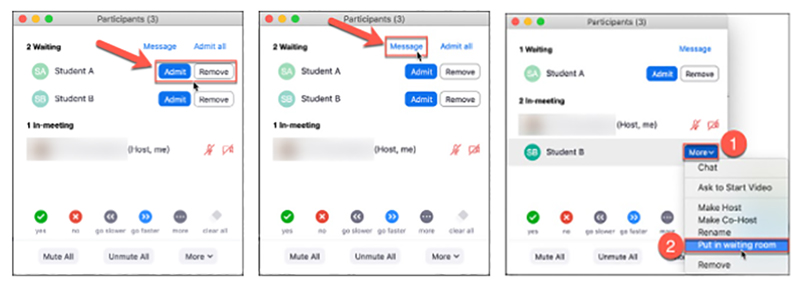
- In the "Participants" window you can either "Admit" or "Remove" participants on a single basis (image 1 above). Alternatively, to admit all participants currently in the waiting room, click "Admit all."
- You can also message all users who are currently in the waiting room. To do so, click "Message" (image 2 above).
- To send an admitted participant back into the waiting room: 1) click the "More" drop-down adjacent to the user, and then: 2) select "Put in waiting room" (image 3 above).
Learn more about the Waiting Room and Passcodes.
Other features you can manage as the host include:
- Mute participants by clicking "Mute all." To mute individuals, hover over a participant's name to reveal "Mute/Unmute." You can also "Mute All" and then "Unmute" specific people as needed.
- Disable video, hover over a participant's name and click the "More" option, select "Stop Video/Ask to Start Video."
- Prevent participants from sharing their screens.
- Lock the meeting so no new participants can enter.
- Invite users other than your current participants to participate in the meeting.
- Assign the role of host / co-host to a participant. Hover over a participant's name and click the "More" option. Select the desired option, i.e. "Make Host" or "Make Co-Host." There can only be one "host" at a time, but unlimited "co-hosts" can be assigned.
- Click "Participants" again to hide the sidebar or click the close "X" to close the pop-up window.
Learn more about managing participants and roles in a Zoom meeting.
5. Polls
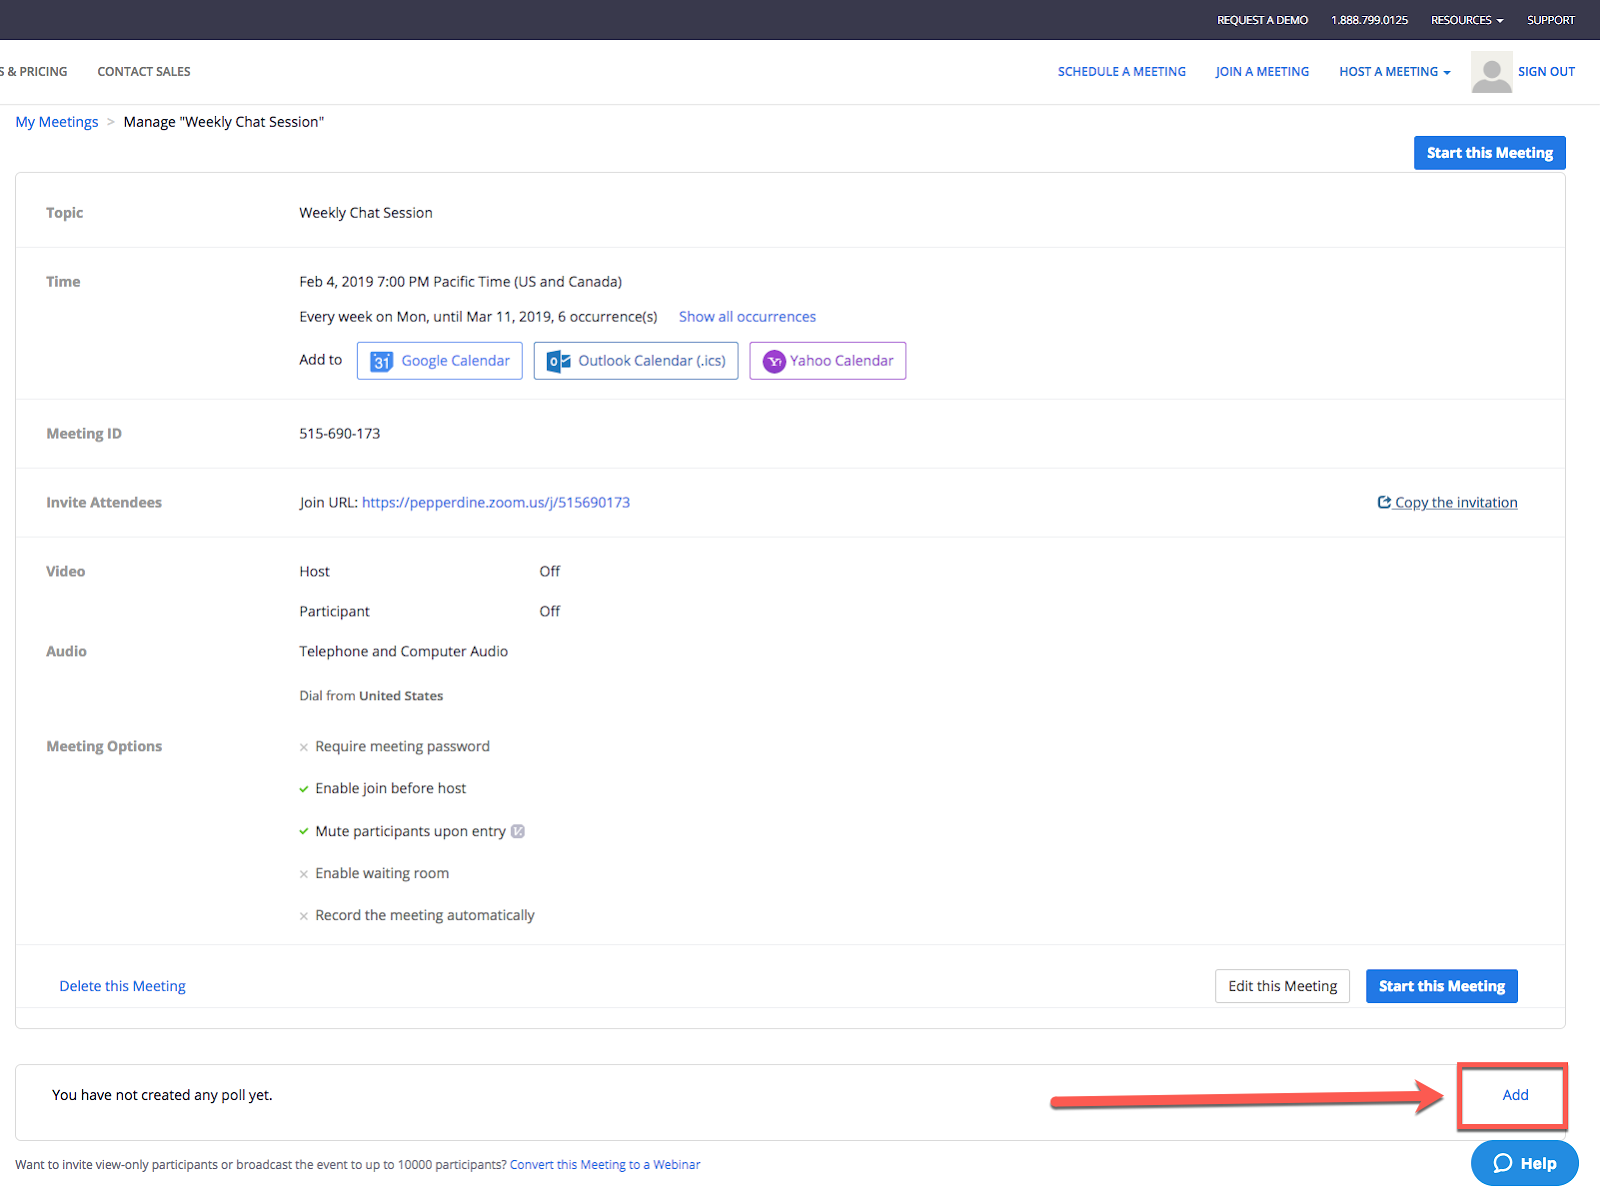
Meeting hosts can administer polls to engage participants. The meeting organizer must enable the "Polling" feature in their account settings. Only the original meeting host can edit or add polls during a meeting. Co-hosts can administer pre-existing polls associated with the meeting, however. Note: If you use the "New Meeting" button in the Zoom app, the Poll feature will not appear unless you use your personal meeting ID (PMI) and you pre-configured your personal room with at least one poll.

Learn more about Zoom polling for meetings.
6. Chat
Communicate with all participants or send messages to specific participants by clicking on their name in the participants list. From the meeting toolbar, click the "Chat" button and then select the recipient from the "To" menu.
As the host, you can enable file sharing in the main Zoom settings. From the Chat window, click "File" and then select the file you wish to share.
The host can also limit who participants can message (No One, Host Only, Everyone Publicly, etc.) by selecting the desired option from the "Chat" window. Open "Chat" and select "..." or "More" to control participant messaging.
Learn more about Zoom in-meeting chat.
7. Share screen
While in a meeting, you can share the following content:
- Entire desktop or phone screen
- One or more specific applications
- A portion of your screen
- Whiteboard
- A locally stored video
- Device audio
- Content from a second camera
- Click the green "Share" button in the middle of the Zoom toolbar.
- Select to mirror a desktop toolbar, whiteboard, or any other open application on your device that you would like to share.
- Click the "Share" button in the bottom right of the toolbar.
When you start sharing your screen, the meeting controls will move into a menu that you can drag around your screen. "Share Screen" minimizes the main meeting window and highlights the window you are sharing (if you're sharing a window and not the desktop). You can stop sharing at any time by clicking "Stop Share."
A host can share any sound played by their computer. Click "Share Screen" and check the "Share sound" checkbox. Select the down arrow just to the right of the "Share sound" option to switch between Mono and Stereo (high fidelity) audio options.
To change screens while sharing, select "New Share," you'll be prompted to select which screen you want to share again.
To pause while sharing your current shared screen, select "Pause Share." Use "Annotate" to display annotation tools for drawing, adding text, or highlighting fields.

Learn more about Zoom Share Screen
8. Record
Start recording locally or to the cloud by clicking "Record" for the session. Recordings are stored in Zoom Cloud Storage or locally on your computer in the folder set in Settings -> Recording. Participants will not be able to record sessions without the host's permission. If a participant does record the session, the recording will be stored locally on the participant's computer.
- Click "Record and when prompted, click "Record on this Computer" (if you are a student) or "Record to Cloud" (if you are an instructor or staff).
- Once you are ready to stop your recording, click the "Stop" button located on your meeting toolbar or the top left of your screen.
- Depending upon the recording strategy (Record to Computer vs. Record to Cloud):
- Record to Computer: The recording will automatically convert into an mp4 file when you leave or end the meeting (a file folder will pop up with the files). It will contain the video file and an audio file of the recorded meeting. You can now move that mp4 file to your Pepperdine Google drive account or choose to keep it on your local device.
- Record to Cloud: Once the video has been processed, the recording will be available for sharing via a link. The recording will also include transcription and closed-captioning. Before recording a meeting, be sure to notify all participants. For classes, professors at a minimum must place a statement in their class syllabus if any class sessions will be recorded (online, hybrid, or in-person).
Recording of class sessions is at the discretion of the instructor; please check with your professor or school about any class recording expectations, guidelines, or requirements.
Any community members that conduct healthcare-related business or meetings will be provisioned with a Zoom Healthcare account. Due to HIPAA regulations, cloud recording is not available with Zoom Healthcare.
Learn more about Zoom cloud recording or local recording
9. Live Transcript
As the host, you can enable closed captioning and live transcription for your account. If you are an instructor with a student who requires accommodations in the Zoom classroom, please reach out to the Pepperdine Office of Student Accessibility (OSA). OSA can outline the available options for your consideration.
To enable the automated Live Transcription service, first ensure the meeting organizer has enabled the feature in their account settings. Next, during a live meeting, the meeting host must enable closed captions and the live transcription option.
Enable Live Transcription in your Account
- With your computer's web browser, log in at pepperdine.zoom.us/signin and select "Settings."
- Scroll down to the "Closed captioning" option and click the button to enable the service (if it is not enabled).
- Once "Closed captioning" is on, new options will appear.
- Select the checkbox that says "Enable live transcription service to show transcript on the side panel in-meeting."
- Decide whether you wish to allow meeting participants to "Save Captions" (we generally recommend it).
Enable Live Transcription in your Meeting
- In the next meeting that you host, a new button will appear titled "CC Live Transcript."
- Click "CC Live Transcript."
- Click the button "Enable Auto-Transcription."
- When you or others speak, automated transcriptions will begin at the bottom of the screen.
Learn more about Zoom Closed Captions and Live Transcription.
10. Breakout Rooms
Breakout rooms allow you to have separate meeting spaces within a single meeting in Zoom. The meeting host or co-host can choose to split the participants of the meeting into these separate sessions automatically or manually, or they can allow participants to select and enter breakout sessions as they please. The host or co-host can switch between rooms at any time.
As the host, you can also pre-assign participants to each room. Breakout rooms are ideal for hosts who conduct group work and want to have teams collaborate privately.
After creating the breakout rooms, you'll have several options for managing participants within the rooms. Once the breakout rooms have been started, the assigned participants will be asked to join the Breakout Session. The host, or co-host that launched the breakouts will stay in the main meeting until joining a session manually.
Note: A host must first enable the breakout rooms within their settings before creating a breakout room.
11. Reactions
If the meeting organizer enables the Non-verbal feedback and Meeting reactions features, meeting participants can place an icon in their video panel and beside their name in the participants panel to communicate with the host and other participants without disrupting the flow of the meeting.
Learn more about Enabling Nonverbal feedback and Meeting reactions.
By default, the meeting reactions have a yellow skin tone. On the Zoom desktop client for Windows and macOS, you can also set your skin tone. Emoji reactions will disappear after 5 seconds, while raise hand and non-verbal feedback, such as Yes, No, Slower, and Faster, will be persistent and must be manually removed by the participant or host.
12. End Meeting
Click "End Meeting" in the bottom, right corner and select either; "Leave Meeting" or "End Meeting for all."
- If "Leave Meeting" is selected, assign a new host to allow the remaining participants to stay in the virtual room.
- If "End Meeting for all" is selected, this will close the meeting for all participants.
Schedule on Behalf of
This is a helpful feature for anyone who schedules meetings on behalf of another individual.
- Sign in to your Zoom account.
- Go to "Settings" and scroll down to the "Other" section at the bottom of the page.
- Click the "+" icon next to "Assign scheduling privilege to" and input the Pepperdine email address of the scheduler. NOTE: The scheduler must have activated their Pepperdine Zoom account prior to this step.
- Click "Assign."
Under the "Advanced Options" section, the assignee will now be able to create meetings on behalf of another user by using the 'Schedule for' dropdown menu.
Learn more about Zoom's scheduling privilege.
Canvas Zoom Pro Tool
IMPORTANT: You must register for Pepperdine Zoom to use the "Zoom Pro" tool
Professors must first register for an official Pepperdine Zoom account at http://pepperdine.zoom.us. If you attempt to use the tool before you have registered, you will see a warning message, "Warning: The instructor's email (your email address) is invalid (2216). Error Code 2216." Simply register at http://pepperdine.zoom.us and then return to Canvas.
Starting your Zoom meeting in Canvas
- Log in to Canvas and navigate to your class site.
- Click the Zoom Pro tool.
- Find the desired meeting and click "Start" on the right-hand side to begin your session.
Managing recordings through the Zoom tool (INSTRUCTOR)
- Log in to Canvas and navigate to your class site.
- Click the Zoom Pro tool and select the 'Cloud Recordings' tab at the top.
- View recording by clicking the meeting title or attached files.
- To delete a specific recording, click 'Delete' on the right side of the meeting line item.