Courses LMS Tools

Overview
Select a tool or topic below to learn how to complete academic work or use our Courses LMS platform.
Tool Guides
In the Assignments tool, students can submit assignment deliverables. Refer to the instructions below for submitting coursework.
Assignment Tips
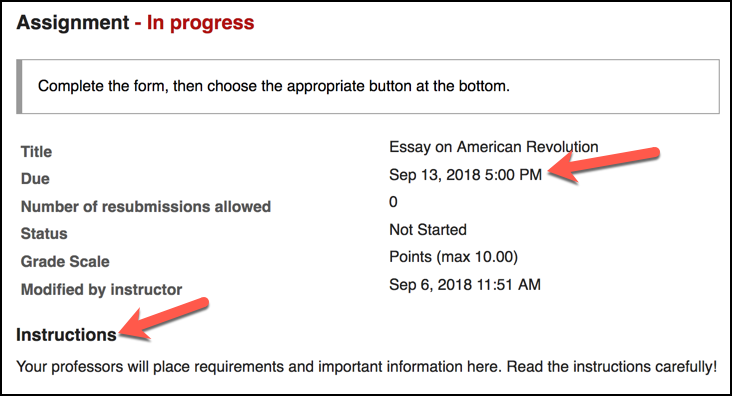
- Pay close attention to the instructions, due date, and the number of attempts allowed/remaining. For example, if an assignment doesn't allow resubmission ("Number of resubmissions allowed 0"), then you will only have one chance to submit your assignment. Read all details carefully, plan ahead accordingly, and double-check your work before submitting your final file(s) or content.
- For long responses, essays, or papers, draft your content in a word processor or Google Docs. You can then submit your final work to the assignment. Google Docs has the benefit of saving automatically and keeping a "Version History" that will be useful if you need to show your writing process.
- If you choose to write in Microsoft Word or the rich text editor in Courses, you should save frequently to reduce the chance of lost work. If using the text editor in Courses, select "Save Draft" every 5-10 minutes to save your progress. If you choose not to save often, then you take the risk of lost work due to a power outage, browser session timeout, accidentally clicking the browser "Back" button, accidentally closing the browser window, or similar situations. Be smart and save frequently.
- Only upload file types approved by your professor. Check the assignment instructions or syllabus to verify that you are attaching files in a format that your professor can open. For example, a professor with a Windows PC will not be able to open an Apple Pages (.pages) file.
- Upload the actual file, not a shortcut to the file. On some systems, you may see a shortcut link to recently opened files. Be sure to locate and choose the actual file, not the shortcut. If the file size is very small when you choose a file to attach (e.g. 1 K), be sure to check that you selected the correct file. If you created your content in Google Drive, you will need to download the file to your computer as a Microsoft Office file type or a PDF and upload that document.
- Avoid special characters in file names. As a general rule when submitting files to others or online tools, limit file names to letters, numbers, hyphens, and underscores. Avoid special characters like slashes, exclamation points, question marks, or other special characters. If Courses will allow the file name, your professor's computer may not. Keep file names simple and avoid special characters whenever possible.
- Avoid "double file names." If you have converted a Word doc to a PDF, make sure that only one file extension (".pdf" in this example) is in the file name. If you see multiple file extensions (e.g. "filename.docx.pdf"), remove the extraneous file extensions by editing the file name on your computer before uploading the document (e.g. "filename.pdf").
- Be sure to "Submit" your final work before the deadline! Saved drafts are not submissions. So that your instructor can review and grade your work, you must "Submit" your assignment.
Instructions
Submit Coursework to Assignments
- Select the Assignments tool in the left tool menu.

- Review the list of open assignments and select the specific Assignment Title you wish to access.

- Pay attention to several main areas:
- Assignment Details: Assignment name, due date, number of submissions allowed, and status (opened or closed)
of the assignment. Pay special attention to the due date and the instructions.
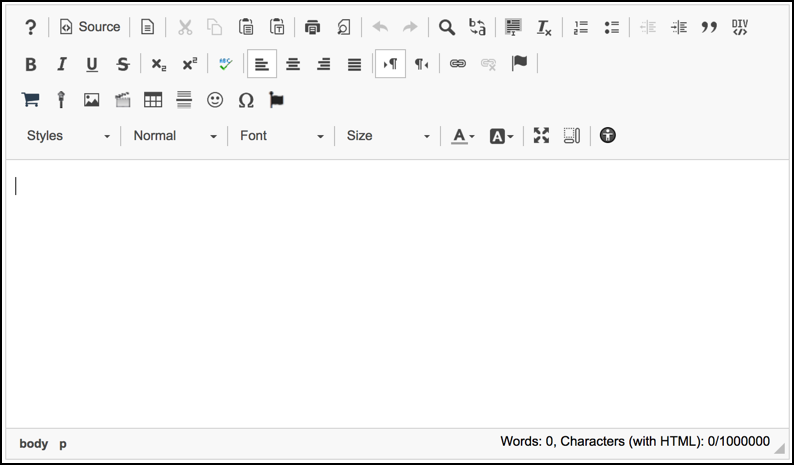
- Text Editor: If this feature is enabled, you can write or copy/paste information into the rich
text editor window.
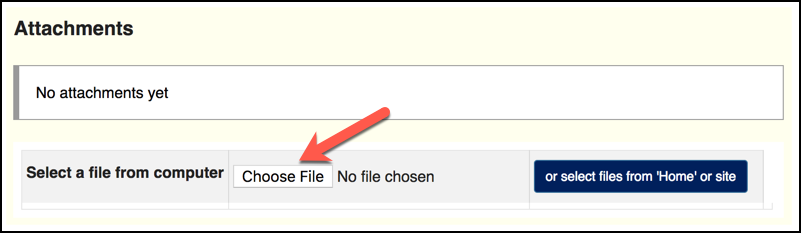
- File Attachments: If enabled, this is where you can upload file attachments. The button will either
say "Choose File" or "Browse," depending on your operating system or web browser.
- Honor Pledge: If enabled, read the pledge and mark your acceptance before submitting your final
work.

- Complete the assignment based on the instructions.
- Select Proceed when you are ready to submit. Alternatively, there are other options you can select as well if you are not yet ready to submit.
- Preview: This option will allow you to preview your work before submission.
- Save Draft: You can complete part of an assignment and save your progress. However, you must still ultimately "Submit" your work before the deadline to receive credit.
- Cancel: Click this option to return to the main Assignments list.
- After choosing "Proceed", you'll reach the last step, the "Submit this Assignment?" page. Choose Submit to finish your assignment and send your work to your instructor. You can click "Edit" if you wish to go back.
- After choosing the "Submit" button, you should receive an email confirmation that your assignment was submitted. Note: be sure to check your spam folder if you don't see it. If you still cannot find it, then you may not have submitted your assignment properly. Return to the assignment and verify that you have completely submitted the work.
Submitting a Turnitin Assignment
- View the full instructions on Submitting a Turnitin Assignment
Viewing a Turnitin Report
- View the full instructions on Viewing a Turnitin Report
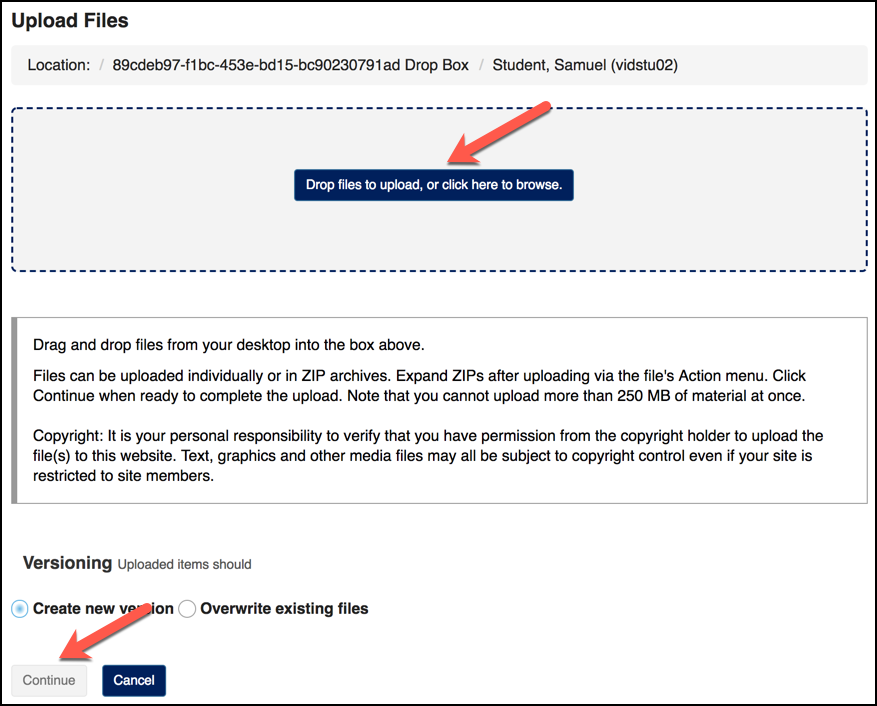
The Drop Box is a private file exchange between students and instructors. Instructors see all student drop boxes, but students only see their own. Use the Drop Box to share files with your professor.
Instructions
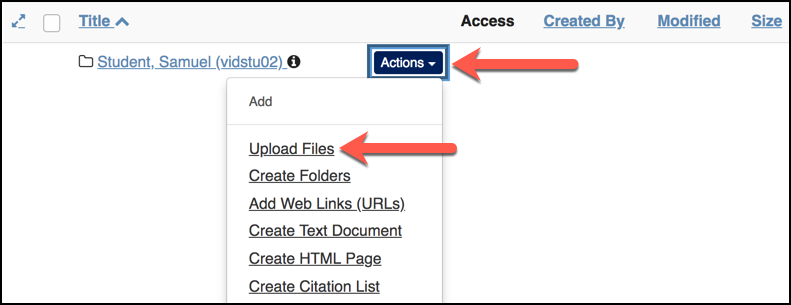
- Select the Drop Box tool in the left tool menu.

- Select Actions and then choose Upload Files.
- Drag and drop files from your computer onto the gray box or click the grey box to
choose a file from your computer.
- Note: The maximum upload size is 250MB. This can be a single 250MB file or several smaller
files that collectively cannot be over 250MB of total content.
- Note: The maximum upload size is 250MB. This can be a single 250MB file or several smaller
files that collectively cannot be over 250MB of total content.
- Select Continue when finished.
Through the Discussions tool, you can contribute to class discussions on certain topics related to the course.
Discussions Tips
- Avoid lost work! For long posts or replies, draft your content in a word processor or Google Docs, saving frequently. You can then paste your content into the text editor when you are ready to post.
- Be thoughtful and respectful in your posts. Read the prompt, question, or instruction carefully for understanding. Do all pre-work, such as reading the article, book, research, or other materials. Don't procrastinate; give yourself plenty of time to reflect before you post. Provide evidence or examples for any arguments or positions.
- Be thoughtful and respectful in your replies. Ask yourself, "How am I moving the conversation forward? How am I contributing to the thought process? Am I providing relevant, constructive feedback? Am I acknowledging the good work of others and offering additional support, resources, or areas of consideration to expand the topic or dive deeper? If I disagree with the author, have I asked the right follow-up questions to be sure I haven't misinterpreted the original intent or perspective? What evidence or support am I bringing to the table if I have a different opinion or counterpoint?"
- Can't edit or delete your own post? Contact your instructor and clarify your instructor's policy on editing or deleting your own post. Professors decide whether students can edit or delete their own posts in the forum and topic settings.
Instructions
- Select the Discussions tool in the left tool menu.
- Select the topic title.

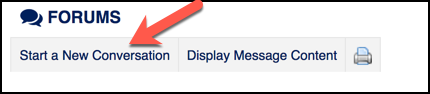
- To Start a New Conversation Thread in a Topic:
- Select Start a New Conversation.
- Enter the Title of the conversation or thread.
- Enter your post in the Message rich text editor.
- (Optional) Following the on-screen instructions, choose Add attachments to add one or more file attachments.
- Select Post when finished.
- Select Start a New Conversation.
- To Reply to Another Conversation Thread
- Select the conversation or thread title.

- Select Reply below the person's name.

- Re-read the original prompt, response, or thread for understanding. Don't forget to read the main Forum or Topic description(s) for context and any discussion requirements from your professor.
- Use the rich text editor to write and format your response. If you are planning a longer response, consider drafting your post in a word processor, like Microsoft Word, and returning to Courses when you are ready to post.
- (Optional) Following the on-screen instructions, choose Add Attachments to add one or more file attachments.
- Select the conversation or thread title.
- Select Post when finished.
The Gradebook is where instructors may post scores related to your coursework.
Instructions
1. Select the Gradebook tool in the left tool menu. Note: If you do not see the Gradebook, then reach out
to your professor.
2. There are six areas you should be aware of:
- (A) Course Grade - This is a "running total" of your grade. Some professors may wait until the end of the term to display this information, so you may see "Not yet available."
- (B) Gradebook Item - This is the activity name, such as an assignment, discussion, quiz, etc.
- (C) Grade - The score or percentage that you earned for the activity out of the total possible.
- (D) Weight - If your professor is using weighting, you will see how much items in this category count toward your overall course grade.
- (E) Due Date - The deadline for an activity, if entered by your professor. Always check your syllabus or contact your instructor if a deadline is unclear.
- (F) Comments - Notes or comments that your professor chose to enter about your performance on
an activity.

The Messages tool allows you to communicate with your instructors or fellow students in class sites.
Instructions
- Click the Messages tool in the left tool menu.
- Click Compose Message.
- Select your recipient(s) in the To drop-down menu. You may select individuals, roles, or groups.
- Verify that the Send cc checkbox is selected to also send the message via email.
- (Optional) Select a "Label" for the message: Normal, Low, or High.
- Enter the Subject for the message.
- Enter the Message in the rich text editor.
- (Optional) Use "Add Attachments" to include files with the message.
- Click Send to finish.
Your instructor may administer quizzes, surveys, or tests through the Tests & Quizzes tool.
Test-Taking Tips
Before you begin your assessment:
- Read all instructions and questions carefully. We cannot stress this step enough. The most common reason why students do not perform well on assessments is that they skip or rush through instructions or questions.
- Study and prepare before you begin. The same preparation you put into a classroom-based exam is required for online assessments. Be sure to study and be ready for your exam before you begin.
- Use a reliable internet connection and plug in your laptop. If possible, we recommend that you use a wired (ethernet) internet connection when taking an online assessment. If you only have access to Wifi, please refer to our internet performance tips. Also, if you are a laptop user, be sure to use your AC power adapter. You may lose work if you lose your network connection or power during a quiz or test.
- Use a supported web browser that is properly configured. Be sure to use a supported web browser. You must also allow cookies, JavaScript, and Java.
- Close all other browser windows and tabs. For the best experience, we strongly recommend that you use a single browser window to take your assessment. Close all other windows and tabs to avoid difficulties or interference from other websites. Finally, do not open the Courses site in multiple tabs or you may lose work.
- Disable third-party browser security add-ons or applications. To complete your online quiz or test, you need to submit the assessment online. Some browser toolbars, add-ons, or internet software may block pop-up messages or filter information you submit online. These tools could interfere with your assessment. We recommend that you temporarily disable any web filtering or pop-up blocking software while you take your quiz or test.
- Log directly into Courses (powered by Sakai). For the best experience, we strongly recommend logging into Courses directly at http://courses.pepperdine.edu and clicking "Pepperdine Login." If connecting through WaveNet, the portal will send pop-up warnings every 20 minutes to keep the WaveNet session alive. These pop-up messages may impact your test or interfere with your concentration.
During your test or quiz:
- Do not use your browser's back button. When navigating your online exam, only use the navigation buttons within the exam itself. Do not use the "back" button or other buttons in your web browser since you may lose your work.
- Wait for each page to load completely. Wait for each page of the exam to load completely. You may lose some of your work if you start writing or selecting answers before the page finishes loading.
- Do not open other browser windows or tabs. Do not open the Courses site or other websites in multiple tabs or windows, else you may receive a "data discrepancy" error and lose your work. One window/tab only is recommended.
- Be mindful of your time. During your online exam or quiz, you should pay attention to the assessment deadline,
any timer, and the main assessment timeout.
- Deadline: Some assessments are configured to allow submission after the deadline, others are not. If you start an assessment at 2:45 PM and the professor has set a hard deadline of 3:00 PM, then you only have 15 minutes to complete the assessment.
- Timer: On timed exams, the clock doesn't stop ticking. Once you start a timed assessment, you must finish within the time limit.
- Timeout: While the system timeout is two hours, an assessment timeout is one hour. To keep your login session active, you must click an exam button, such as "Save and Continue," "Table of Contents," or "Submit for Grading," to save your progress and keep your session alive.
- "Save" as you go. During the test, use the "Save" button at the bottom of the page to save your current progress. In the event that your internet connection is disrupted or you accidentally close your web browser, this will allow you to return to your last save point while the exam is still open.
- Write short answers or longer essays in a word processor (or text editor) and then paste them into Courses. As a best practice, we recommend composing and saving your written work frequently in a word processor. This way, you'll have a backup copy of any short answer or essay questions in case of a problem with your computer or your network connection.
- You must select "Submit for Grading" to receive credit for your test or quiz.
Instructions
- Select the Tests & Quizzes tool in the left tool menu.
- Below "Take an Assessment," select the title of the test or quiz you wish to take.
- Review the details carefully.
- Read any introduction your professor may have entered about the assessment.
- Pay attention to the due date and whether the quiz, test, or survey has a timer. If a timed assessment, you must submit your test within the time limit or else it will be automatically submitted when the test time expires.
- If your professor has enabled the "Honor Pledge," you must select the checkbox to accept that you will neither give nor receive any aid on the assessment.
- Select Begin Assessment to start your test or quiz.
- Answer each question, clicking Save or Next, to move through the assessment.
- If all questions appear on a single page, be sure to scroll down and click Save frequently to save your progress.
- If your professor has enabled the feature, you can use the "Mark for Review" checkbox for your personal reminder to review the question before submission.
- At the right, use the "Question Progress" sidebar to see the questions you've answered, not answered, or marked for review.
- Select Submit for Grading to finish.
- Read the "Assessment Submission Warning" and then select Submit for Grading again to confirm.
- Review or print the final submission details page.
- Choose Continue to return to the main "Tests & Quizzes" page.
The Zoom Pro tool allows you to access online class meetings scheduled by your professor.
Online Meeting Tips
- Be polite and respectful; show up prepared and on time for your online session.
- With your computer or mobile Zoom application, be sure to check for updates.
- Join a Zoom test meeting to verify your connection and audio.
- Use a headset or at least headphones/earbuds to reduce audio feedback.
- Reduce any other internet usage during your class or meeting; focus your bandwidth on your session.
- Close unnecessary browser tabs and applications.
- Mute your microphone if you are not speaking.
- Reduce background noise or disruption during your online session, if you will be speaking.
- If you will be presenting, practice sharing your screen ahead of time (before your session).
Instructions
- Log in to Courses and navigate to your class site.
- Select the Zoom Pro tool in the left tool menu.
- To Join a Meeting:
- From the "Upcoming Meetings" tab, locate the specific meeting and click the corresponding Join button.
- To Watch a Class Recording:
- From the "Cloud Recordings" tab, locate the specific meeting.
- Select the meeting title or files link for the meeting recording you wish to view.
- Select the desired recording, e.g. video recording or audio-only format (See example image below.)

Additional questions?
Please refer to the Zoom Training Guides.
Account Setup and Customization
In the Roster tool of a class site, there are two photo options: "Official" or "Profile" photos. The "Official" University photos are automatically applied to class rosters via WaveNet from the University Photo ID Card service. The display of official photos within a class site roster is controlled by the professor as an on/off permission selection for the entire class, not individual students.
To add your "Official" photo:
- Submit your ID card photo selfie online.
- Your photo must adhere to the ID photo guidelines.
- It can take 2-3 business days after you have submitted your ID card selfie before it will appear in Courses.
Regarding your Official University photo, this is considered public information concerning classroom usage (see the University's Information Classification and Protection Policy Schedules). The official photo cannot be removed from the system, but you can update the photo. To change an official photo, you must resubmit a photo for the University ID Card System that adheres to the University Photo ID guidelines (see previous links).
Please be aware that per the US Department of Education, "Under FERPA, a student may not use his or her right to opt out of directory information disclosures to prevent school officials from identifying the student by name or disclosing the student’s electronic identifier or institutional e-mail address in class." See "A student has opted out of directory information and wants to be anonymous in an online course. Are we required to allow the student to take the course anonymously?" to learn more.
In the Roster tool of a class site, there are two photo options: "Official" or "Profile" photos. A "Profile" photo is an optional, personal photo that you can upload to personalize your experience. Personal profile photos can also appear in tools like Discussions/Forums to create a greater sense of connection or community. Learn more about setting up your Courses Profile. Use good judgment when selecting photos; refer to Netiquette guidelines as well as your school's standards of conduct.
Instructions
- Log in to Courses LMS.
- Go to the Home site.
- Select the Profile tool.
- From the "My Profile" tab, hover your mouse over the profile photo and select the Change Picture button.
- Select the Choose file or Browse button (depending on your web browser) to select your photo from your computer.
- Your computer's file browser will open. Navigate to your desired profile photo, select it, and click Open.
- Click the Upload button.
When it comes to personal profile photos, you have several controls within your profile privacy permissions (e.g. share with "Everyone" or "Only my connections"). You may also delete or replace your personal profile photo at any time if you do not wish to share the photo with anyone.
In Courses, students and faculty may now upload an audio recording of their name pronunciation and input accompanying phonetic details. This data will be available for instructors in the Roster tool.
Note: To successfully make a vocal recording of your name pronunciation, you must have a functioning microphone on your computer. If necessary, be sure to enable or plug in your microphone and install the latest hardware drivers for your computer.
Instructions
- Log in to Courses LMS.
- Choose the Home site and select Profile in the tool menu.
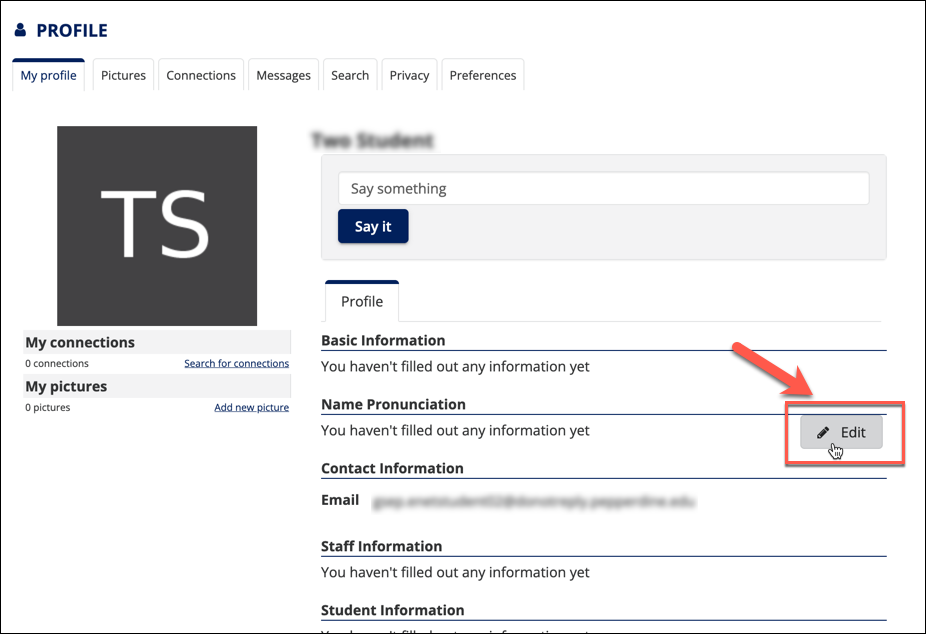
- On the My Profile tab, locate the Name Pronunciation and Pronouns section.
- Hover your mouse cursor over the area (or tap the heading on mobile or tab with the
keyboard) to reveal the "Edit" button, and then select Edit.
- In the Phonetic Pronunciation field, input a textual guide corresponding to the pronunciation
of your name. Examples include:
- kris-TEEN BEAR-it
- j-AHN BUCK-ing-ham
- j-ORE-dan lot
- For the Name Recording field, click the red Record button.
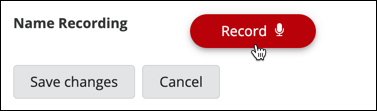
- Important: your web browser may prompt you to "Allow" courses.pepperdine.edu to use your microphone. Be sure to choose Allow.
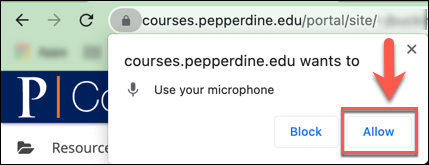
- Clearly speak your name into your microphone and click Stop when finished. Note: there is a maximum recording time of twenty (20) seconds.
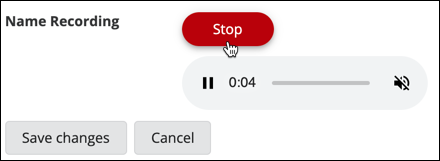
- Using the recorder, select the Play button to preview your recording.
- If you wish to re-record your name, follow steps 6–9 above.
- When finished, select Save Changes.
You may optionally add your personal pronouns to your Courses Profile.
Instructions
- Log in to Courses LMS.
- Choose the Home site and select Profile in the tool menu.
- On the My Profile tab, locate the Name Pronunciation and Pronouns section.
- Hover your mouse cursor over the area (or tap the heading on mobile) to reveal the "Edit" button, and then select Edit.
- Next to the label "Pronouns," select the drop-down menu.
- Choose the appropriate pronoun option.
- If none of the options meet your preference, use the adjacent text field to enter a manual pronoun.
- Select Save Changes to finish.
Pro Skills